Heartfelt Blossoms

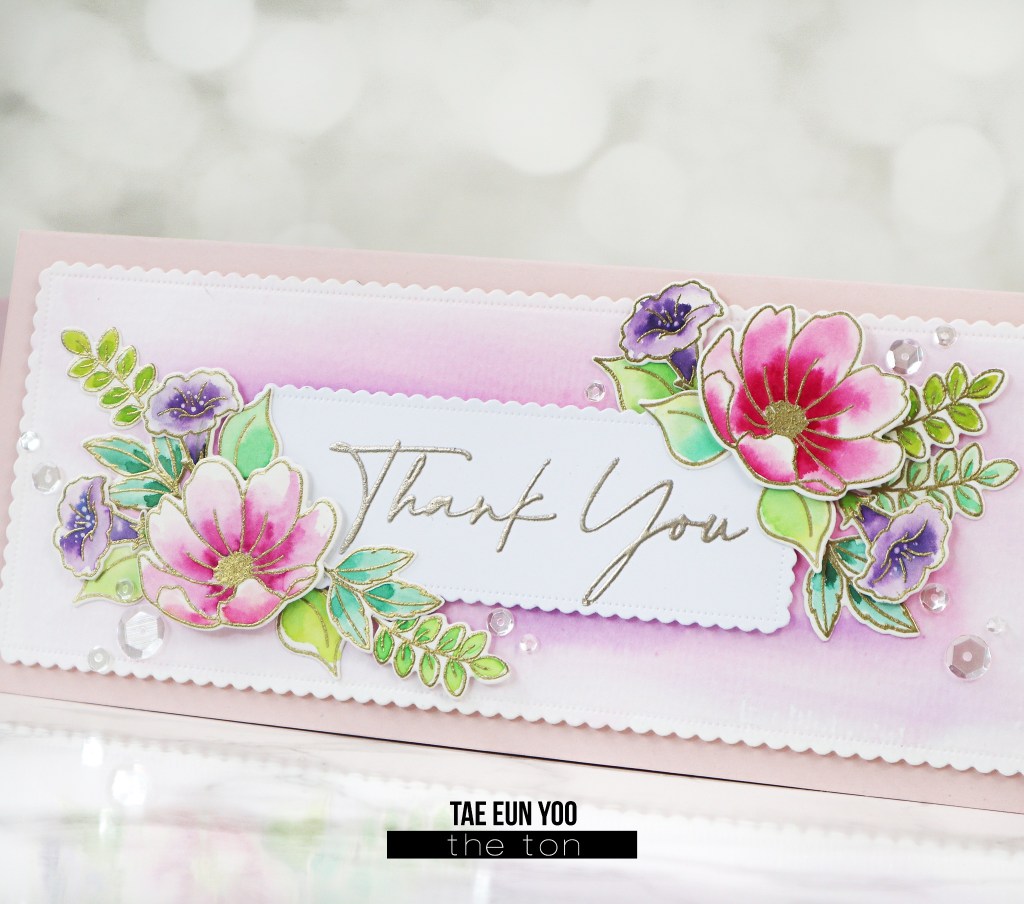
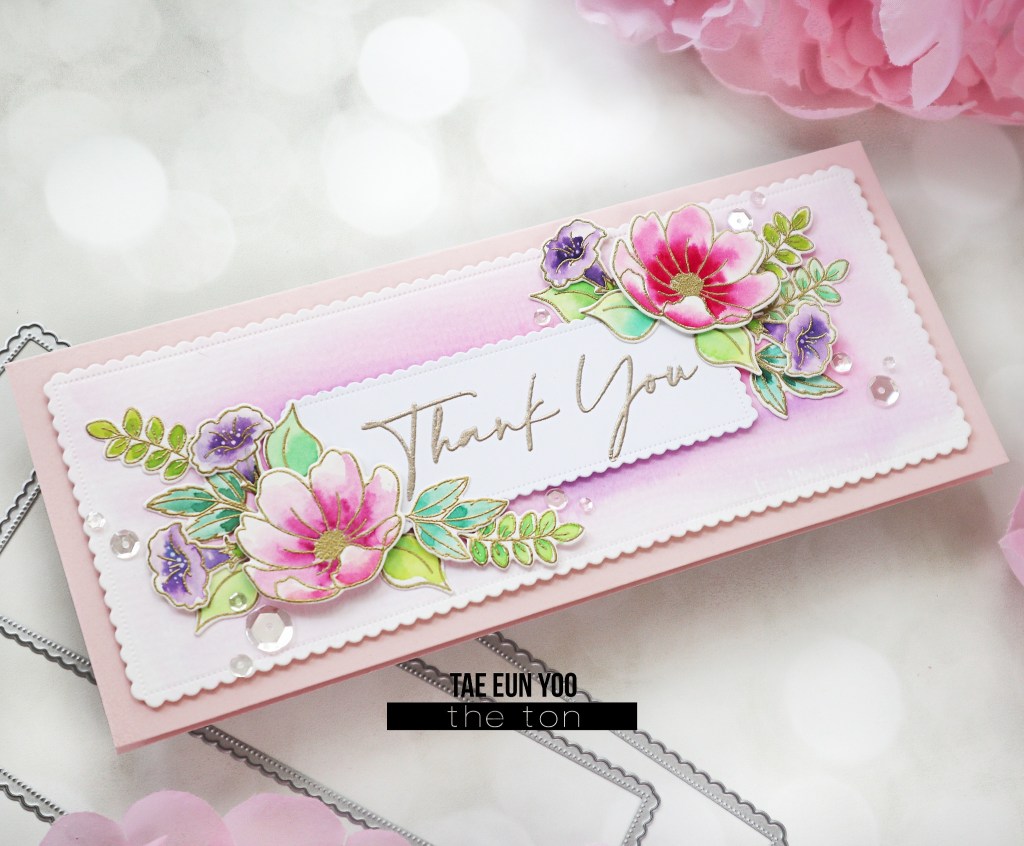
Hello friends. Vera here to start this week with inspiration on behalf of The Ton. I love that The Ton keeps coming out with matching stencils for previously released sets as seriously these stencils really help me in coloring the flowers beautifully in a jiffy. Way easier than using markers, even though I still enjoying coloring with markers. Today, I am highlighting Heartfelt Blossoms layering stencil set.

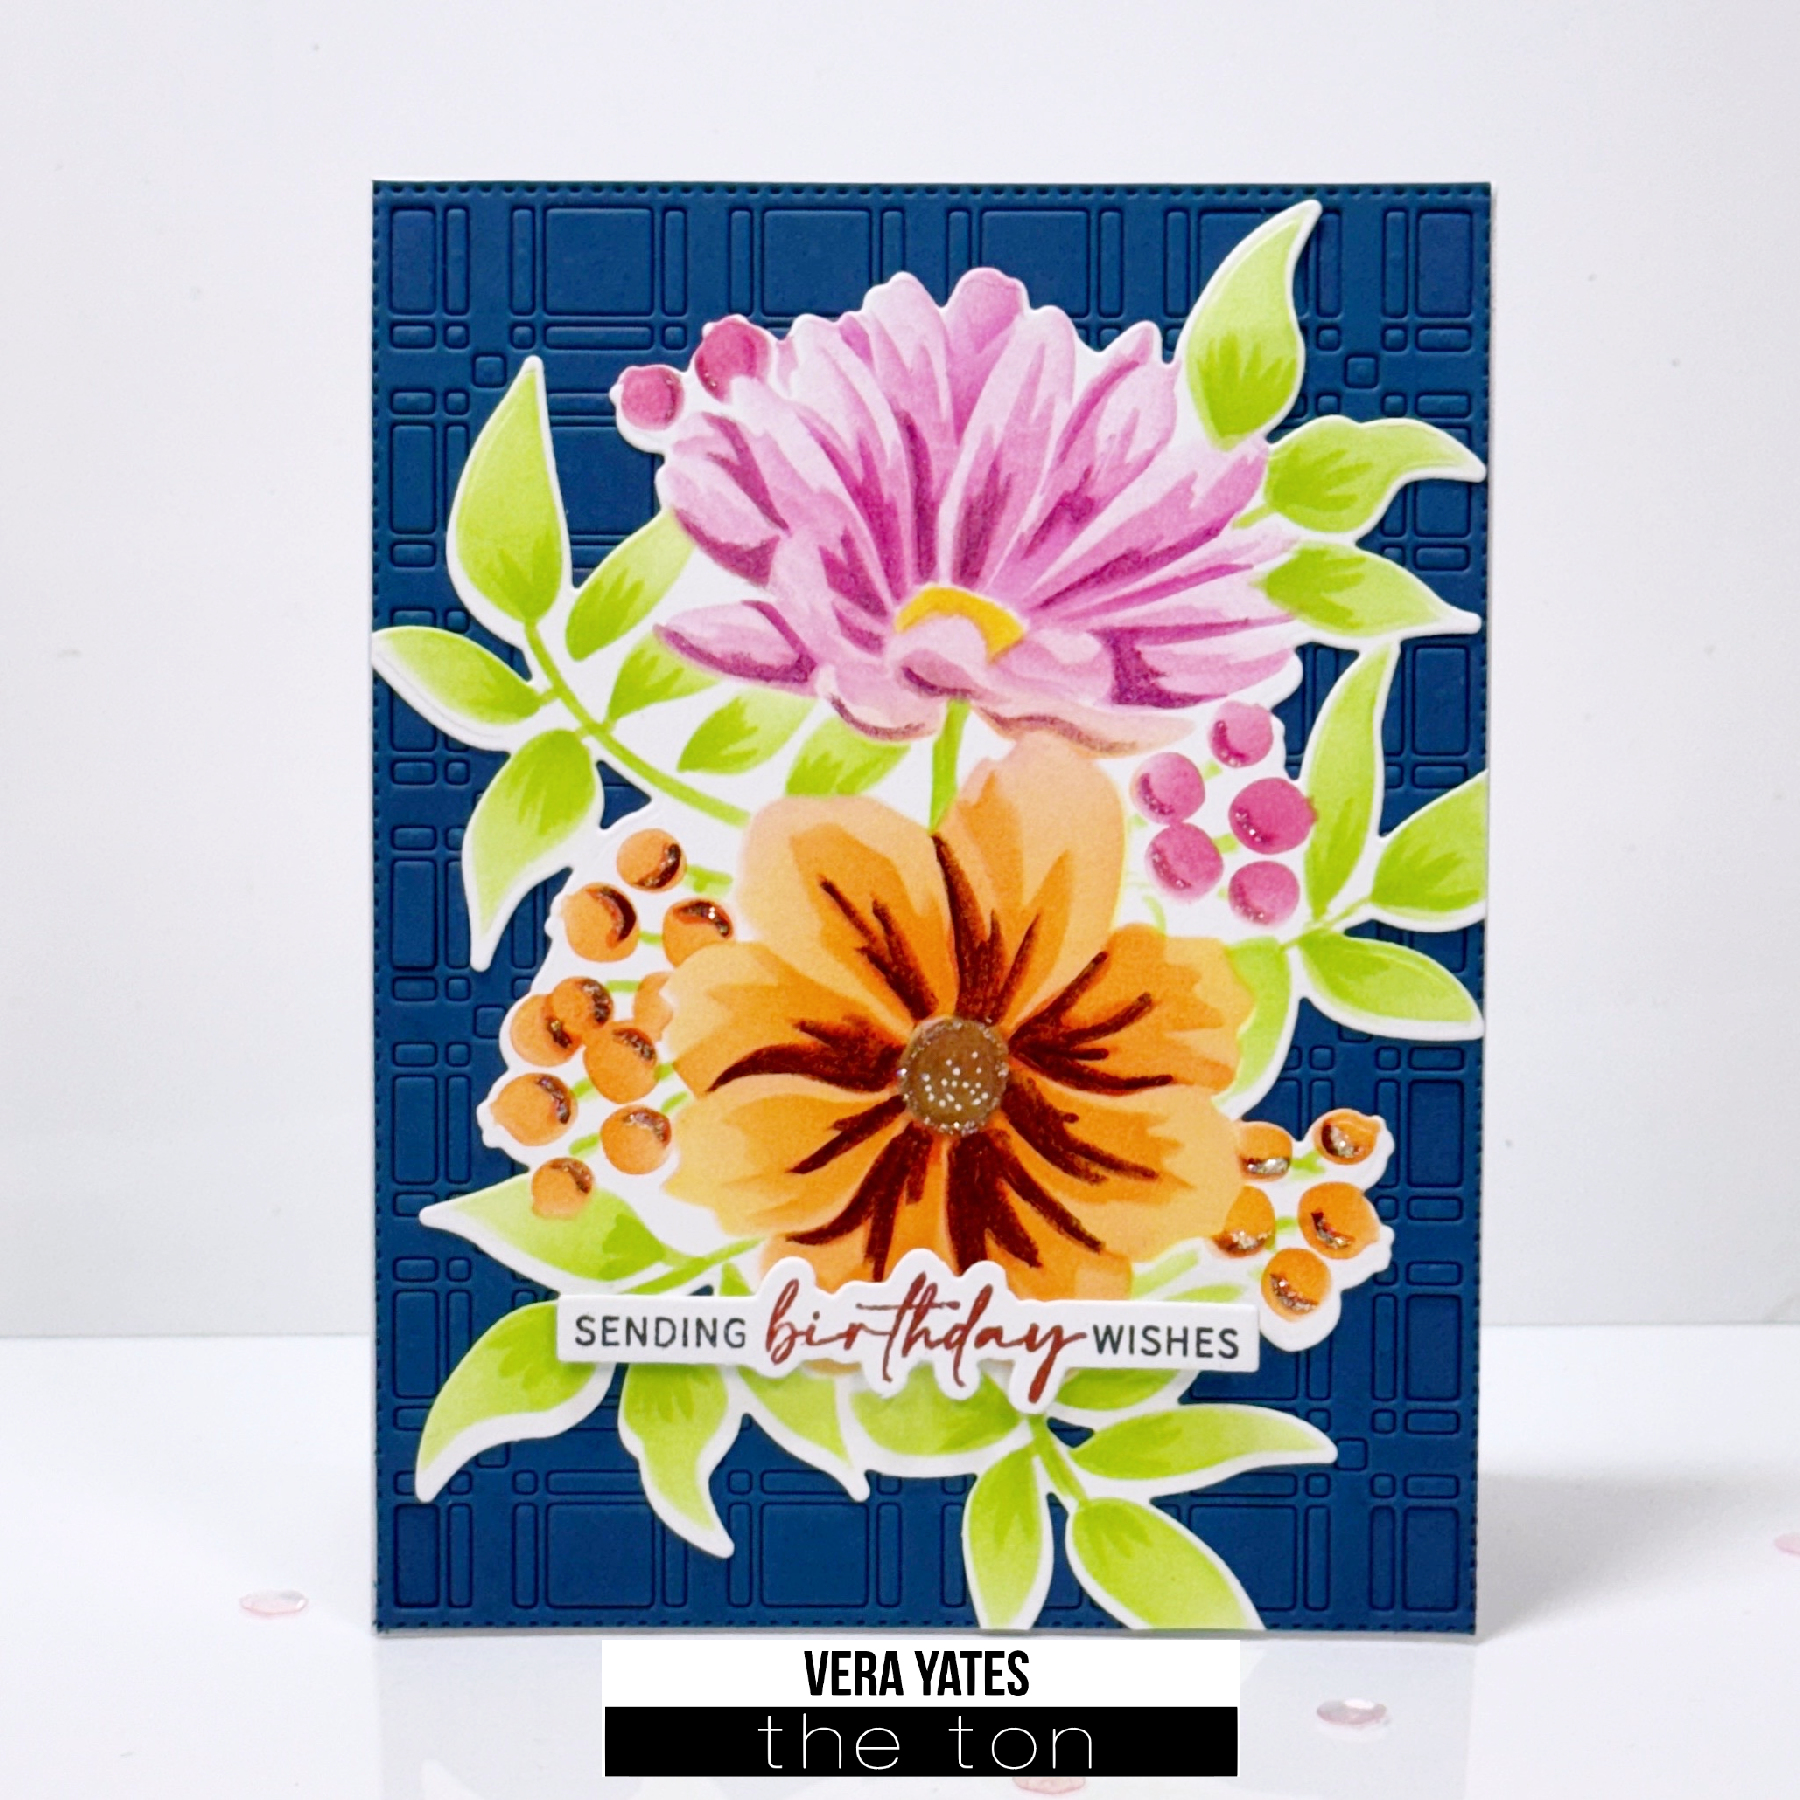
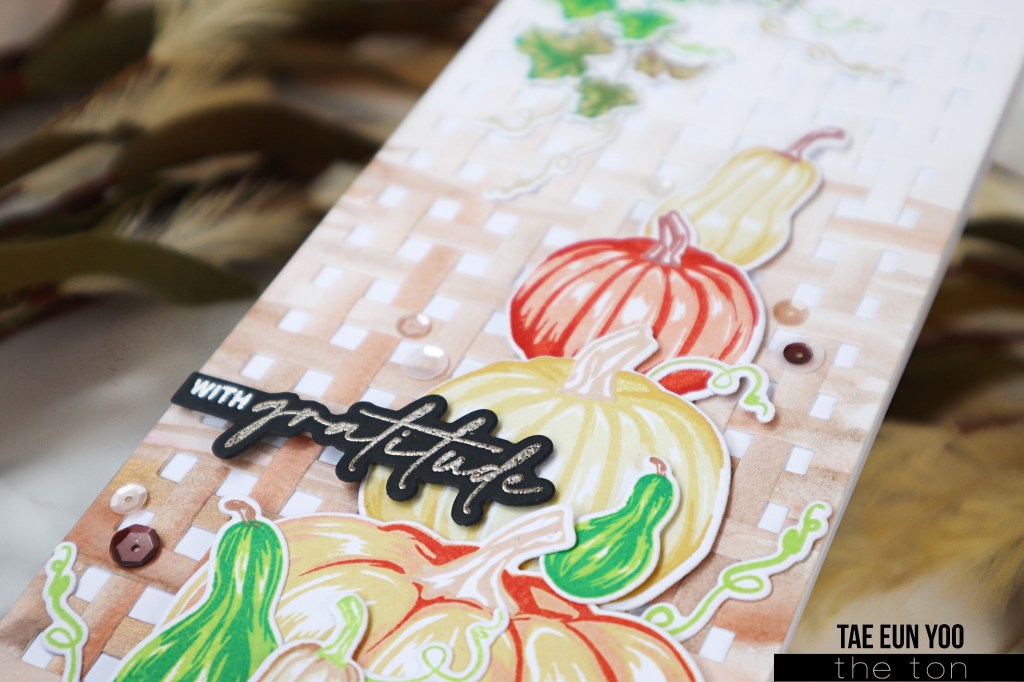
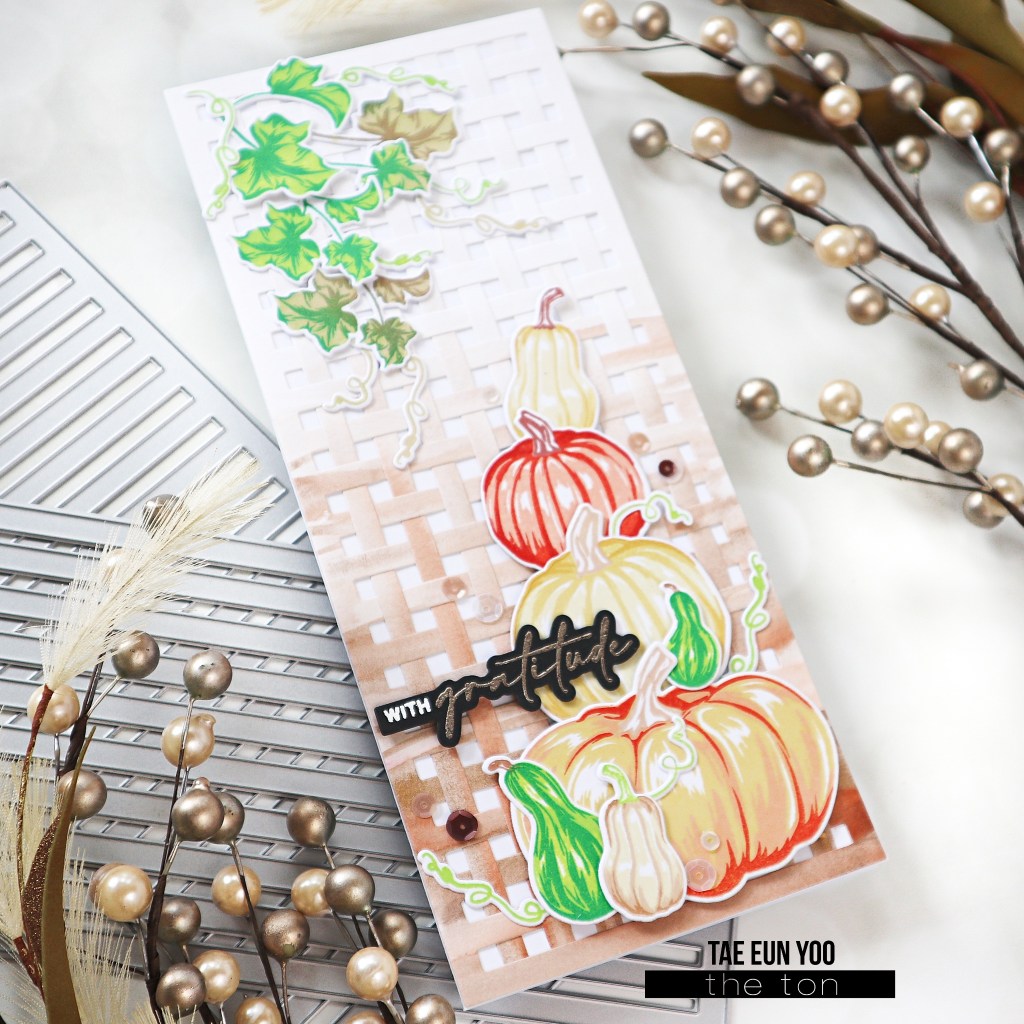
I love this flower set and I immediately play with this set as soon as I got it. I used Lemon Drop, Coralline, Coral Cavern, Dolled Up, Deep Peony, Aspen Cocoa, Soft Garden & Matcha ink.

As you can see above, I started with Lemon Drop ink on the first layer of the bottom flower, but when I almost done, the yellow just didn’t quite work out, so I blend the left over Coral Cavern on the brush on top of it to make the colors blend better. Once I am done with the stenciling, I die cut the piece with the Heartfelt Blossoms Coordinating die. Then I die cut the background using Single Plaid Coverplate die. And, honestly, by accident, I didn’t put the right layering when I run the die, so pretty much all the pieces still intact, and I actually like the way it look, so I keep all the pieces like that and use it for the background the way it is. Adhere the flower and finish with sentiment from Easy Expressions set.

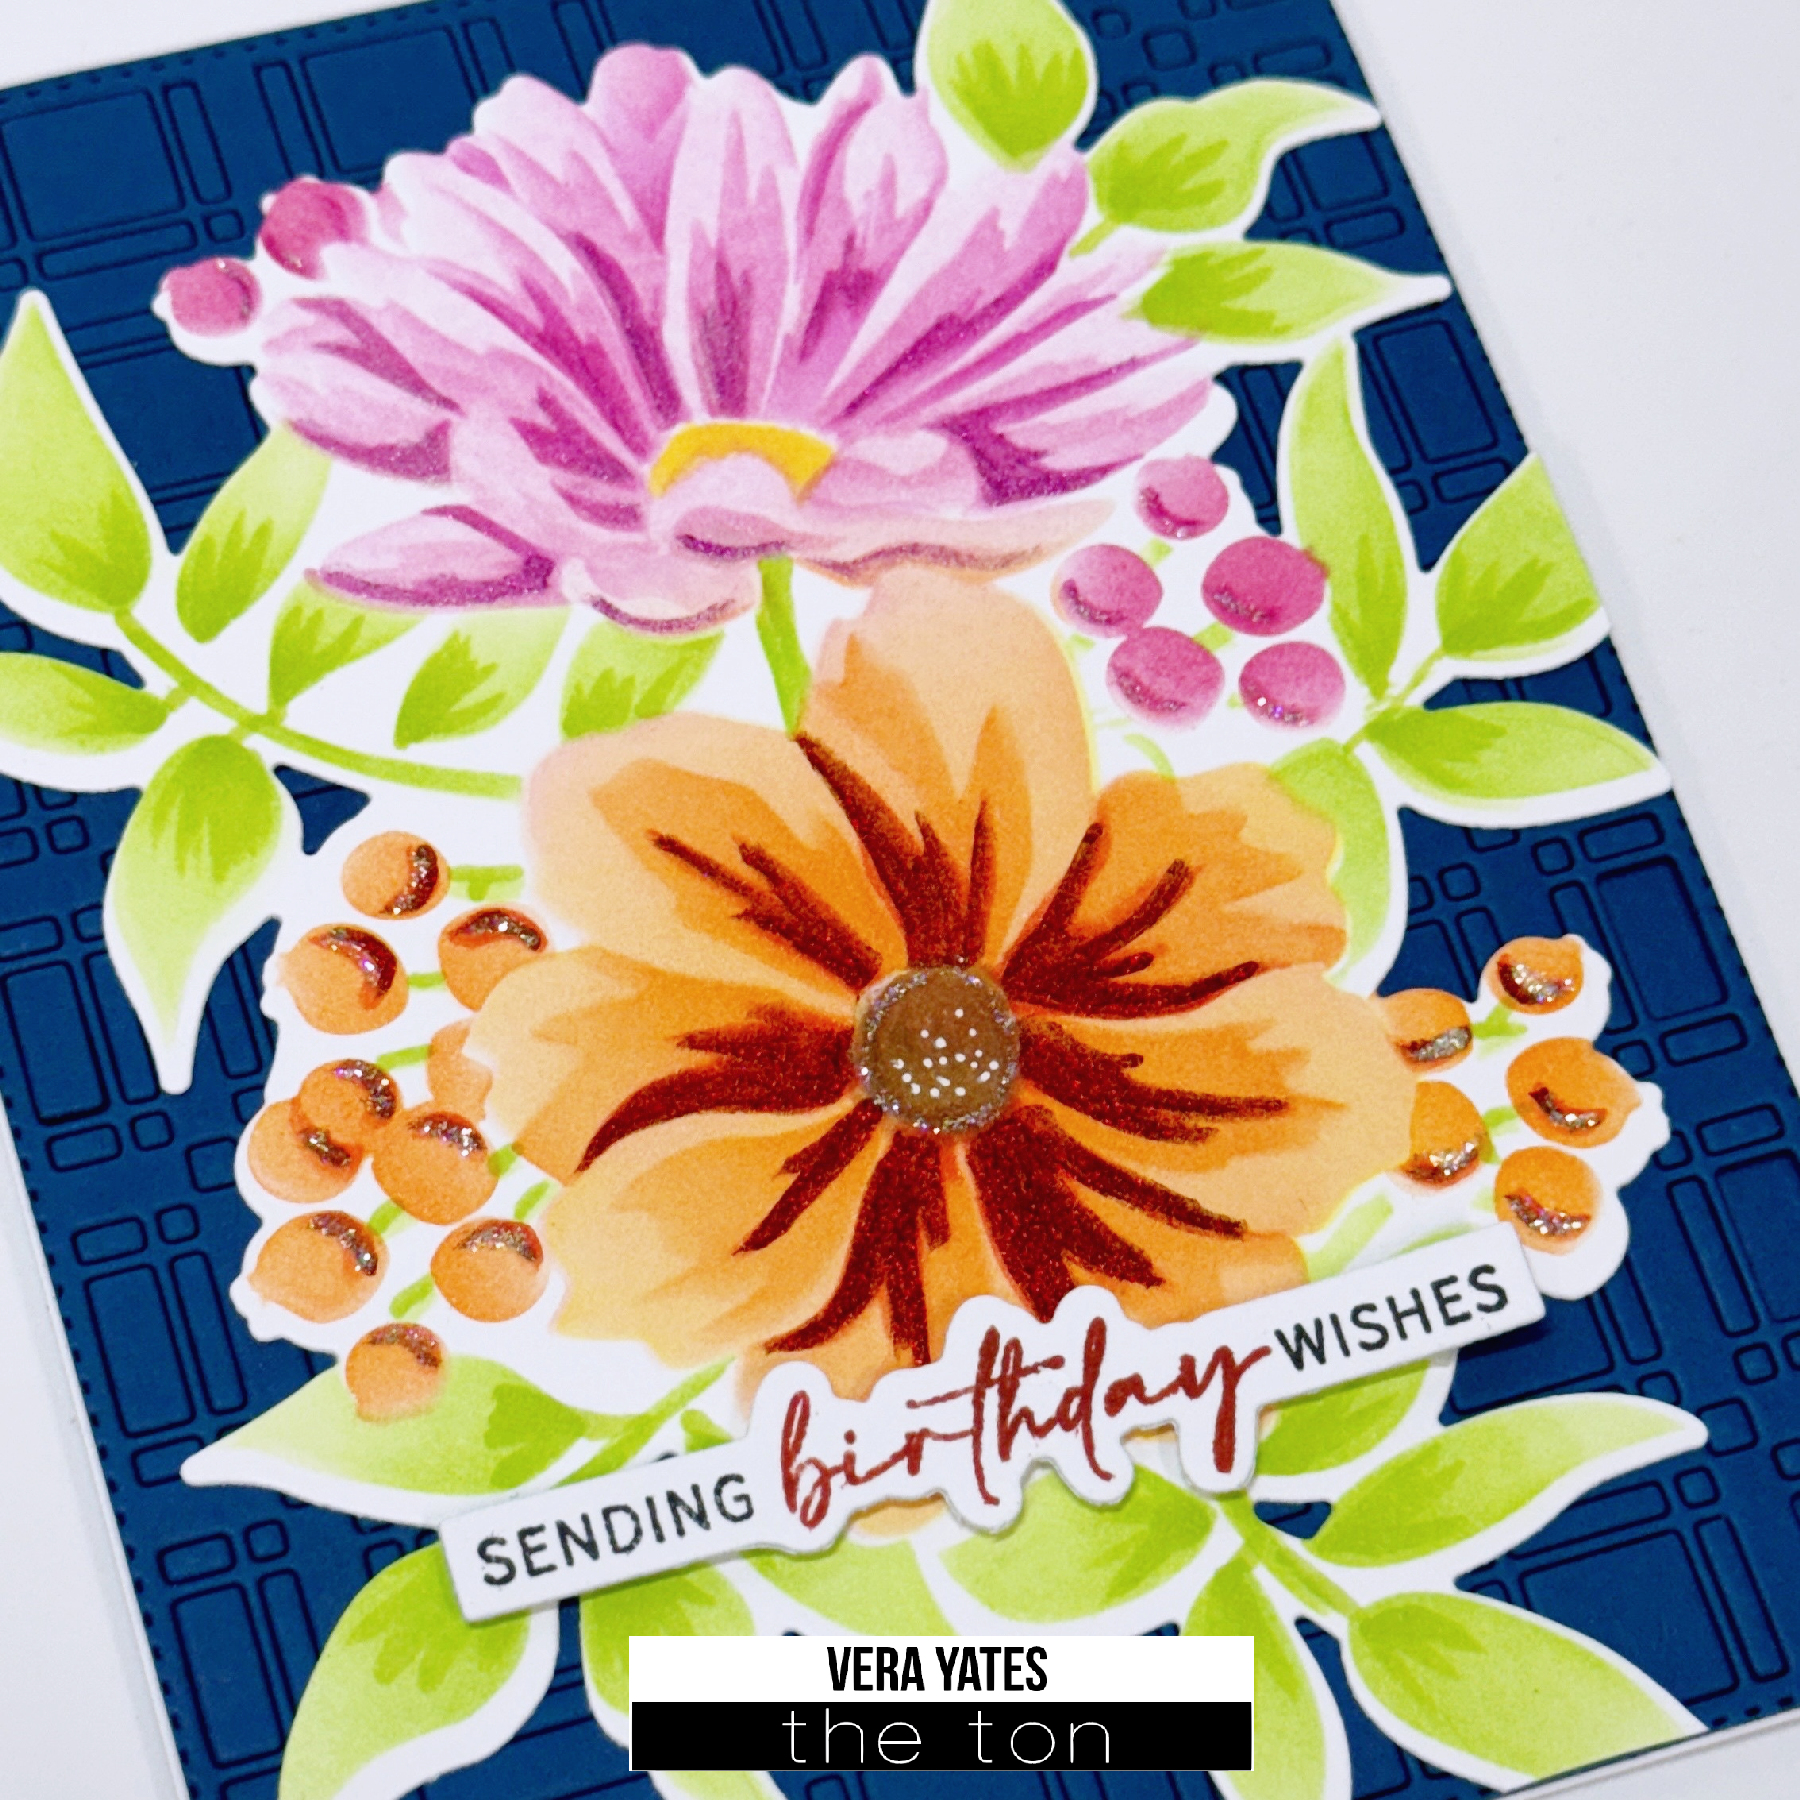
At last minutes, I decided to add some shimmer and glitters. I used metallic watercolor and Stickles. As always, I think a little glitter never hurt. Hah! BTW, I was going to use the card below for today post actually, but then I received the Heartfelt Blossoms set. So, here’s a bonus card I made using Poinsettia Wreath Layering Stencils for your enjoyment. 🙂

Well peeps, that’s all I have for today. Hope your holiday season be a good one. May the joy and peace of the season be yours and your family this holiday season. Cheers…

More Slimline Inspiration

Hello everyone! Hope you’re having a great week so far! It’s TaeEun here today sharing a couple of slimline Thanks cards featuring some of our new goodies 🙂 ! Have you enjoyed our Slimline Die Release last week?  14 diverse Slimline die designs were introduced. From basic shapes to unique  Coverplate there are a variety of die sets from which you can choose! 

Without further ado, let’s take a look at my cards!

The first one is featuring Slimline Long Stripes and Short Stripes coverplate dies along with our grouped layering pumpkin stamp sets. 

I stamped and cut all the pumpkins and mixed them up to make the stack of pumpkins. The stamp sets used are  Ella PumpkinsRound PumpkinsButternut Squash and Thankful Gourds.

The ink colors I used are listed below. 

Ella Pumpkins and Round Pumpkins:  Vanilla Frosted CupcakeBeach Blondie and Amber Citrine for the lightest pumpkins / Amber CitrinePeach Blossom and Coralline hybrid for the middle shaded pumpkins / Peach BlossomCoralline hybrid and Coral Cavern for the darkest pumpkins

Butternut SquashVanilla Frosted CupcakeWarm Hazelnut and Found Topaz

Thankful GourdsSoft GardenBright FernWarm Hazelnut and Found Topaz

I also arranged the leaves and tendrils from Thankful Gourds set. I secured the leafy arrangement and the stack of pumpkins using a piece of Press’n Seal wrap and set it  aside.

To create the woven background I watercolored two Canson Mixed Media paper panel in brown and gold in an ombre fashion. I then cut one of them using the Long Stripes slimline die and the other one using the Short Stripes Slimline die. I cut the bottom end of the long striped panel and started to weave the long stripes through the short striped panel. After that I mounted the woven panel flat on a white cardbase. 

The stack of the pumpkins were added to the card using some foam tape and the leafy arrangement using liquid glue to the upper left corner of the card. The sentiment is from Easy Expressions: Thanks set which was heat embossed in Liquid Platinum and white on some black cardstock. I finished off the card with some sequins from Hot Cocoa Couture Mix

The second card is featuring Slimline Scalloped Nested dies. I was inspired by this video which Effie once has shared on our YouTube Channel. She used scraps to stamp small floral elements and made a pretty floral card using them.

I started off by gold heat embossing the small floral elements from Charmed Wildflowers set. I watercolored the images using Color Burst and cut them all using the coordinating dies

To create the pretty pink background I loosely watercolored a watercolor paper panel in Peony, Orchid and Cerulean blue Color Burst. After the panel was dry I cut it using the second largest Slimline Scalloped die. I also cut a white scalloped panel using the smallest die for my sentiment. As it was too long, I die cut one end again with the same die and heat embossed the sentiment from Poppy Wishes stamp set on it in Liquid Platinum embossing powder. 

Now I started assembling the card. The scalloped background panel was foam mounted on a baby pink cardbase and the small scalloped panel with the sentiment on it. I then arranged the floral elements as shown in the picture, some of them were added using foam tape. To finish off I scattered Glass Slippers sequins. 

That’s it from me for today! Hope you enjoyed looking my cards!

Thank you so much for stopping by! 

Stay well and healthy! 

Hugs,

TaeEun

Lovely Hibiscus

Hello crafty friends! Hope you’re having a great week so far!  It’s TaeEun here today with a couple of cards featuring Lovely Hibiscus Layering Dies from our July Die Release.

TT0716 all WM

For the first card I used only the outline die cut and colored the hibiscus with alcohol ink and for the second one I layered up watercolored die cut pieces.

TT0716 1 1 WM

To make this card I stared off by die cutting the outline of the Lovely Hibiscus Layering Dies. I cut it three times and adhered one of them on a A2 sized Yupo panel. I then applied alcohol inks on it. For the petals I used Mountain Rose, Watermelon and Red Pepper and for the leaves Meadow ink. I blended the alcohol ink with rubbing alcohol and splattered a bit of alcohol on the panel and let it dry.

TT0716 1 4 WM

After the alcohol inked panel was dry I stacked two white die cut Hibiscus outlines on the first layer. I die cut the stamen from some yellow cardstock and added it to the hibiscus.

TT0716 1 2 WM

For the sentiment I used one from my stash which was stamped using Easy Expressions: Birthday stamp set. I gold heat embossed the scripty part and stamped the rest in Noir and cut it using the coordinating die. I finished off the card by adding three small Medallion Gold sequins to the stamen.

TT0716 1 3 WM

And this is the second card.

TT0716 2 1 WM

To start off I cut the layers of the Lovely Hibiscus Layering Dies from Canson Mixed Media paper and colored them using Color Burst. I used Wisteria, Peony, Orange and Lemon Yellow for the layers of hibiscus flower and Sap Green, Phthalo green and Sepia for the leaves.

After the pieces were dry I assembled the flower and added the outline which was cut from some light gold shimmer cardstock.

TT0716 2 4 WM

To create the background I watercolored a watercolor paper panel in Payne’s gray, Phthalo green and gold, let it dry and cut it using the Double Pierced Rectangle Coverplate die. I adhered one frame using foam tape and the rest flat on a white cardbase. The sentiment was stamped using Easy Expressions set and cut with the coordinating die. To finish off the card I added some Medallion Gold sequins.

TT0716 2 3 WM

This huge hibiscus, filling the whole A2 panel, is so classy and gorgeous! Have you checked out our  July 2020 Die Release ? Along with this beautiful Lovely Hibiscus Layering Dies eight more gorgeous die sets were debuted, so hope you’ll check it out, if you haven’t already 🙂 !

Thank you so much for stopping by!

Have a happy day!

Hugs,

TaeEun

so very happy for you

Hello everyone! Hope you’re having a great week so far! It’s TaeEun here sharing a couple of floral cards which are mainly watercolored. I happened to use the same sentiment for both of my cards, so I took the title of my post from it 🙂 .

Without further ado let’s get on today’s cards!

In the first card I paired the morning glories from Morning Glory Cheer stamp set with the Morning Glory Border background.

TT0520 1 1 WM

I started off by making the background panel. I white heat embossed the Morning Glory Border background and colored it using Color Burst powders in blue, purple and green. I cut the panel using a Rectangle A2 Nested Die and set it aside.

TT0520 1 4 WM

The Morning Glory Cheer was stamped in the Amethyst collection, the Blues Collection and the Crystal Garden Collection. I cut them using the coordinating die.

Tt0520 1 2 WM

I then assembled the card together. The background panel was foam mounted on a navy cardbase. I added a piece of vellum rectangle, one side of which was torn, to the background to tone it down. The morning glory cluster was arranged on the vellum. The sentiment is from Easy Expressions set. I gold heat embossed the handwritten part and stamped the rest in Noir. I. cut it using the coordinating die.  I added the sentiment using some foam tape and scattered some Glass Slippers Round Confetti sequins to finish off the card.

TT0520 1 3 WM

For the second card I used the outline leaves from Bountiful Leaves set.

TT0520 2 1 WM

I white heat embossed the leaves and cut them using the coordinating die. I arranged the leaves on a piece of A2 sized scrap paper to get an idea where I should add colors in the background. I watercolored a watercolor paper panel in blue and green and let it dry.

TT0520 2 4 WM

I then adhered the die cut leaves on the background panel and watercolored them also in blue and green. I added lots of white splatters on the panel. After the panel was dry I cut the panel using a Rectangle A2 Nested Die  and foam mounted it on a white cardbase.

TT0520 2 2 WM

I used the same sentiment that I used for the first card. I added a tiny bouquet of yellow flowers with the sentiment strip to the card. The little flowers are made using the Floral Bits stamp and die set. To finish off the card I added some Lemon Chiffon and Glass Slippers sequins.

TT0520 2 3 wM

That’s it from me today! Hope you enjoyed looking my cards!

Stay well, lovelies!

Hugs,

TaeEun