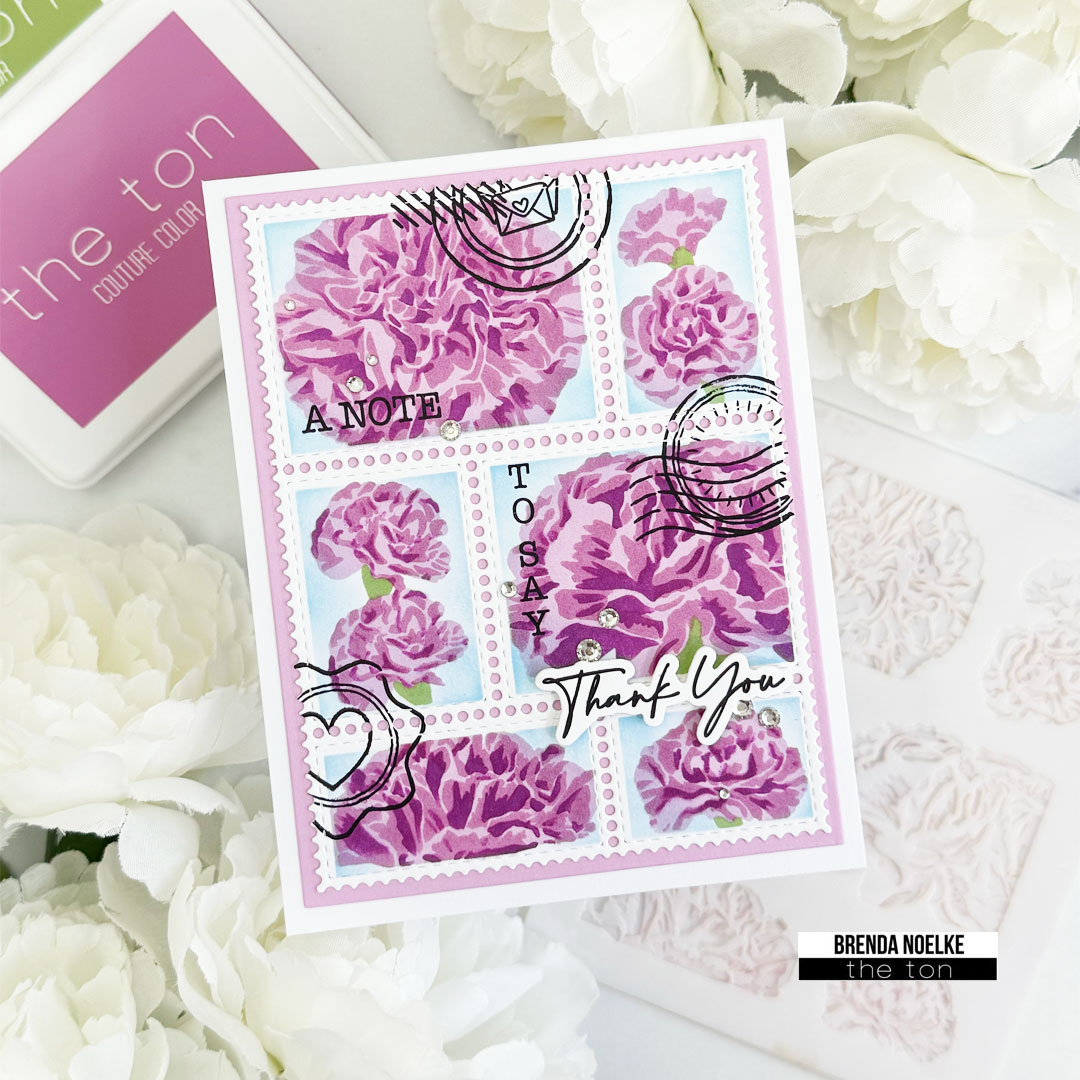
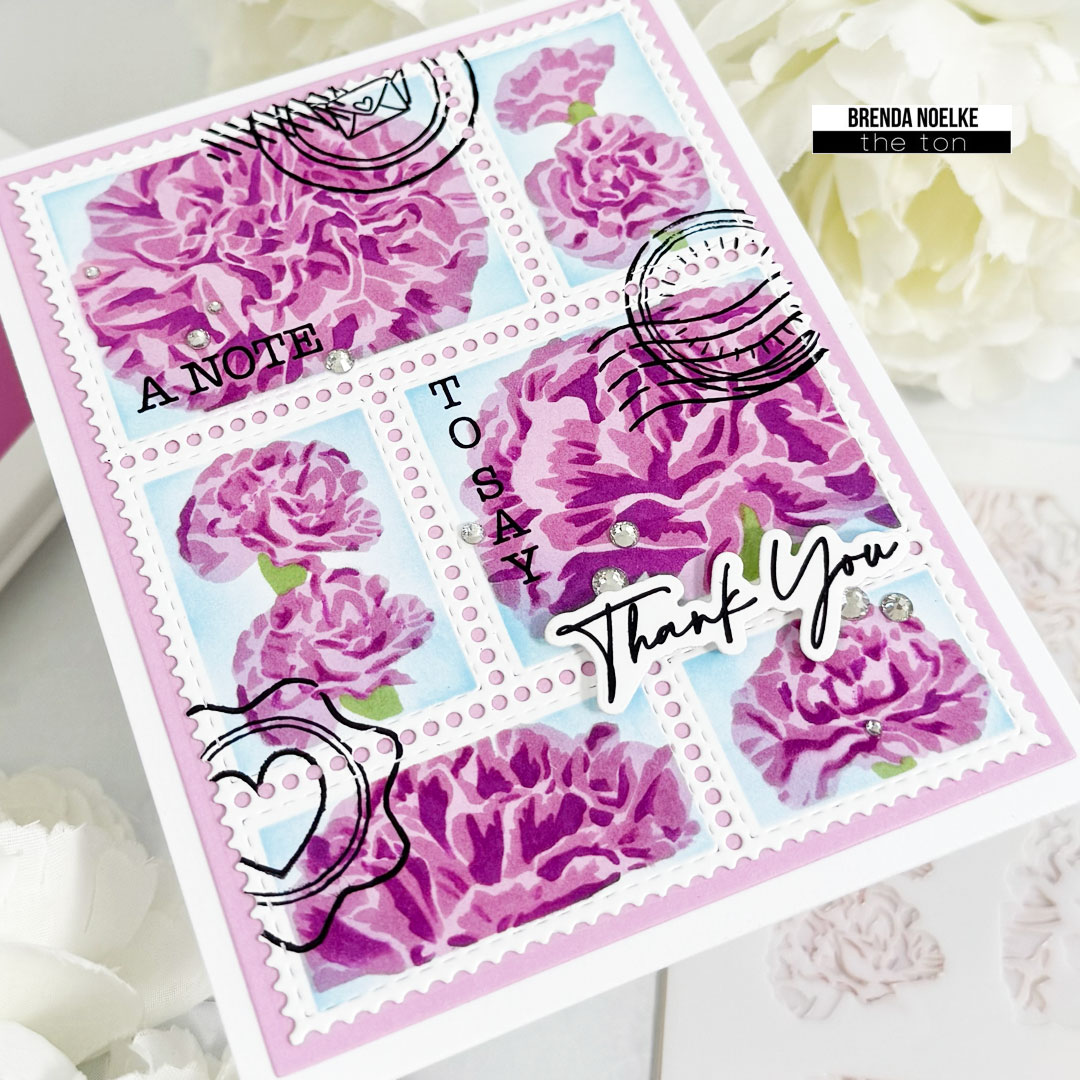
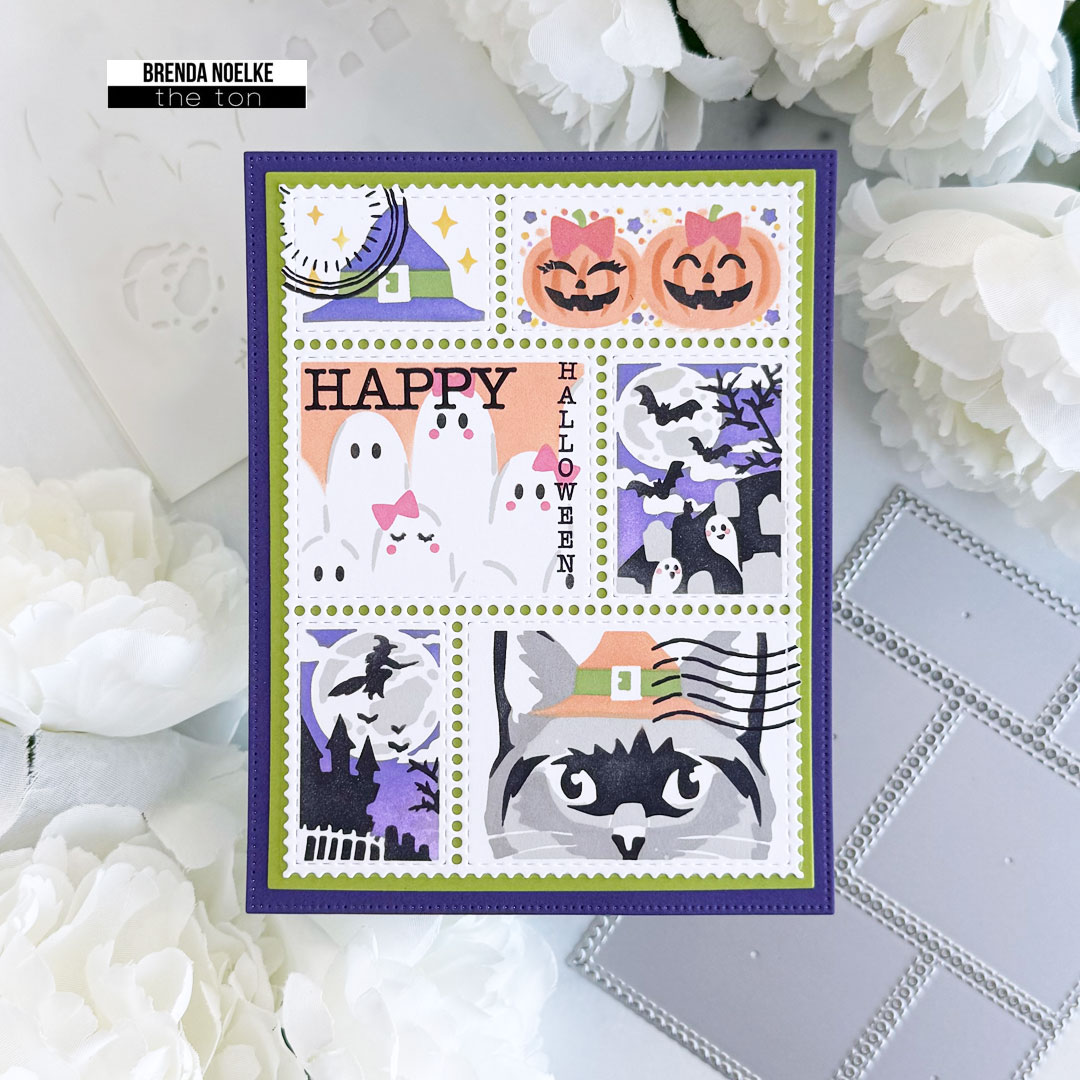
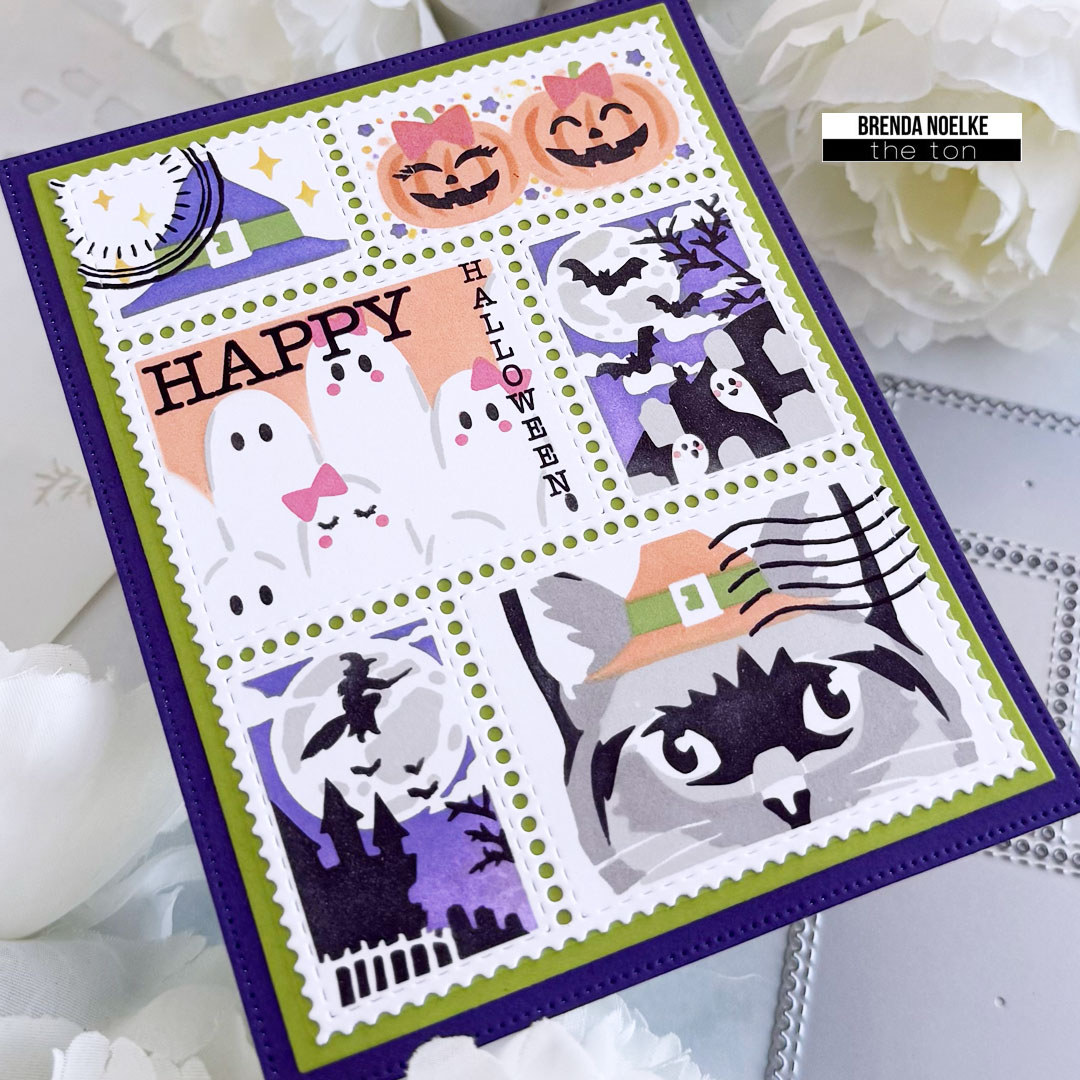
The sentiments and images from Postage Sentiments and Not A Bill stamp sets were stamped directly onto the background with Noir ink. The second largest die in the Rectangle A2 Nested Die Set was cut from pale orchid cardstock. The postage panel was adhered to it, then to an A2 white top-folding card base.
Super quick and easy. And, I am so sorry for super short post today. My anxiety been acting up and I just have a hard time focusing. I am glad that crafting brings some moment of calmness, but boy it’s been hard. Till next time. Cheers….
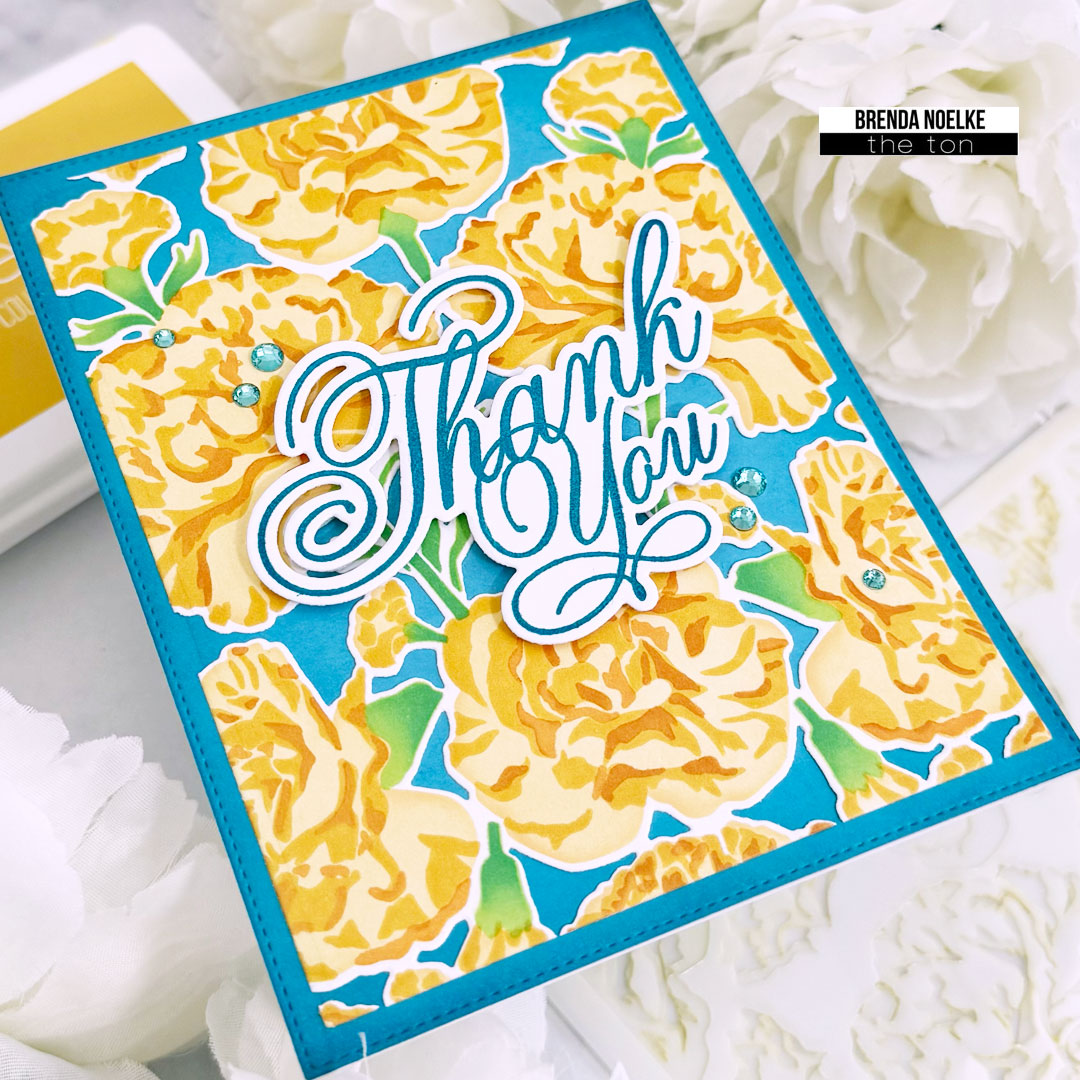
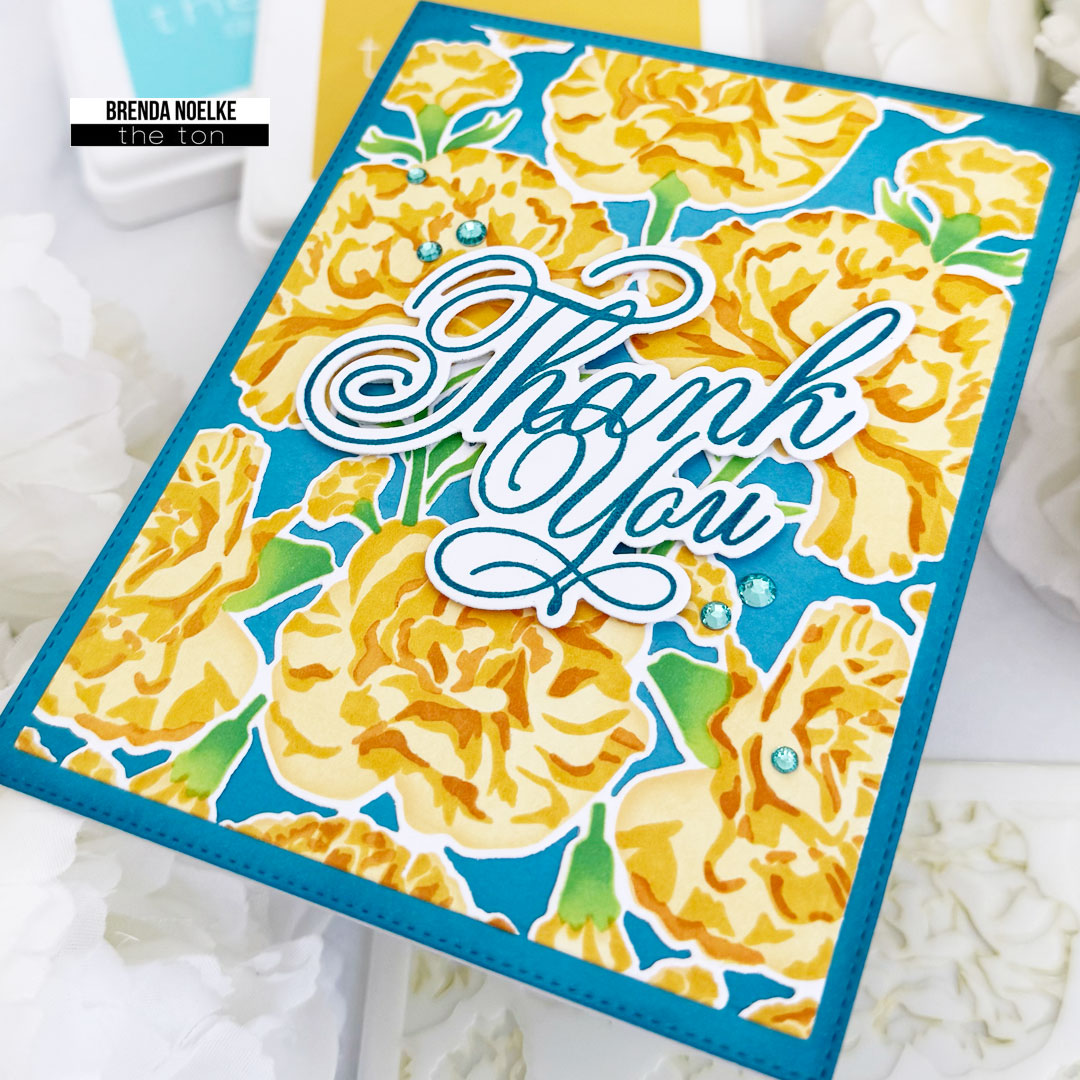
Hi friends. Vera here. I know it’s fall, but hey flower is for all season, right? Especially when you get to play with the new Climbing Carnations Layering Stencils from The Ton. These stencils brings you rich texture, depth and elegance to your card-making. And, of course give you plenty of creative freedom to personalize them to match your creative style and mood.
To start, I used post-it-note tape to mask the edge of the card. Then ink blended Soft Ash to create the soft frame. Then for the flower I used Periwinkle, Parisian Blue, Azurite and Olive. Die cut with Coordinating Climbing Carnation dies (coming soon). Adhere flower to card base and pop the top part with foam adhesive. For the sentiment I used one of the sentiment from Easy Expression set. I used this set often cause I can get a bunch of sentiments done and ready for use. Finish with some enamel drops.
It’s a quick and easy card that I hope inspire you to get crafty. Honestly, crafting is my stress therapy. When the world out there get too much, playing with stamps and colors is my way to calm down and relax. Wishing you all a blessed and happy weekend! Till next time.
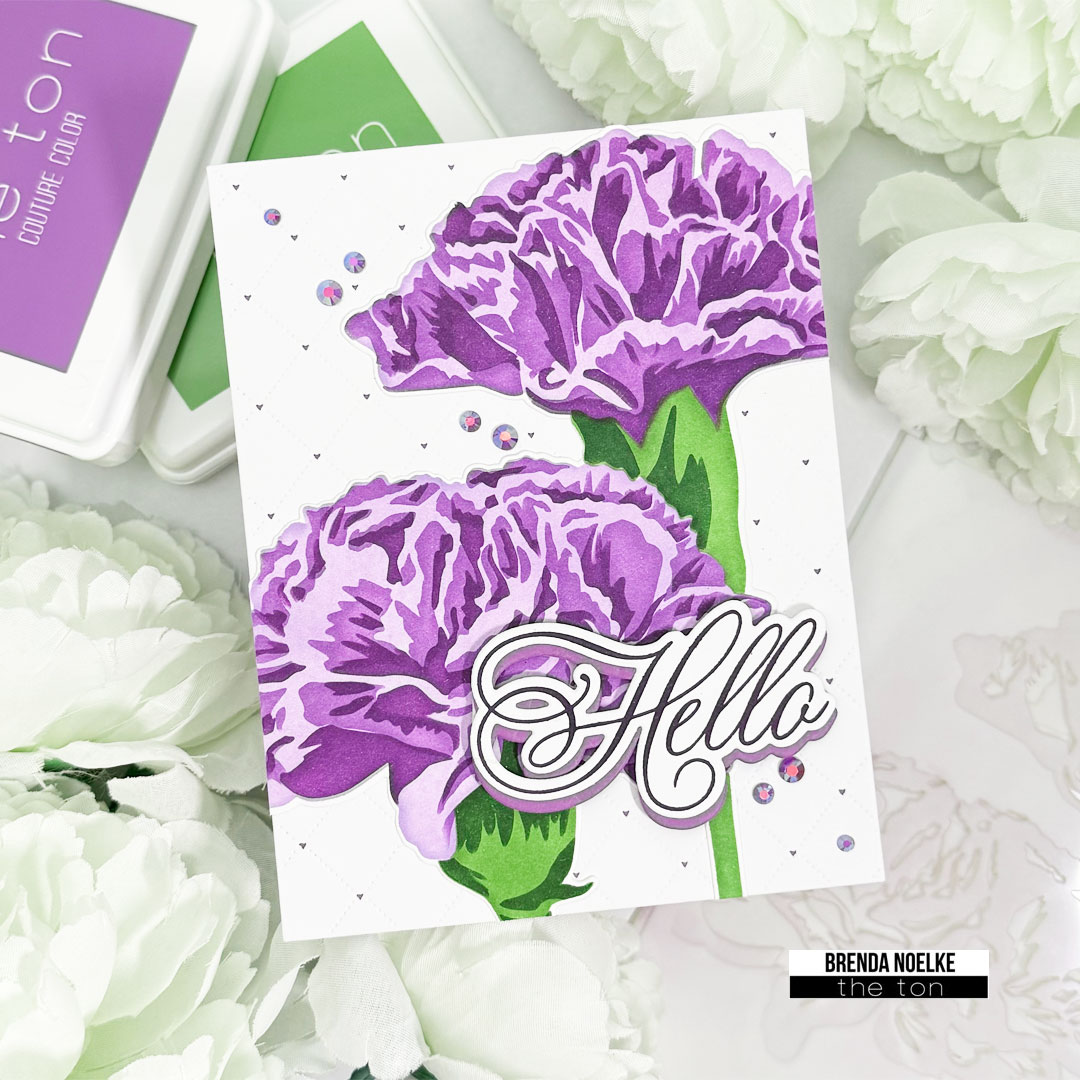
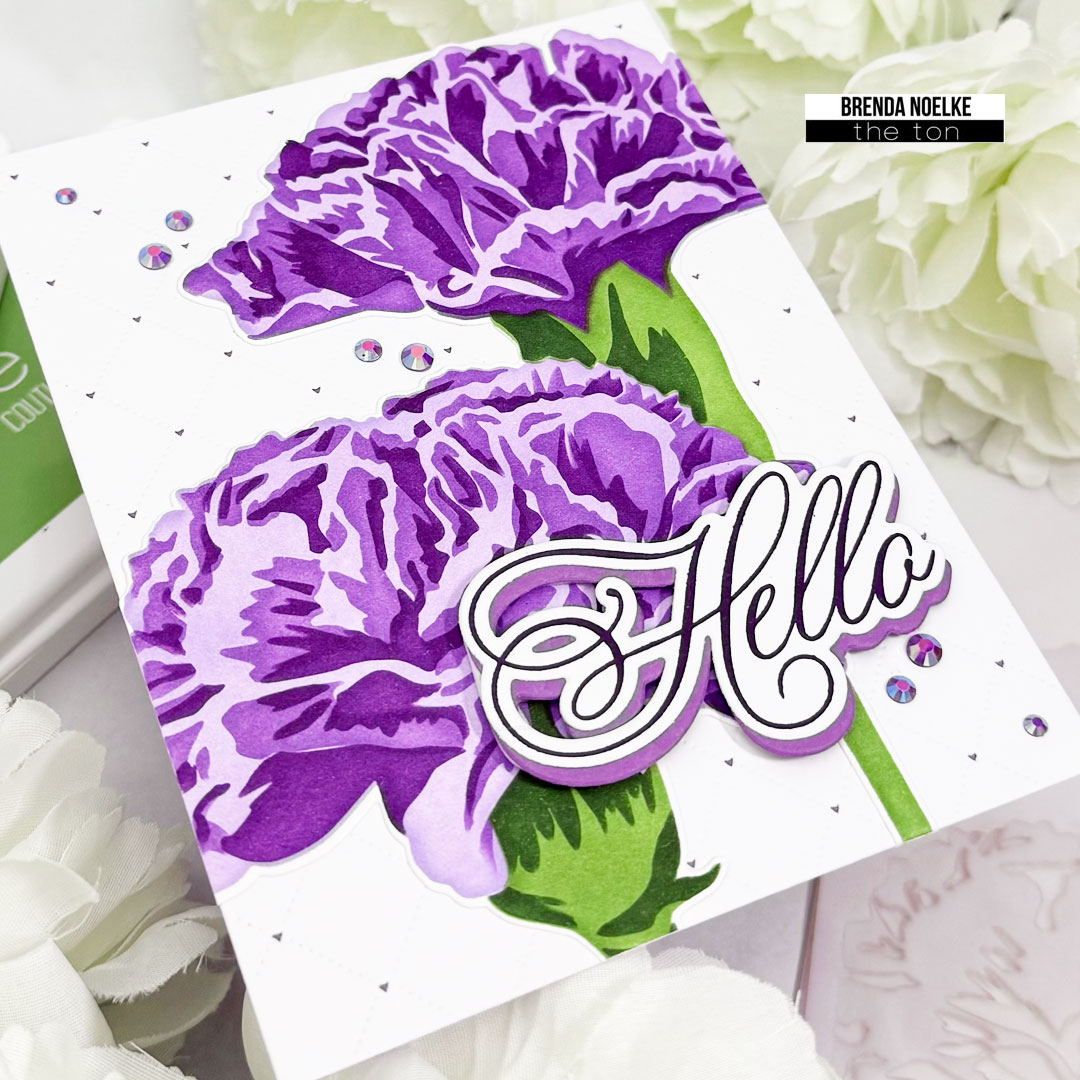
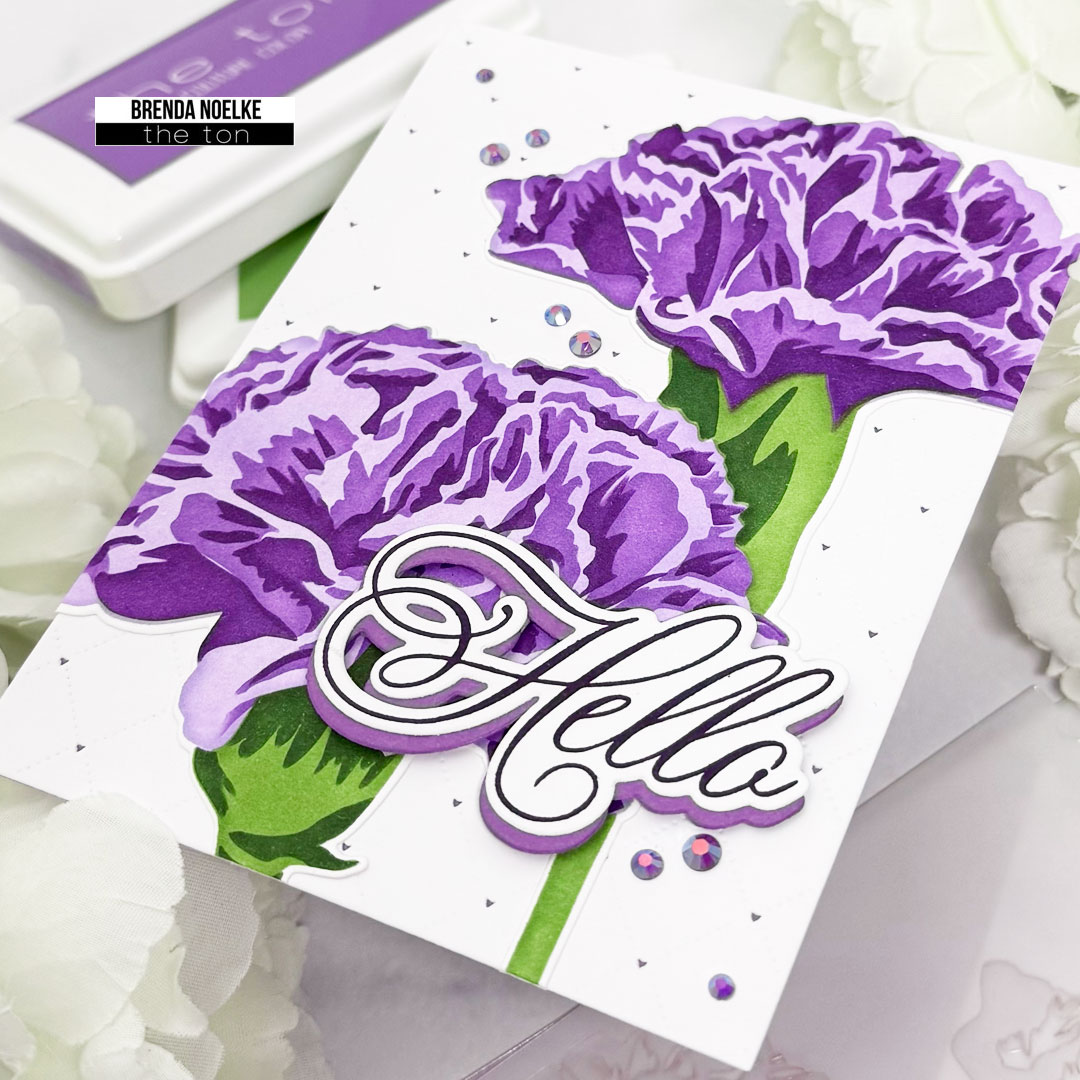
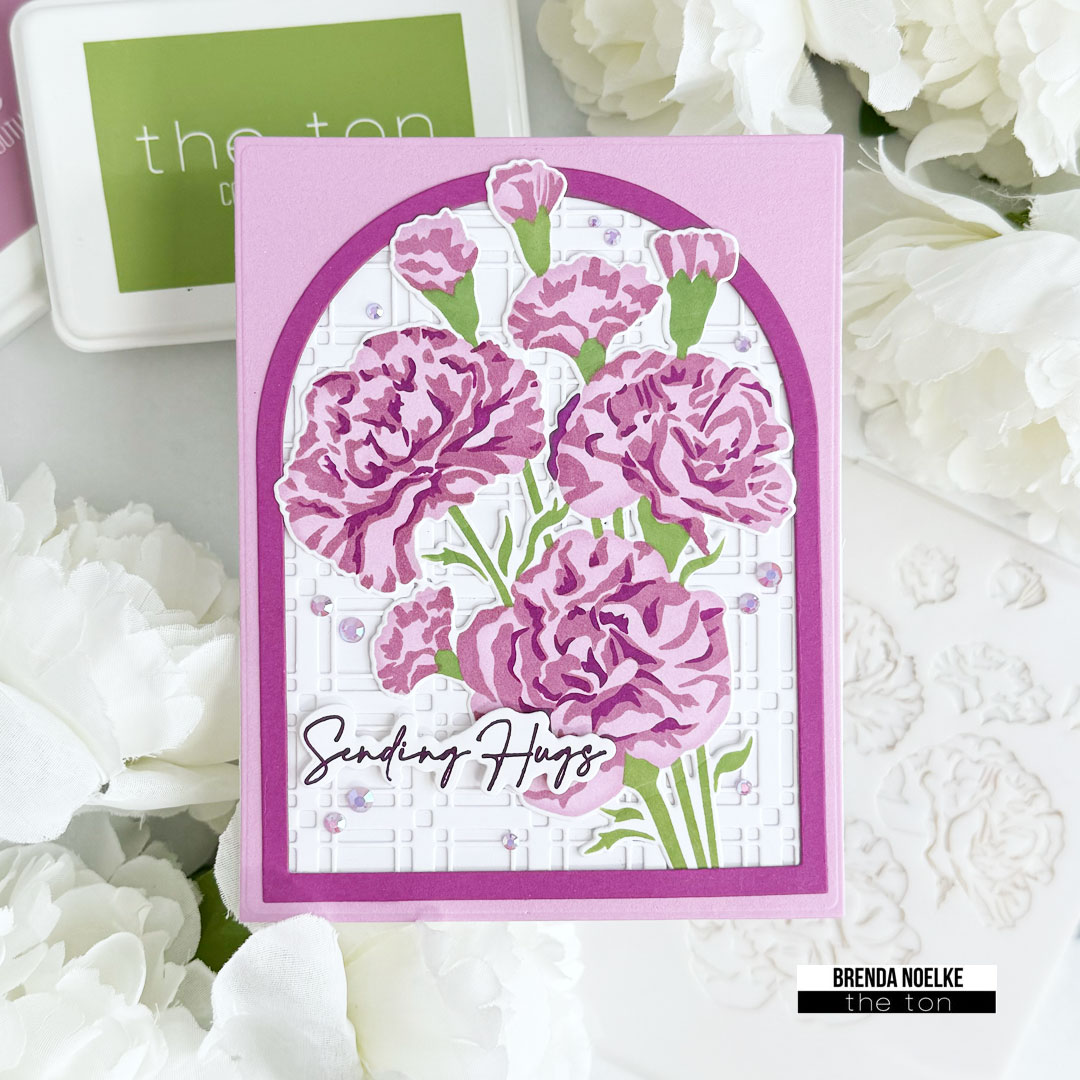
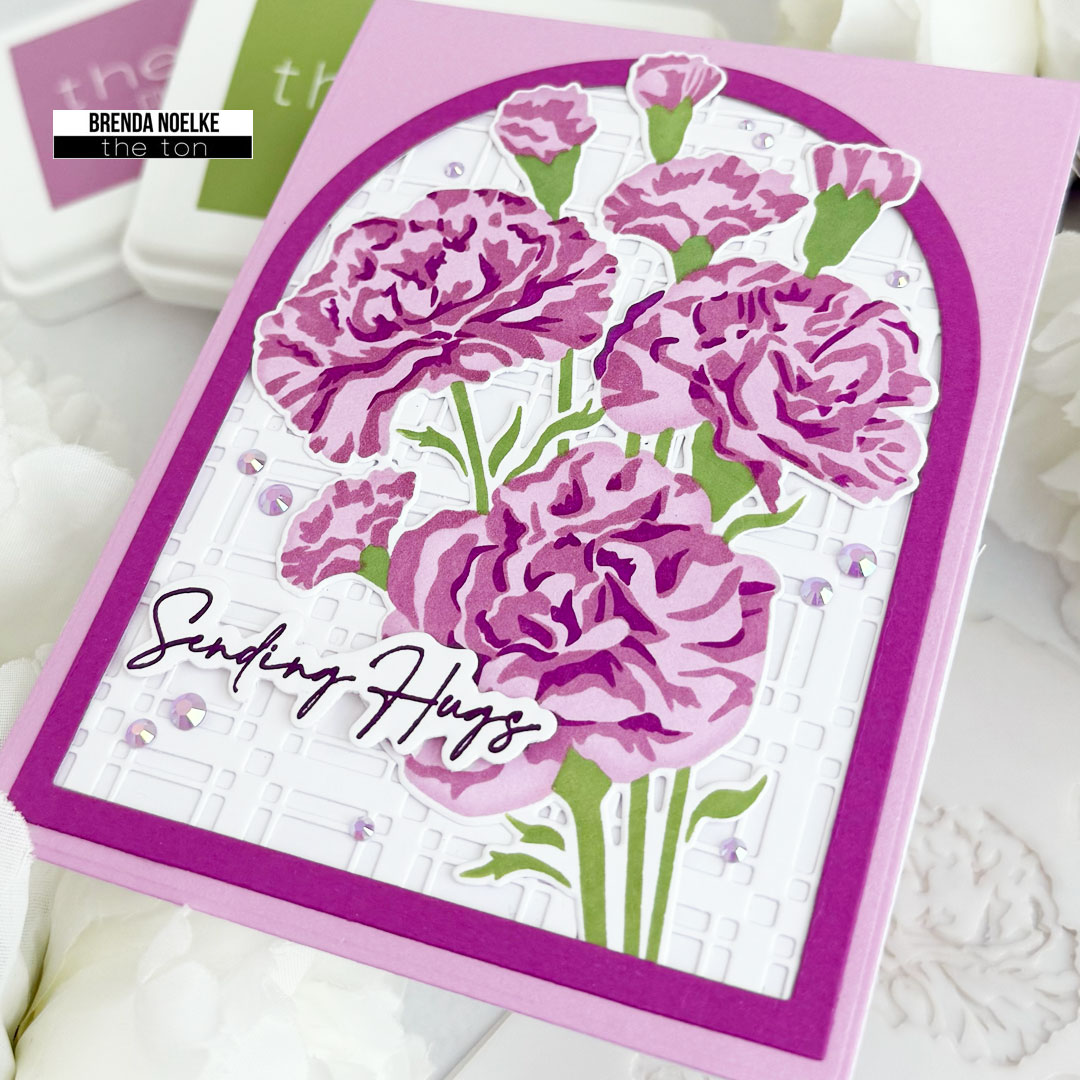
Hello, fellow crafters and happy Wednesday!! Brenda back with you today!! I had an urge to create with purple today!! It might be because I’ve been creating so many holiday cards….ha!! Also, I’m still having fun exploring the new inks and how they coordinate with my previous collection. I thought the Carnation Duo Layering Stencil Set was the perfect way to try out some of those combos!!
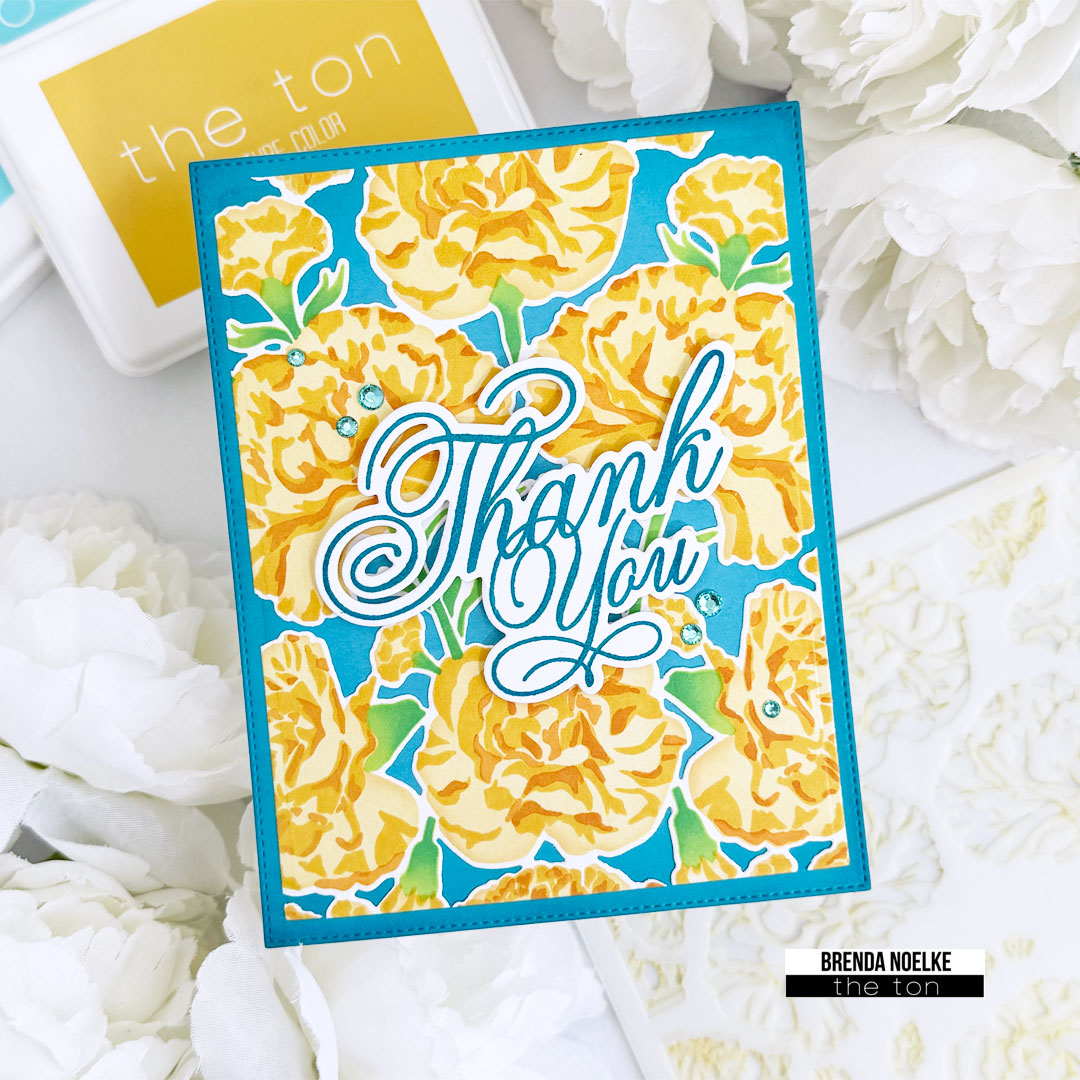
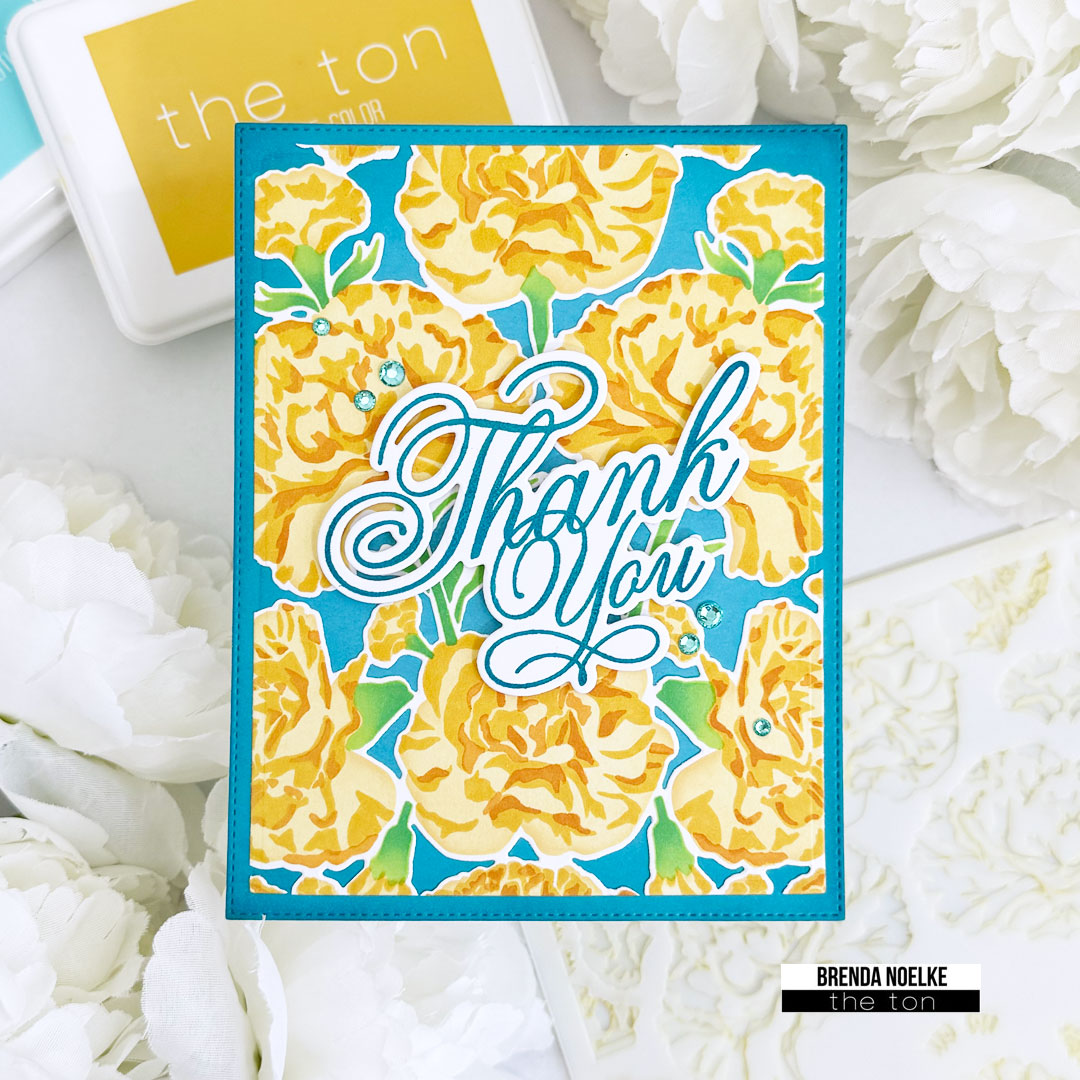
For the background, I die-cut the Quilted A2 Coverplate Die from white cardstock and layered it over an A2 panel of purple cardstock. The carnation die-cut was adhered with liquid glue and the excess was trimmed from the edges.
The sentiment is from the Fancy Script Stamp Set. It was stamped onto white cardstock with Grape Crush ink, then cut out with the Coordinating Die. I also die-cut another layer from purple cardstock, adhered it behind the stamped sentiment, slightly offset, and adhered it to the background with foam tape. A sprinkling of Dark Purple Opaque Gems placed diagonally leads your eye to the sentiment and finishes off the card.
I was super happy to get my dose of purple in!!
That does it for me today!! Thanks so much for stopping by!!
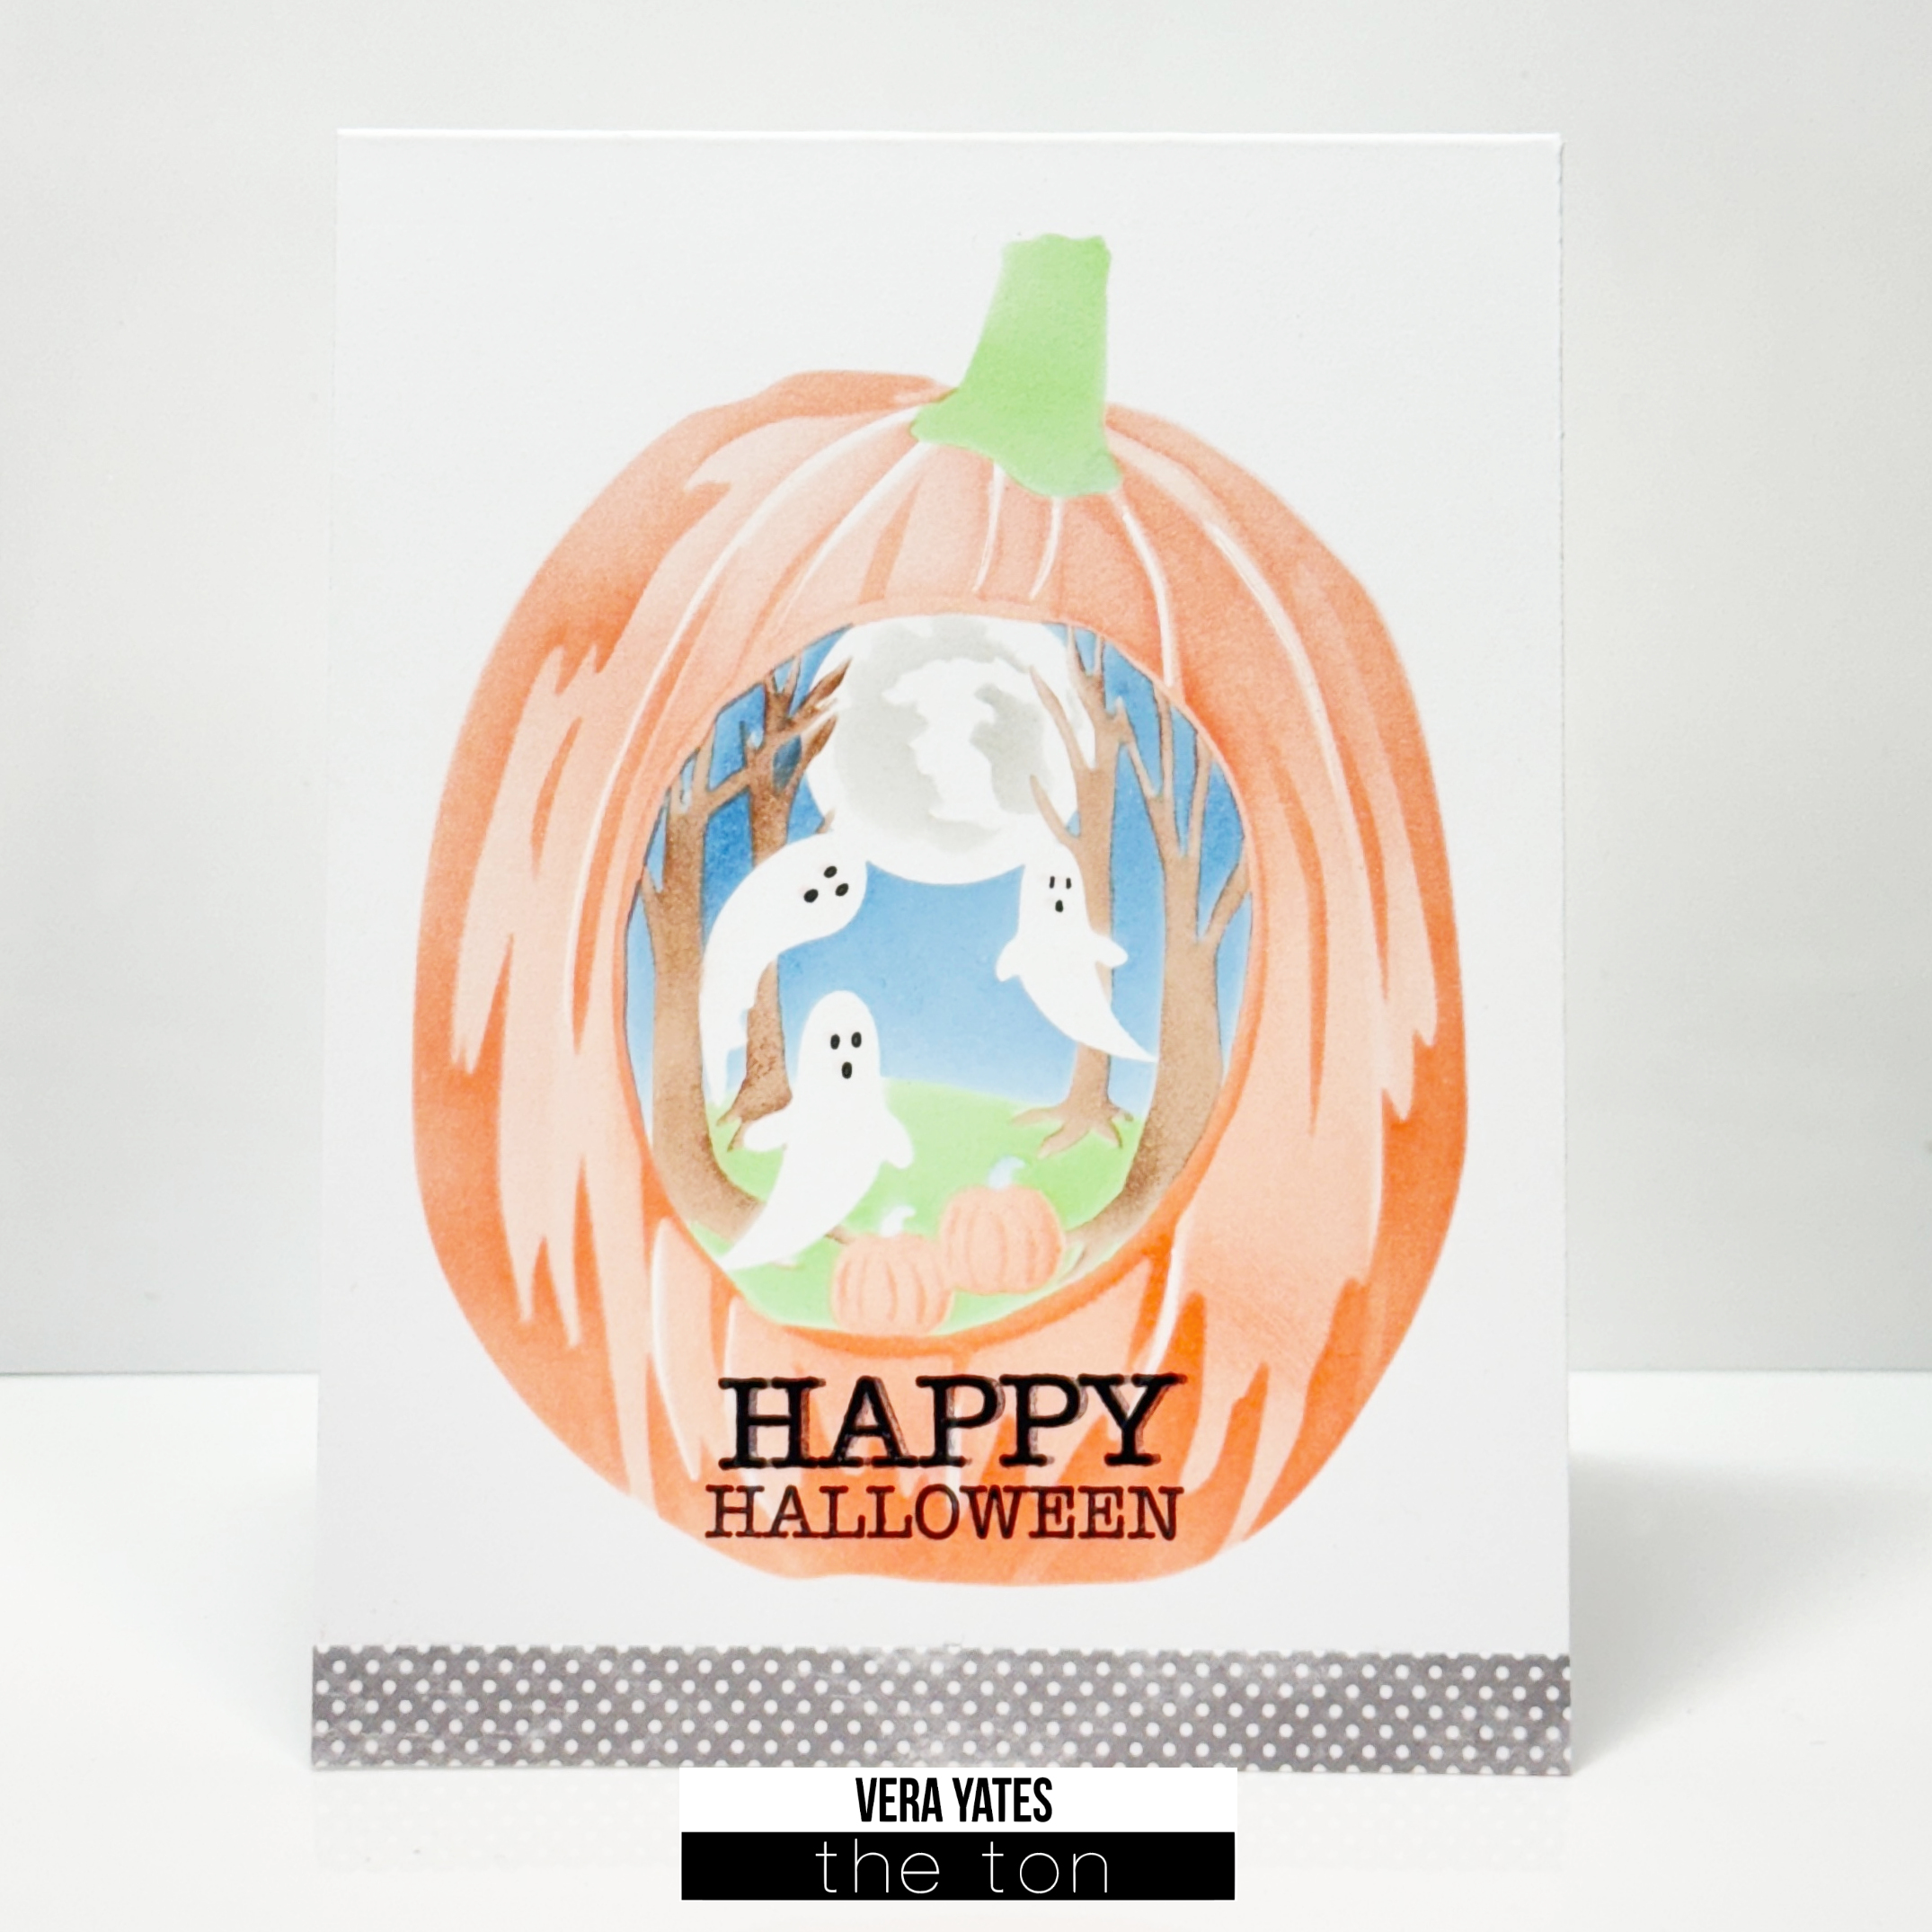
Hi friends. Happy Halloween! Vera here as we closed off the month of October. Since it’s Halloween it’s only appropriate that I share a couple Halloween cards. For my first card, I am showcasing Ghosts & Bow Layering Stencil set. I mean, come on… how adorable are these ghosts?
I used some pot-it-notes to help block some of the ghosts while ink blending the background. For the gradient background I used Peach Puff, Lime Twist and Deep Sapphire. For the shadow on the ghost I used Crystal Pewter. For the bows I used Lavender, Deep Blush, Peach Puff and Rouge. Sentiment from Postage: Fall Sentiment set. Finish by splattering some white inks and adding some white dots to the ghost eyes.
I just thought this set is brilliant. I never seen any pumpkin set like this and I love it. For the pumpkin I used Peach Puff, Peach Blossom and Vineyard for the stem and the ground inside the pumpkin. For the tree I used the new Trunk ink. It’s quick and easy.
I hope you have a great Halloween and stay safe. Till next time.
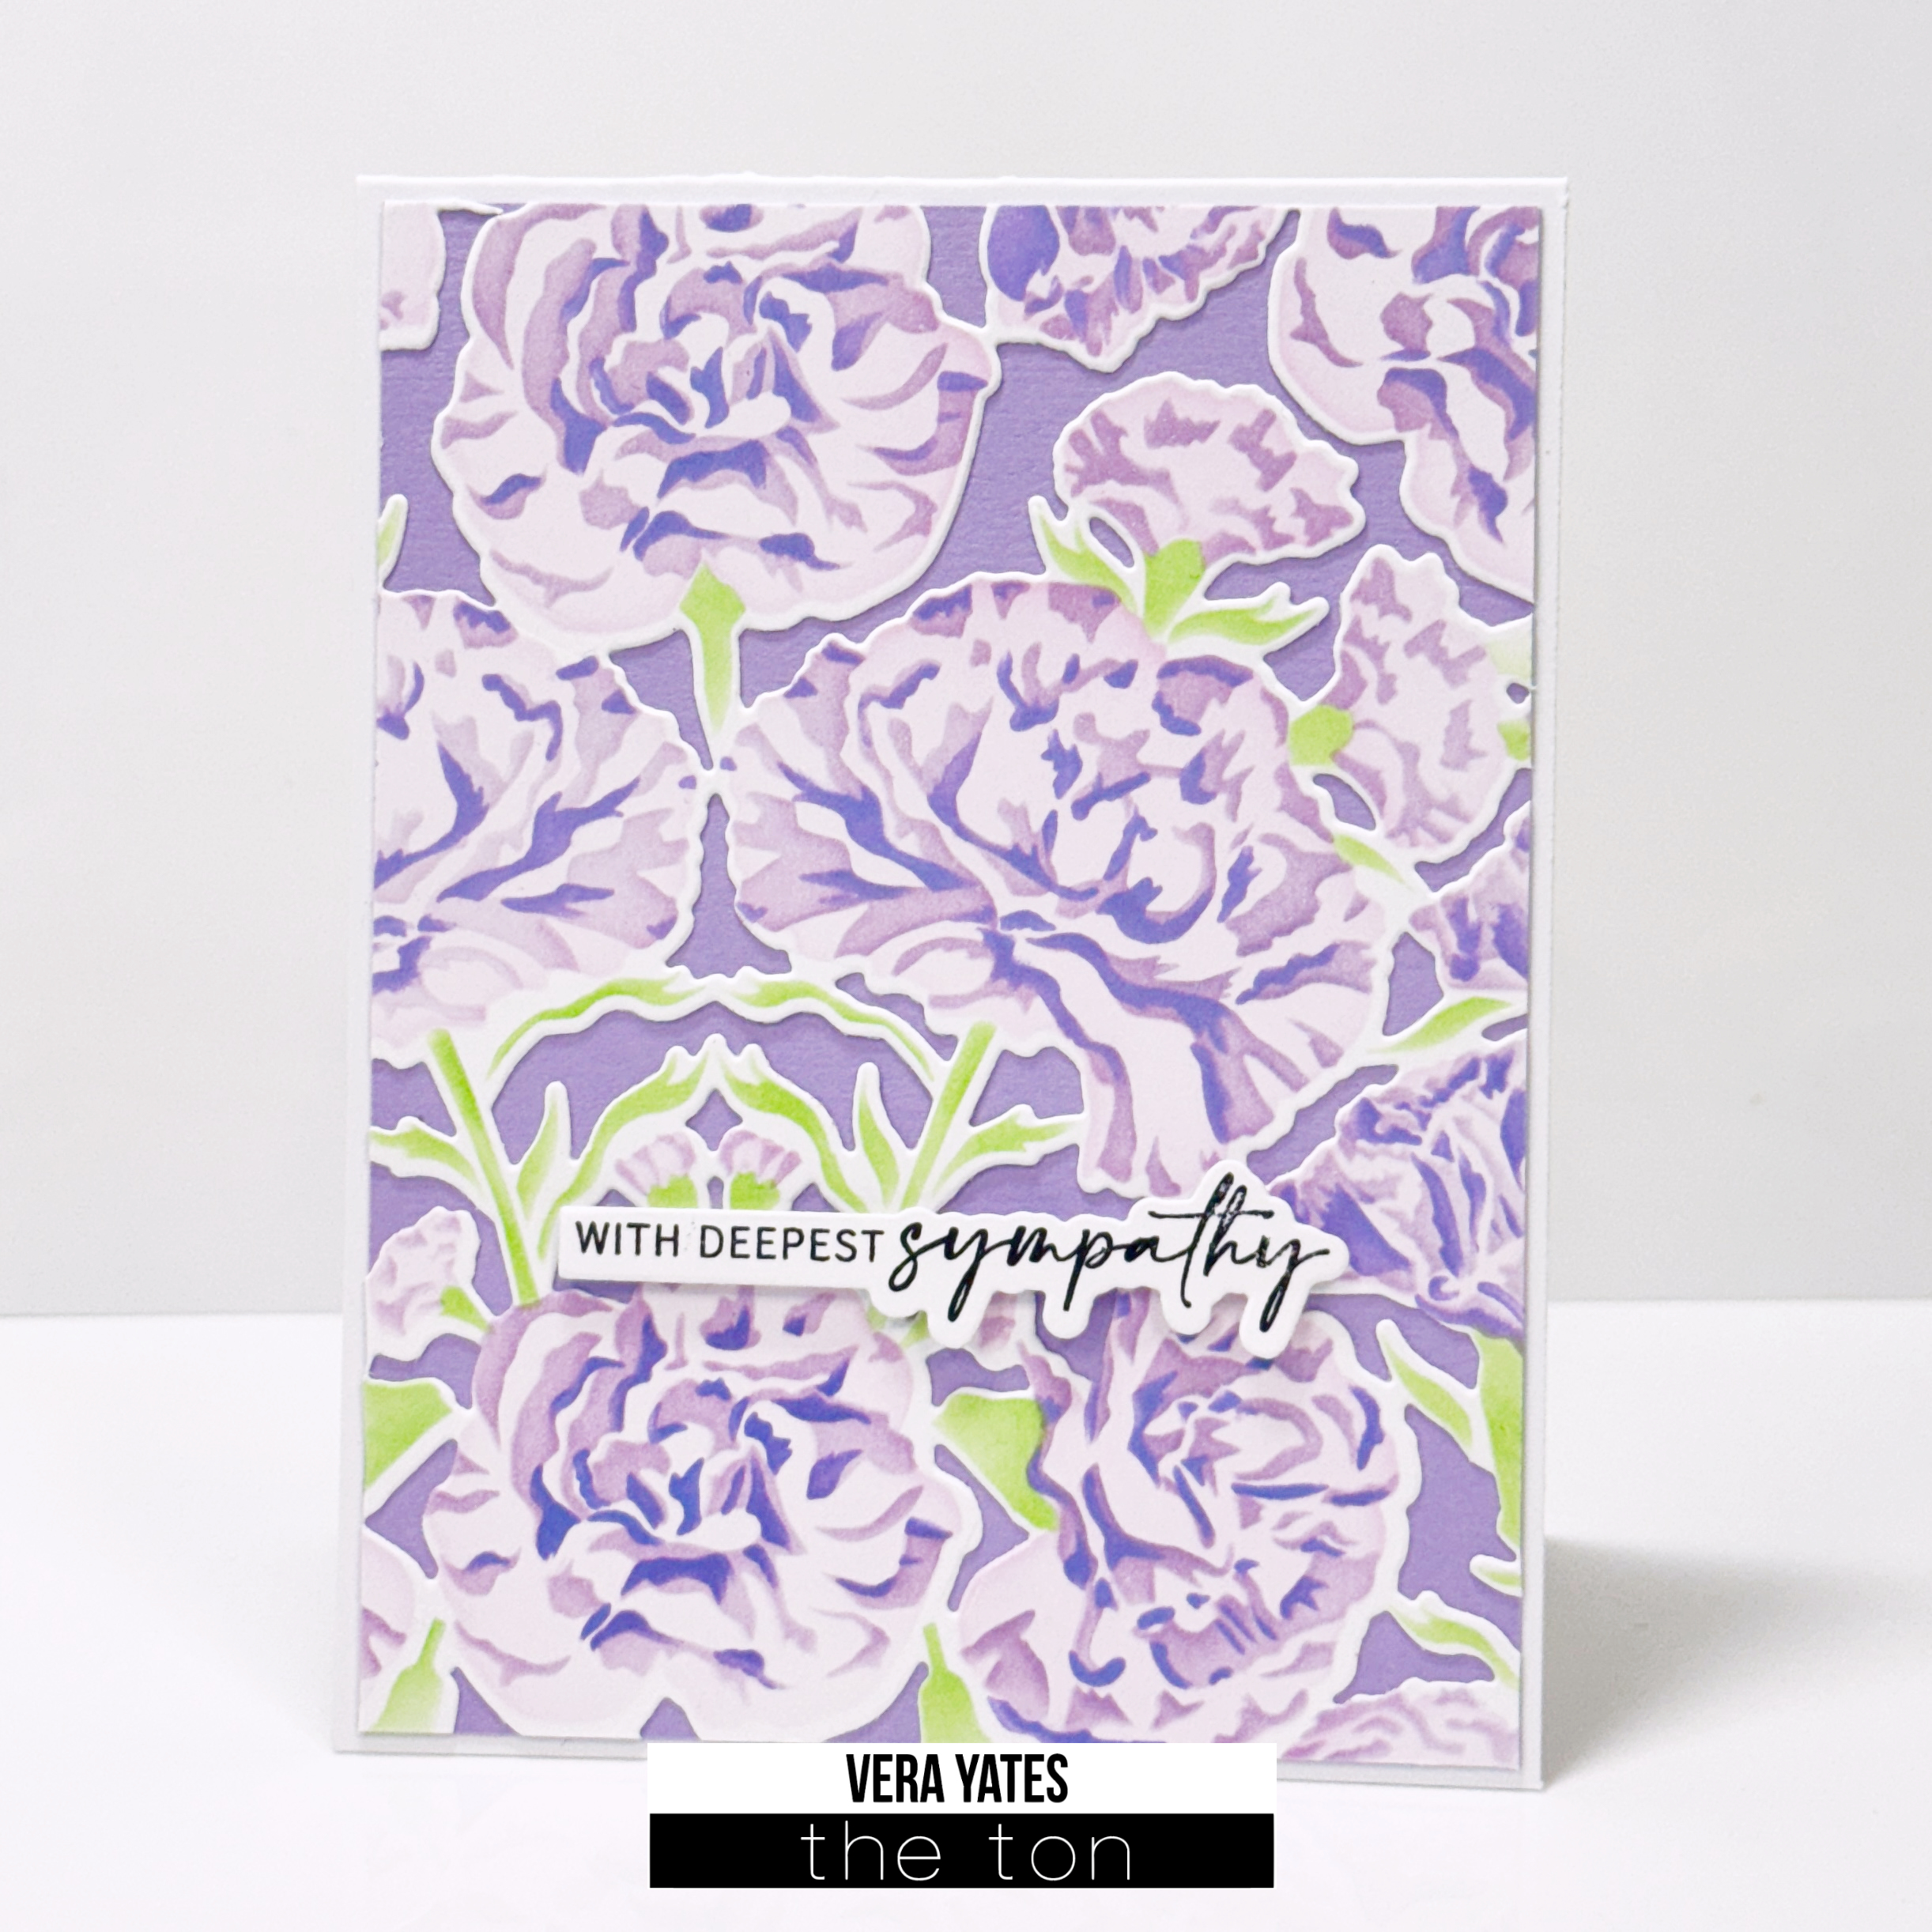
Hi there crafty friends. Vera here. Sorry, I missed posting for this month. I was dealing with some health scare. During a mammogram the doctor found a small mass. First biopsy result was inconclusive and it was recommended for me to have the mass removed and sent to pathologist. Thankfully it was confirmed that it was just an abnormal growth and not cancerous. My scar still healing, but I am just grateful and relief that I still have my health. Now that’s over, I am back to crafting and have a couple cards to share.
For the card I used the new inks, Peach Puff, Grapefruit, Lime Twist and Melon. It might not look like it, but the lightest and 2nd lightest layer was using Peach Puff. Just vary the pressure and amount of ink. Once done, I die cut it using Coordinated Carnation Duo dies (the dies will be available in store soon). I die cut blank cardstock 2 more times to and adhere them together to create thickness. For the background, I used my favorite background Quilted A2 Coverplate. Adhere to card base then adhere the flower. Finish with sentiment from Easy Expressions set.
There a couple Carnation beauty that I hope inspire you to get crafty. I have to say, it feels good to craft again. So much easier to craft when your mind is clear. 🙂 Friends, I hope you enjoy today’s cards . Till next time.
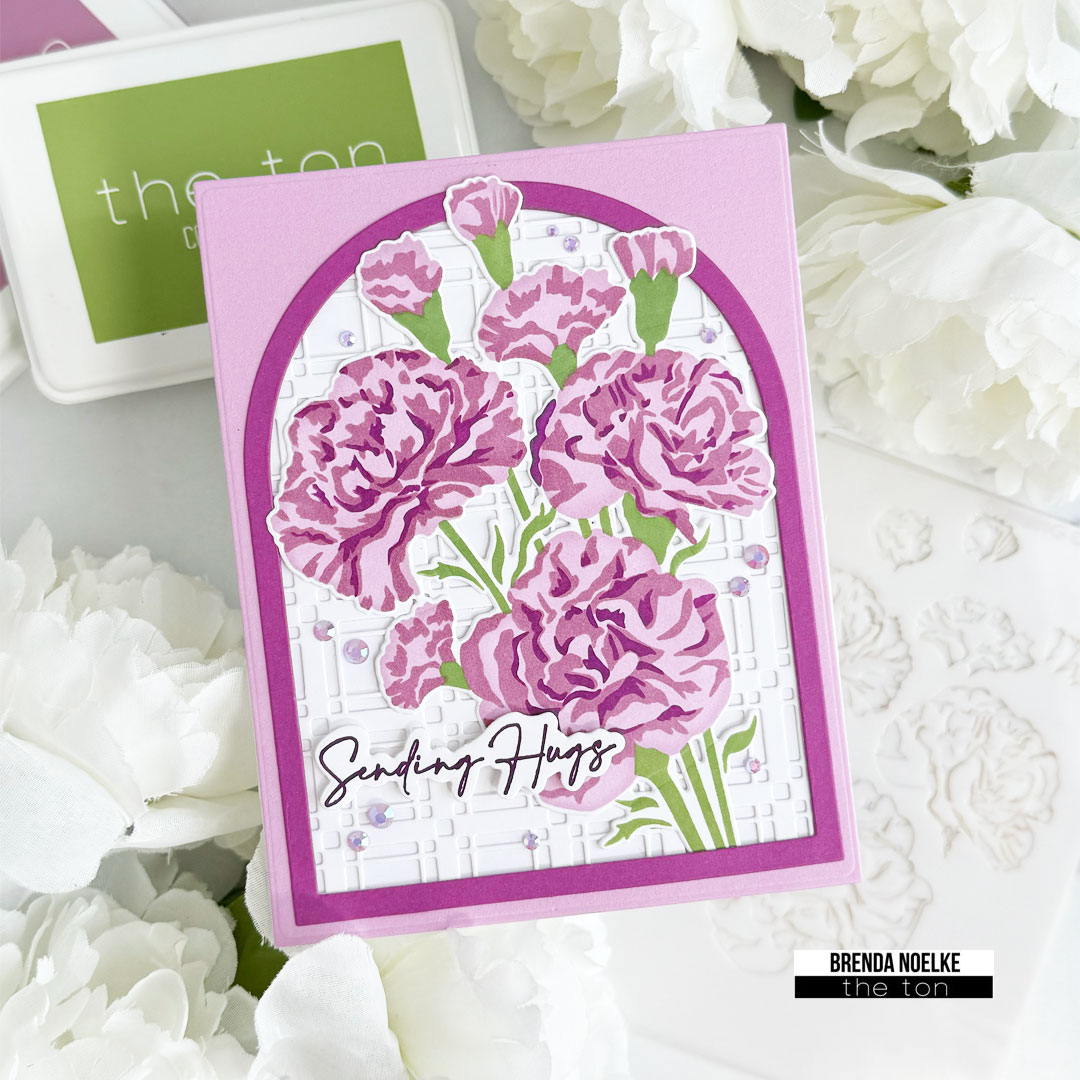
Hello, friends and happy Tuesday!! Brenda here with a card featuring the Climbing Carnations Layering Stencil Set!! I’m having so much fun discovering the new ink pad colors and combining them with the older ones!!
For the background, I die-cut the Single Plaid Coverplate Die from white cardstock and adhered it to an A2 white card base. Next, I die-cut the Rectangle A2 Nested Die and the second largest Dome Nested Die from a panel of pale plum cardstock to create a frame. The Dome Frames Slim Borders Coverplate Die was cut from plum cardstock and the second largest frame was adhered around the opening of the frame, then adhered to the background. The bottom of the carnation die-cut was tucked into the frame and adhered with liquid glue.
Hello, crafters and happy Wednesday!! Brenda here with a trio of Halloween cards featuring products from the newest release to share with you today!! Halloween is just a little over two weeks away!!
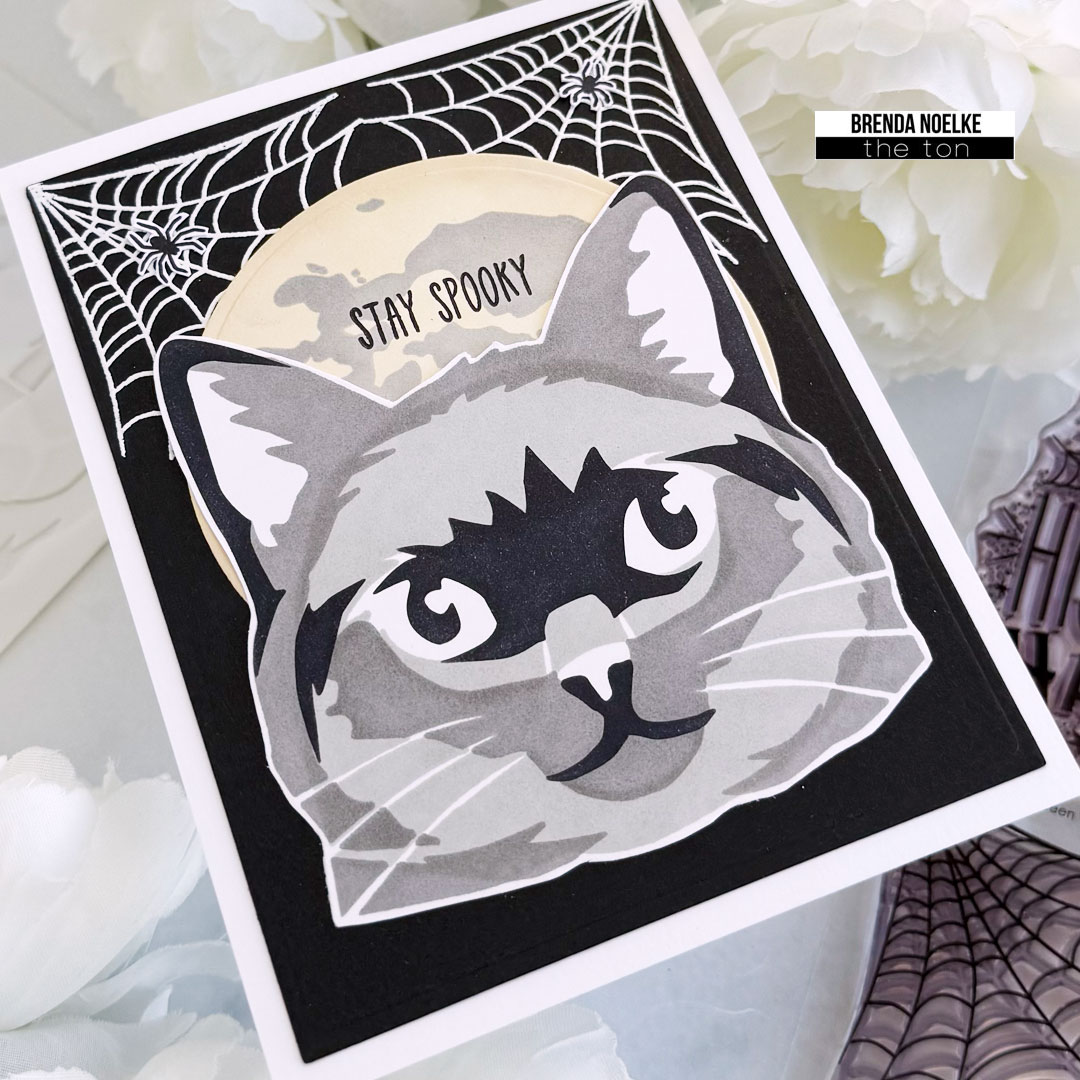
For the background, I die-cut a panel of black cardstock with the second largest die in the Rectangle A2 Nested Die Set. I white heat embossed the spider web in the Halloween Wishes Stamp Set onto the top two corners, then adhered it to a white A2 card base. I used one of the dies in the Circle Nested Die Set to cut the moon from white cardstock. I blended Vanilla Frosted Cupcake ink onto the circle, then used a stencil from the Super Moon Stencil Set with Crystal Pewter ink to add in the details. The sentiment is also from the Halloween Wishes Stamp Set. It was stamped onto the moon with Noir ink. The spiders, from the same stamp set, were stamped onto white cardstock with Noir ink and fussy cut. Everything was adhered with liquid glue and this card was finished.
I started by stenciling the Ghosts and Bows Stencils onto white cardstock. I got the new colors of ink pads in my hot little hands and couldn’t wait to use them. I used Clay, Rhubarb, Celadon and Olive on the background with the ghosts masked off with the first stencil. I used Rouge for the bows and cheeks, Noir for the eyes and Crystal Pewter for the shading between the ghosts. The panel was die-cut with the second largest die in the Rectangle A2 Nested Die Set. I put the large stencil over the ghosts and splattered the panel with diluted white bleed-proof ink. It was adhered to an A2 panel of black cardstock that was die-cut with the largest die in the Stirped Edge Nested Die Set.
This sentiment is also from the Halloween Wishes Stamp Set. It was white heat embossed onto black cardstock, trimmed into a narrow banner and popped up with foam tape to finish this one off.