Hello everyone! Hope the week is off to a great start! It’s TaeEun here today with a couple of cards featuring some of our butterfly stamps.
Did you know that there is no real pink butterflies in the nature? I realized it recently as I decided to make the butterflies for my cards pink. I was curious and googled. hmmm.. but why not? Nothing is impossible in cardmaking 🙂 !
For my first card I used Sunny Folk Garden stamp set which includes some whimsical butterflies and layering florals. I added also a frame made using the Garden Foliage Coverplate SVG cut file.

I cut the Garden Foliage Coverplate three times from heavy weight white cardstock and glued them together to add dimension. I set it aside and started to make the main panel. I stamped the layered flowers from Sunny Folk Garden stamp set in Ballet Slippers, Hollywood Star and Cosmopolitan Pink and the leaves in Caribbean Turquoise. I stamped the floral cluster on the bottom and left border of the panel. I then ink blended Caribbean Turquoise on the bottom of the panel and Lemon Drop on the top of the panel.

I stamped one butterfly in Lemon Drop and filled it with the patterns in Arctic Sky and Caribbean Turquoise. I fussy cut the butterfly and glued it on the main panel as shown in the picture. I also stamped another butterfly in Hollywood Star and heat embossed the inner pattern in Rose Gold. I cut the butterfly and set it aside.

I adhered the main panel on a white cardbase and added the Garden Foliage Coverplate to it. The sentiment is from Transformation set. I white heat embossed it on a strip of white cardstock , ink blended it in Hollywood Star and Cosmopolitan Pink and cut it in a banner.
I adhered the pink butterfly next to the sentiment and finished off the card by scattering some Glass Slippers sequins.

The second card is featuring our washi tapes and butterflies from Beautiful Butterflies 1 stamp set.
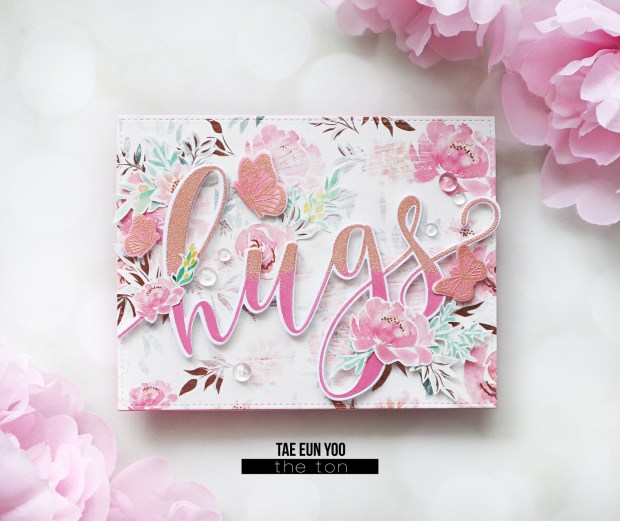
I started off by making the background panel using Pink Peonies washi tape. I adhered it on a white cardstock panel and added white gesso on the center of it. I then stamped the “hugs” in Hollywood Star using Brushed Hugs stamp set. I heat embossed the upper half of the letters in Rose Gold. I cut it using the coordinating die and set it aside.

I cut the small floral elements from the Pink Peonies washi tape and wildflowers washi tape which I adhered on some white cardstock. The little butterflies from Beautiful Butterflies 1 stamp set were heat embossed in Rose Gold and then ink blended in Soft Garnet. I cut them using the coordinating dies (now we have the coordinating cut files in the shop!).

I cut the panel with the Pink Peonies washi tape using a Double Stitched Rectangle die and adhered it on a pink cardbase. I foam mounted the words and arranged the flowers and butterflies as shown in the picture. I finished off the card with a few clear dew drops.

I like the texture which the white gesso adds to the background. It also toned down the pattern in the background!
That’s it from my side today! I hope you enjoyed a little break from making holiday cards 🙂 !
Wishing you all a happy and crafty week!
TaeEun


