Climbing Dahlias Layering Stencils

Hello everyone! Hope you’re having a great week so far! It’s TaeEun here today sharing a nearly one layer Dahlia card. I used the Climbing Dahlias Layering stencils to create the panel with two large dahlias. I also used the coordinating Coming Up Dahlias stamp for the black outline!

To start I stamped the Coming Up Dahlias image in Noir twice on a Neenah solar white panel. To stamp the second image on the left side of the panel I masked one bud. Next I stenciled the image using the Climbing Dahlias Layering Stencils. The dahlias were stenciled in orange, while the right one was colored slightly darker. I used Lemon Drop, Amber Citrine, Peach Blossom and Coraline Hybrid ink for stenciling. The Leaves were stenciled in Soft Garden and Deep Emerald

I ink blended the bottom edge of the panel in Soft Garden and the top part in Parisian Blue with a very light hand. To make the flowers slightly pop I colored the background around the flowers in light gray using some C Copic markers. 

I cut a frame from this panel using two Double Pierced Rectangle A2 Nested dies. The center part was mounted flat on a white cardbase and the frame was foam mounted. 

The sentiment from the Sweet Bouquet set was stamped in Noir on some yellow cardstock, cut into a fishtail banner and added to the card. Lastly I finished off the card with a few Bright Yellow Opaque rhinestones

That’s it from me! Hope I was able to inspire you with my card today!

Thank you so much!

TaeEun

Congrats – Posy Bouquet

Happy Memorial Day, friends!! I hope those of you in the US are having a great extended weekend!! Thank you so much to all of the military and those who have served, as well as their families, for keeping all of us in the US safe!!

I have a congrats card to share today that would make a beautiful wedding card!!

I began by stenciling the Posy Bouquet Layering Stencil Set onto white cardstock four times with Soft Orchid, Dolled Up, Pink Derby, Beach Blondie, Soft Garden and Bright Fern inks. I used the Coordinating Dies to cut them out.

For the background, I die-cut the Quilted A2 Coverplate Die from white cardstock and adhered it to an A2 white card base. The posy bouquet die-cuts were adhered to the top and bottom with liquid adhesive and the excess was trimmed from the edges. I used some of the off-cuts to fill in where needed.

The sentiment, from the Ribbons General Stamp Set, was stamped onto white cardstock with Dolled Up and Pink Derby inks. It was cut out with the Coordinating Die and popped up in the center of the card with foam tape. I added Bright Yellow Opaque Gems to the centers of the flowers to finish it off.

That’ll do it for me today!! Thanks for stopping by!! Have a wonderful day!!

Brenda

Rose Blossoms card

Happy Friday, everyone! Anna here with a floral card, I made using Rose Blossoms Layering Stencils.

I started by stenciling the floral image with Soft Orchid and Dolled Up (roses), Light Oat and Matcha (cosmos flowers), Spring Salad (leaves) and Periwinkle (berries) inks. I then cut the image using coordinating dies. To make the background, I ink blended Soft Ash on a white card base and adhered the white cardstock panel that was cut out with Convention Coverplate Die on it.

For the sentiment, I cut out “Hello” from Adhesive Foil Paper – Gold (7.9in x 9in) and white cardstock with Script Word Dies Bundle. Next, I added some gems from Rhinestones Mixed – Pale Yellow Opaque.

Thank you so much for stopping by today!

Anna

Sweet Bouquet

Hello everyone! Hope you’re having a great week so far! It’s TaeEun here today sharing a floral encouragement card. I used Sweet Bouquet stamp, layering stencil and die sets to get the layered look of the floral clusters. 

To start I stamped the Sweet Bouquet image two times in Noir on Neenah solar white cardstock, once the whole image and again on a corner of an A2 sized panel. 

I then colored the flowers using the layering stencil set. The pink flowers were stenciled in Bubblegum, Dolled Up and Cherry. I added a bit of orange hue to the flowers using Peach Blossom and Coralline hybrid ink. The small yellow flowers were colored in Lemon Drop and Amber Citrine and the leaves in Soft Garden and Everglade Moss

After done with the stenciling I cut the whole image using the coordinating die. The other panel with the stenciled Sweet Bouquet was for the background. I ink blended the bottom of the panel in pink, cut the panel using the Double Pierced Rectangle A2 Nested die and adhered the panel on a white cardbase. I splattered white opaque ink on the bottom of the background panel and let it dry. 

Next I foam mounted the die cut Sweet Bouquet image on it as shown in the picture. I added white highlights to the stamen of the flowers using a white gel pen. 

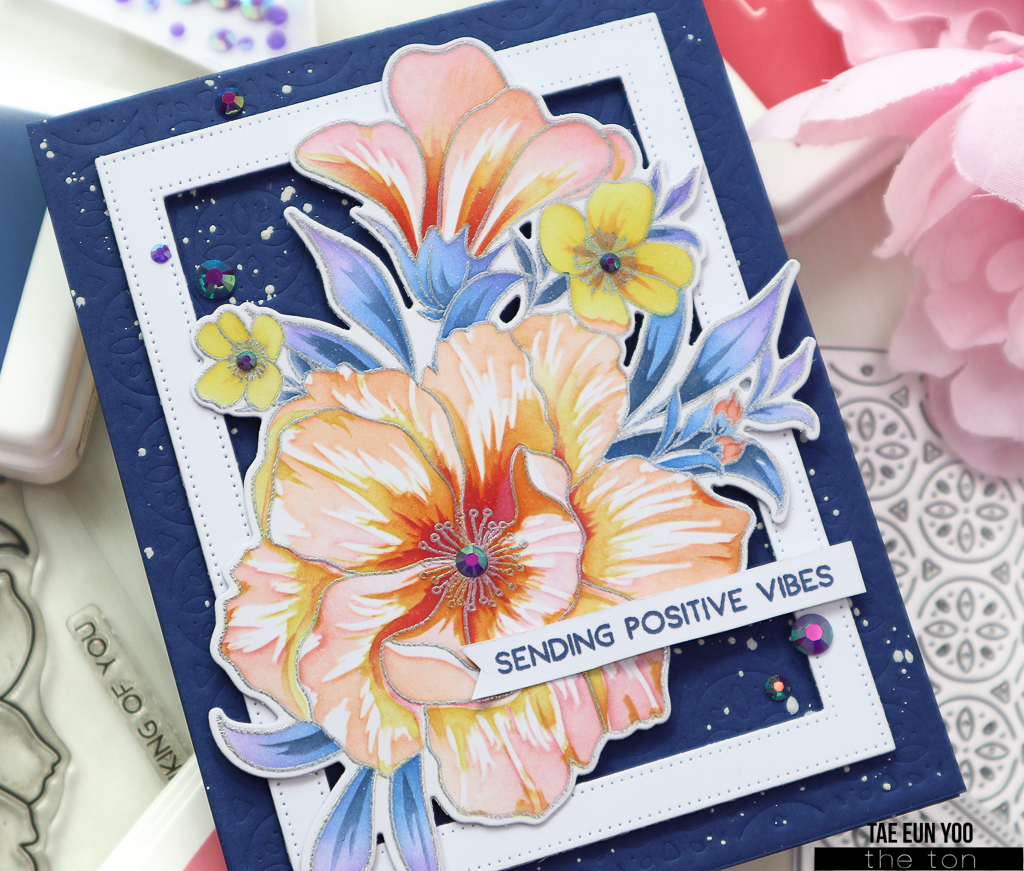
The sentiment is also from the Sweet Bouquet stamp set. To finish off the card I scattered some Soft Pink Gems

That’s it from me! Hope I was able to inspire you with my card today!

Thank you so much!

TaeEun

Warm Floral Bouquet

Hello lovely peeps. Vera here. Hope this post goes up without a hitch as I have to schedule this post in advance. As this post goes up, I’d be exploring Spain with hubby. Spain been on my travel bucket list for a long time and am excited to finally able to visit this beautiful country.

For today’s card I am showing love for some older sets. That’s one of the thing I love about The Ton sets, so many of them are timeless. Whether they were released a year or 3 years ago, or longer, I find myself reaching out to older sets often. Here, I am using Precious Poppies Layering Stencil and Floral Bits 2.

I start by inking up Precious Poppies stencil with Coralline, Coral Cavern, Aspen Cocoa and Ocean Teal. Once done, I die cut the piece using Precious Poppies Coordinating Die. Put aside. Next, I worked on the background panel. For the panel, I used Quilted A2 Coverplate die. I love the dainty dots and the tiny hearts on this panel. Adhere the panel to card base. Next, I adhere the poppies. Once I done that I feel like the card still missing something. So, after looking around, I decided to add a couple flowers from Floral Bits 2. I stamped the flower using Dolled Up & Deep Peony. Finished by adding sentiment from Rose Labels set.

I tend to use soft colors, but am pretty excited at the way this card turned out with its warm colors. Hope you enjoy today’s card and I wish you a wonderful week. Happy Monday all.

Peony Season

Hello, everyone, Anna here today with a floral slimline card I made using beautiful Pretty Peony Close Up Layering Stencils.

I stenciled the peony image with Cherry, Cosmopolitan Pink, Pink Derby and Plum Wine inks. The leaves were colored in Spring Salad. I then fussy cut the flower.

For the background, I ink blended Raw Sea Glass on a slimline card base and adhered a white panel that was cut out with SLIMLINE – Fractured Coverplate Die on it.

The sentiment is from Ribbons General. “Congrats” was stamped in Raw Sea Glass and Everglage Moss and cut out with matching die. Next, I added a few rhinestones from Rhinestones Mixed – Crystal Clear Rainbow to embellish my card.

That’s all from me today! Have a great Friday!

Anna

Darling Dahlia Trifold Card

Hello everyone! Hope you’re doing well! It’s TaeEun here today with a trifold thank you card. I used the huge Darling Dahlia stencils along with the coordinating die set which are large enough to cover a whole A2 sized card.

I started off by stenciling the Darling Dahlia. This stencil set has three layers. I used Bubblegum, Dolled Up and Deep Peony for each layer. I stenciled the center of the dahlia in Pink Derby to make the area darker. I also added blue tone to the flower using Cali Blue, Parisian Blue and Violet Fringe. After the stenciling was done I cut the dahlia with the coordinating die and set it aside. 
The Dahlia Leaves were stenciled in Evergreen and Everglade Moss and cut with the coordinating die

I cut the Darling Dahlia into two pieces. I foam mounted the smaller piece from the dahlia along with three Dahlia Leaves on a side-fold white cardbase and connected the larger piece from the dahlia to the right side of the back of the cardbase using a strip of white cardstock so that I can fold it to cover the front of the card. 

I stamped the sentiment from the Lovely Lily stamp set in Noir on the cardbase next to the dahlia and added a few sequins from the Lilac Blossoms and Disco Spring Couture Mix. 

To keep the trifold card closed I made a horizontal band using a purple striped clear acetate strip. The sentiment on that is from the Sweet Bouquet stamp set. I heat embossed it in Liquid Platinum on a white cardastock and cut it using a die from the Double Pierced Ornate Nested die set. I adhered it on the center of the horizontal band and the card was finished!

That’s it from me! Hope I was able to inspire you with my card today!

Thank you so much!

TaeEun

Watercolor Coming Up Lilies

Hi peeps. How’s it going. Vera here and today I am sharing a card using one of my all time favorite set from The Ton, Coming Up Lilies. I am pretty sure this is one of those set that I’d keep forever, because I love lilies and this one is beautifully designed. Heads up that this post is a short one, since really there’s not that many steps in making this card.

I stamped and heat embossed the image with Rose Gold embossing powder on a watercolor cardstock panel. Watercolor the image with Karin watercolor markers, let dry and then add some splatters by tapping a wet watercolor brush. Once it all dry, trim and adhere the watercolor panel to card base. Next, I stamped and heat embossed a sentiment from Charming Cosmos set.

Adhere the sentiment strip with foam adhesive and voila… I am done. Pretty quick card. It’s simple, but I love the way this card turned out and I hope you like it, too.

Well, that’s all I have for today and I wish you all a lovely weeks. Big hugs!

Peruvian Lilies Birthday Card

Hello, fellow crafters!! Happy Friday!!

I have a bright birthday card to share with you today!!

I began by stamping the image from the Coming Up Peruvian Lilies Stamp Set onto white cardstock with Caviar Ink. I colored it with Copic markers and used the Coordinating Die to cut it out.

For the background, I dry embossed the Geometric Circles Coverplate Die into white cardstock using an embossing mat and my die-cut machine. I trimmed the panel and adhered it to an A2 panel of yellow cardstock, flush with the bottom, right corner. The lily die-cut was adhered with liquid glue.

The sentiment, also from the Coming Up Peruvian Lilies Stamp Set, was white heat embossed onto black cardstock, cut out with the Coordinating Die and popped up with foam tape. A sprinkling of Pale Orange Opaque Gems were the perfect finishing touch.

Thanks so much for stopping by today!! Have a wonderful weekend!!

Brenda

Peony Print card

Hello, everyone! It’s Anna here with a spring birthday card I made using Peony Print Layering Stencils.

I started by stenciling the image with Cherry, Red Sangria, Vanilla Frosted Cupcake, Beach Blondie, Vineyard and Spring Salad inks. Next, I cut it out using Peony Print Coordinating Die. For the background, I ink blended Periwinkle on a white cardstock card base. I adhered the peony image on it.

The sentiment was cut out with Script Word Dies from yellow cardstock and vellum. “Birthday” was stamped on a stripe of cardstock that was colored with Beach Blondie and heat embossed in white. I added a few Crystal Clear Rainbow rhinestones to embellish my card.

Thank you for stopping by today! Happy Wednesday!

Anna