Birthday Fish

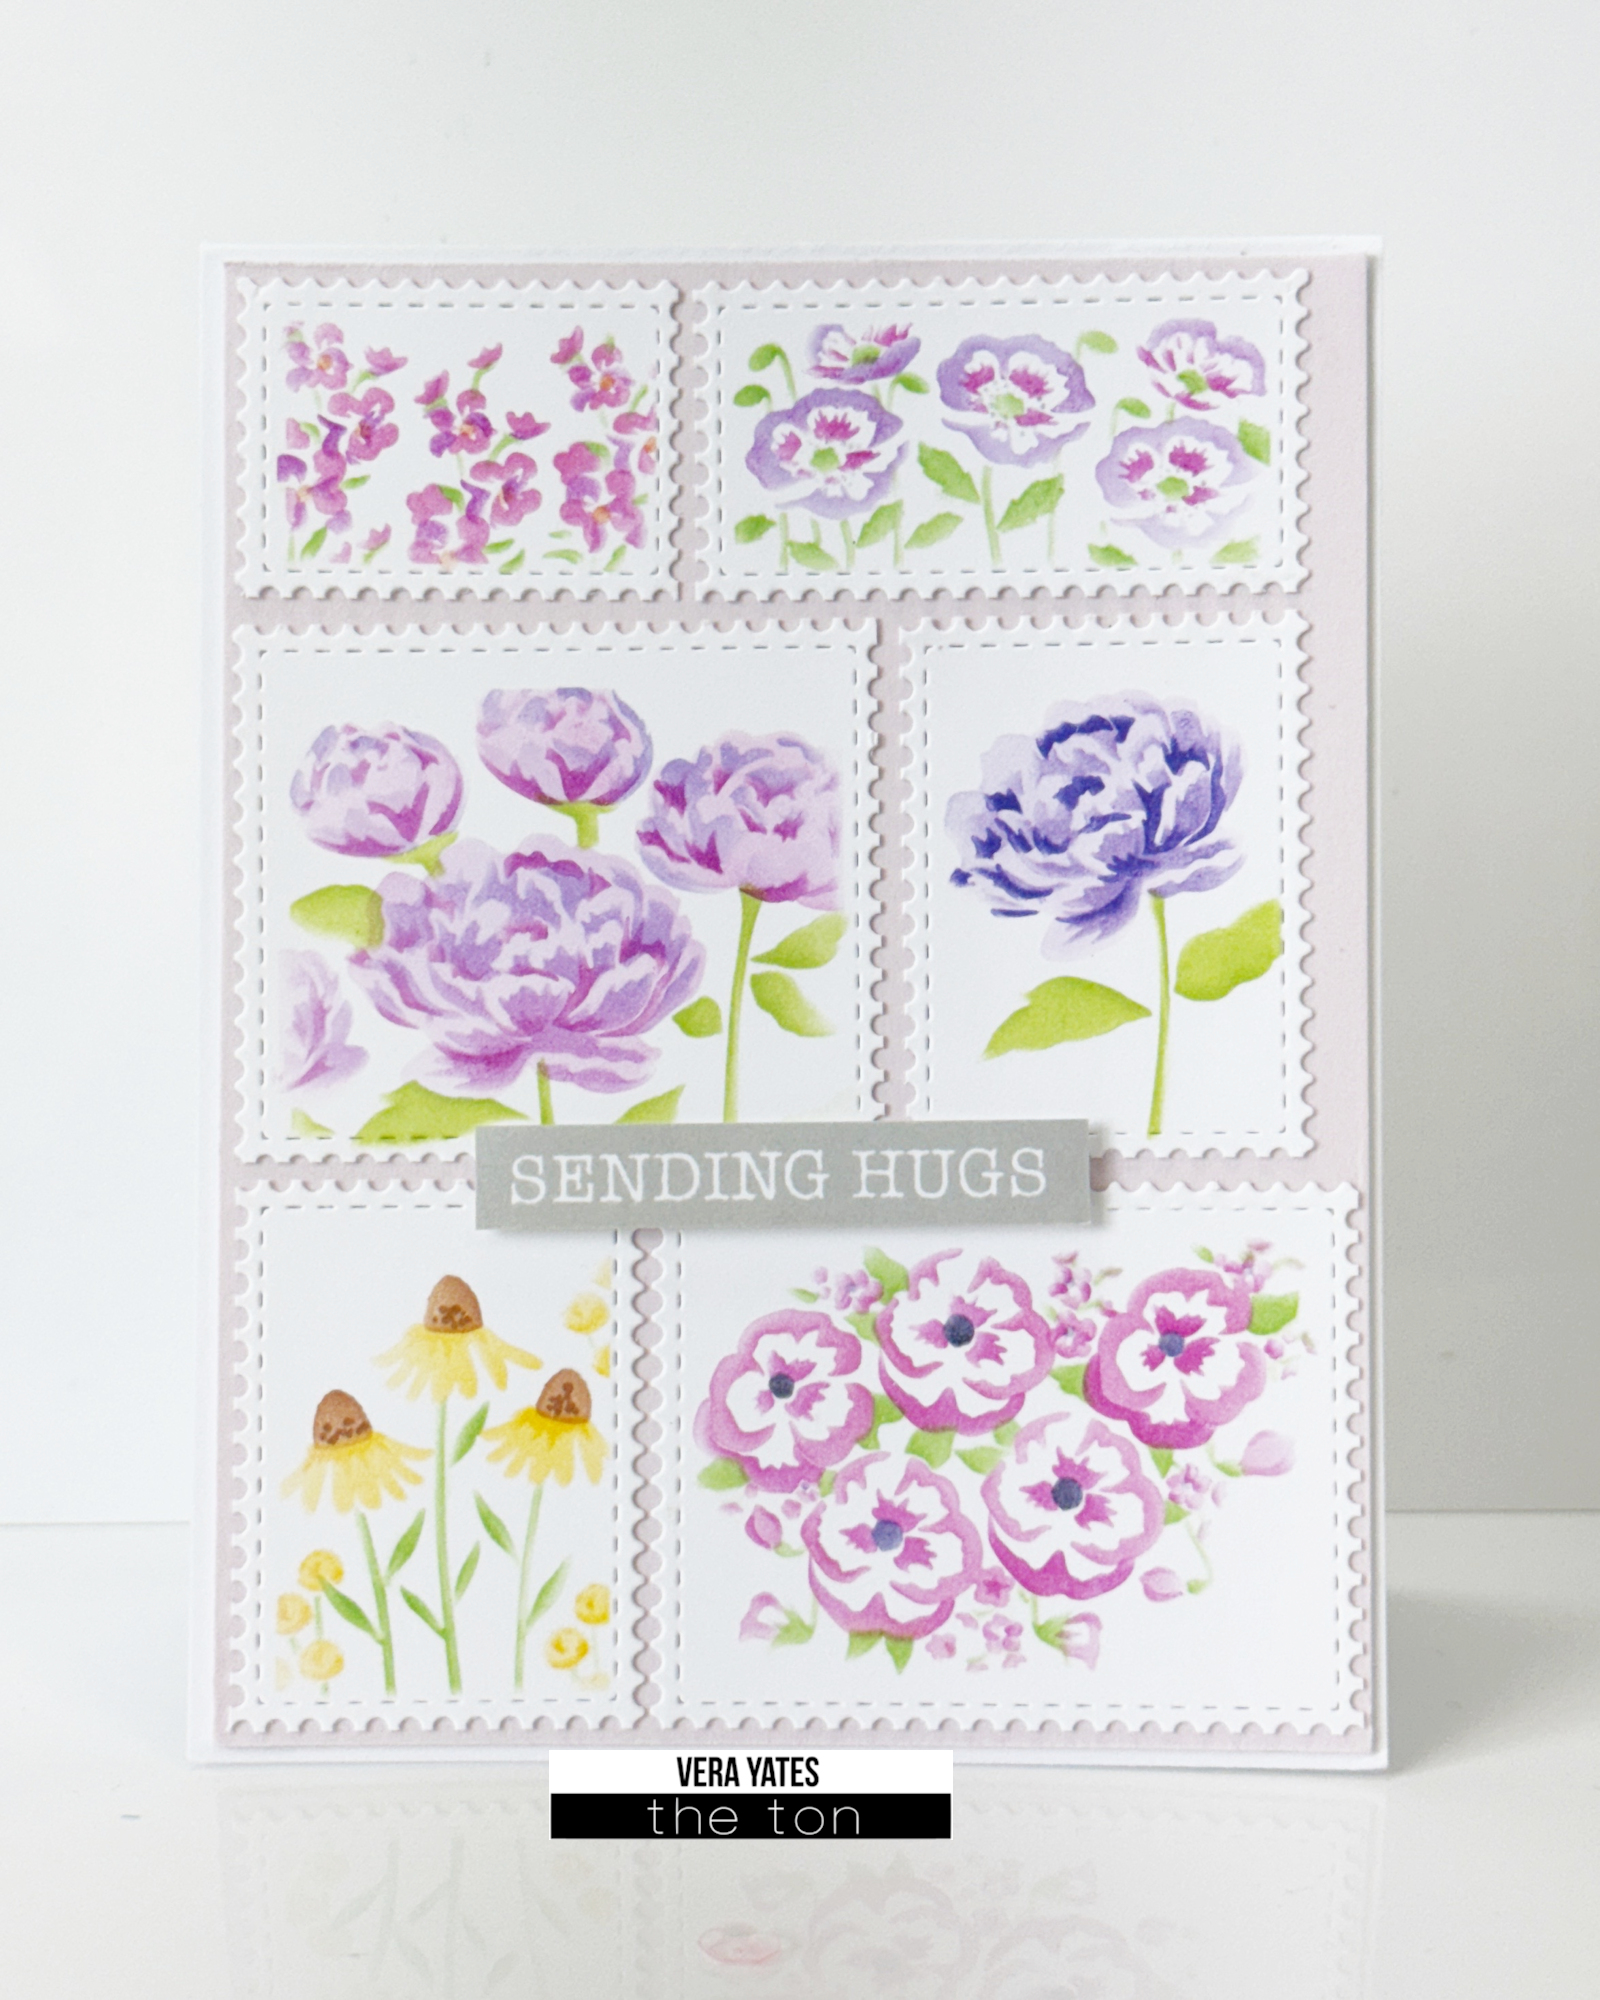
Hi friends. Vera here bringing you inspiration as we’re about to enter the weekend. Today, I am playing with cute & fun Postage Sea set.

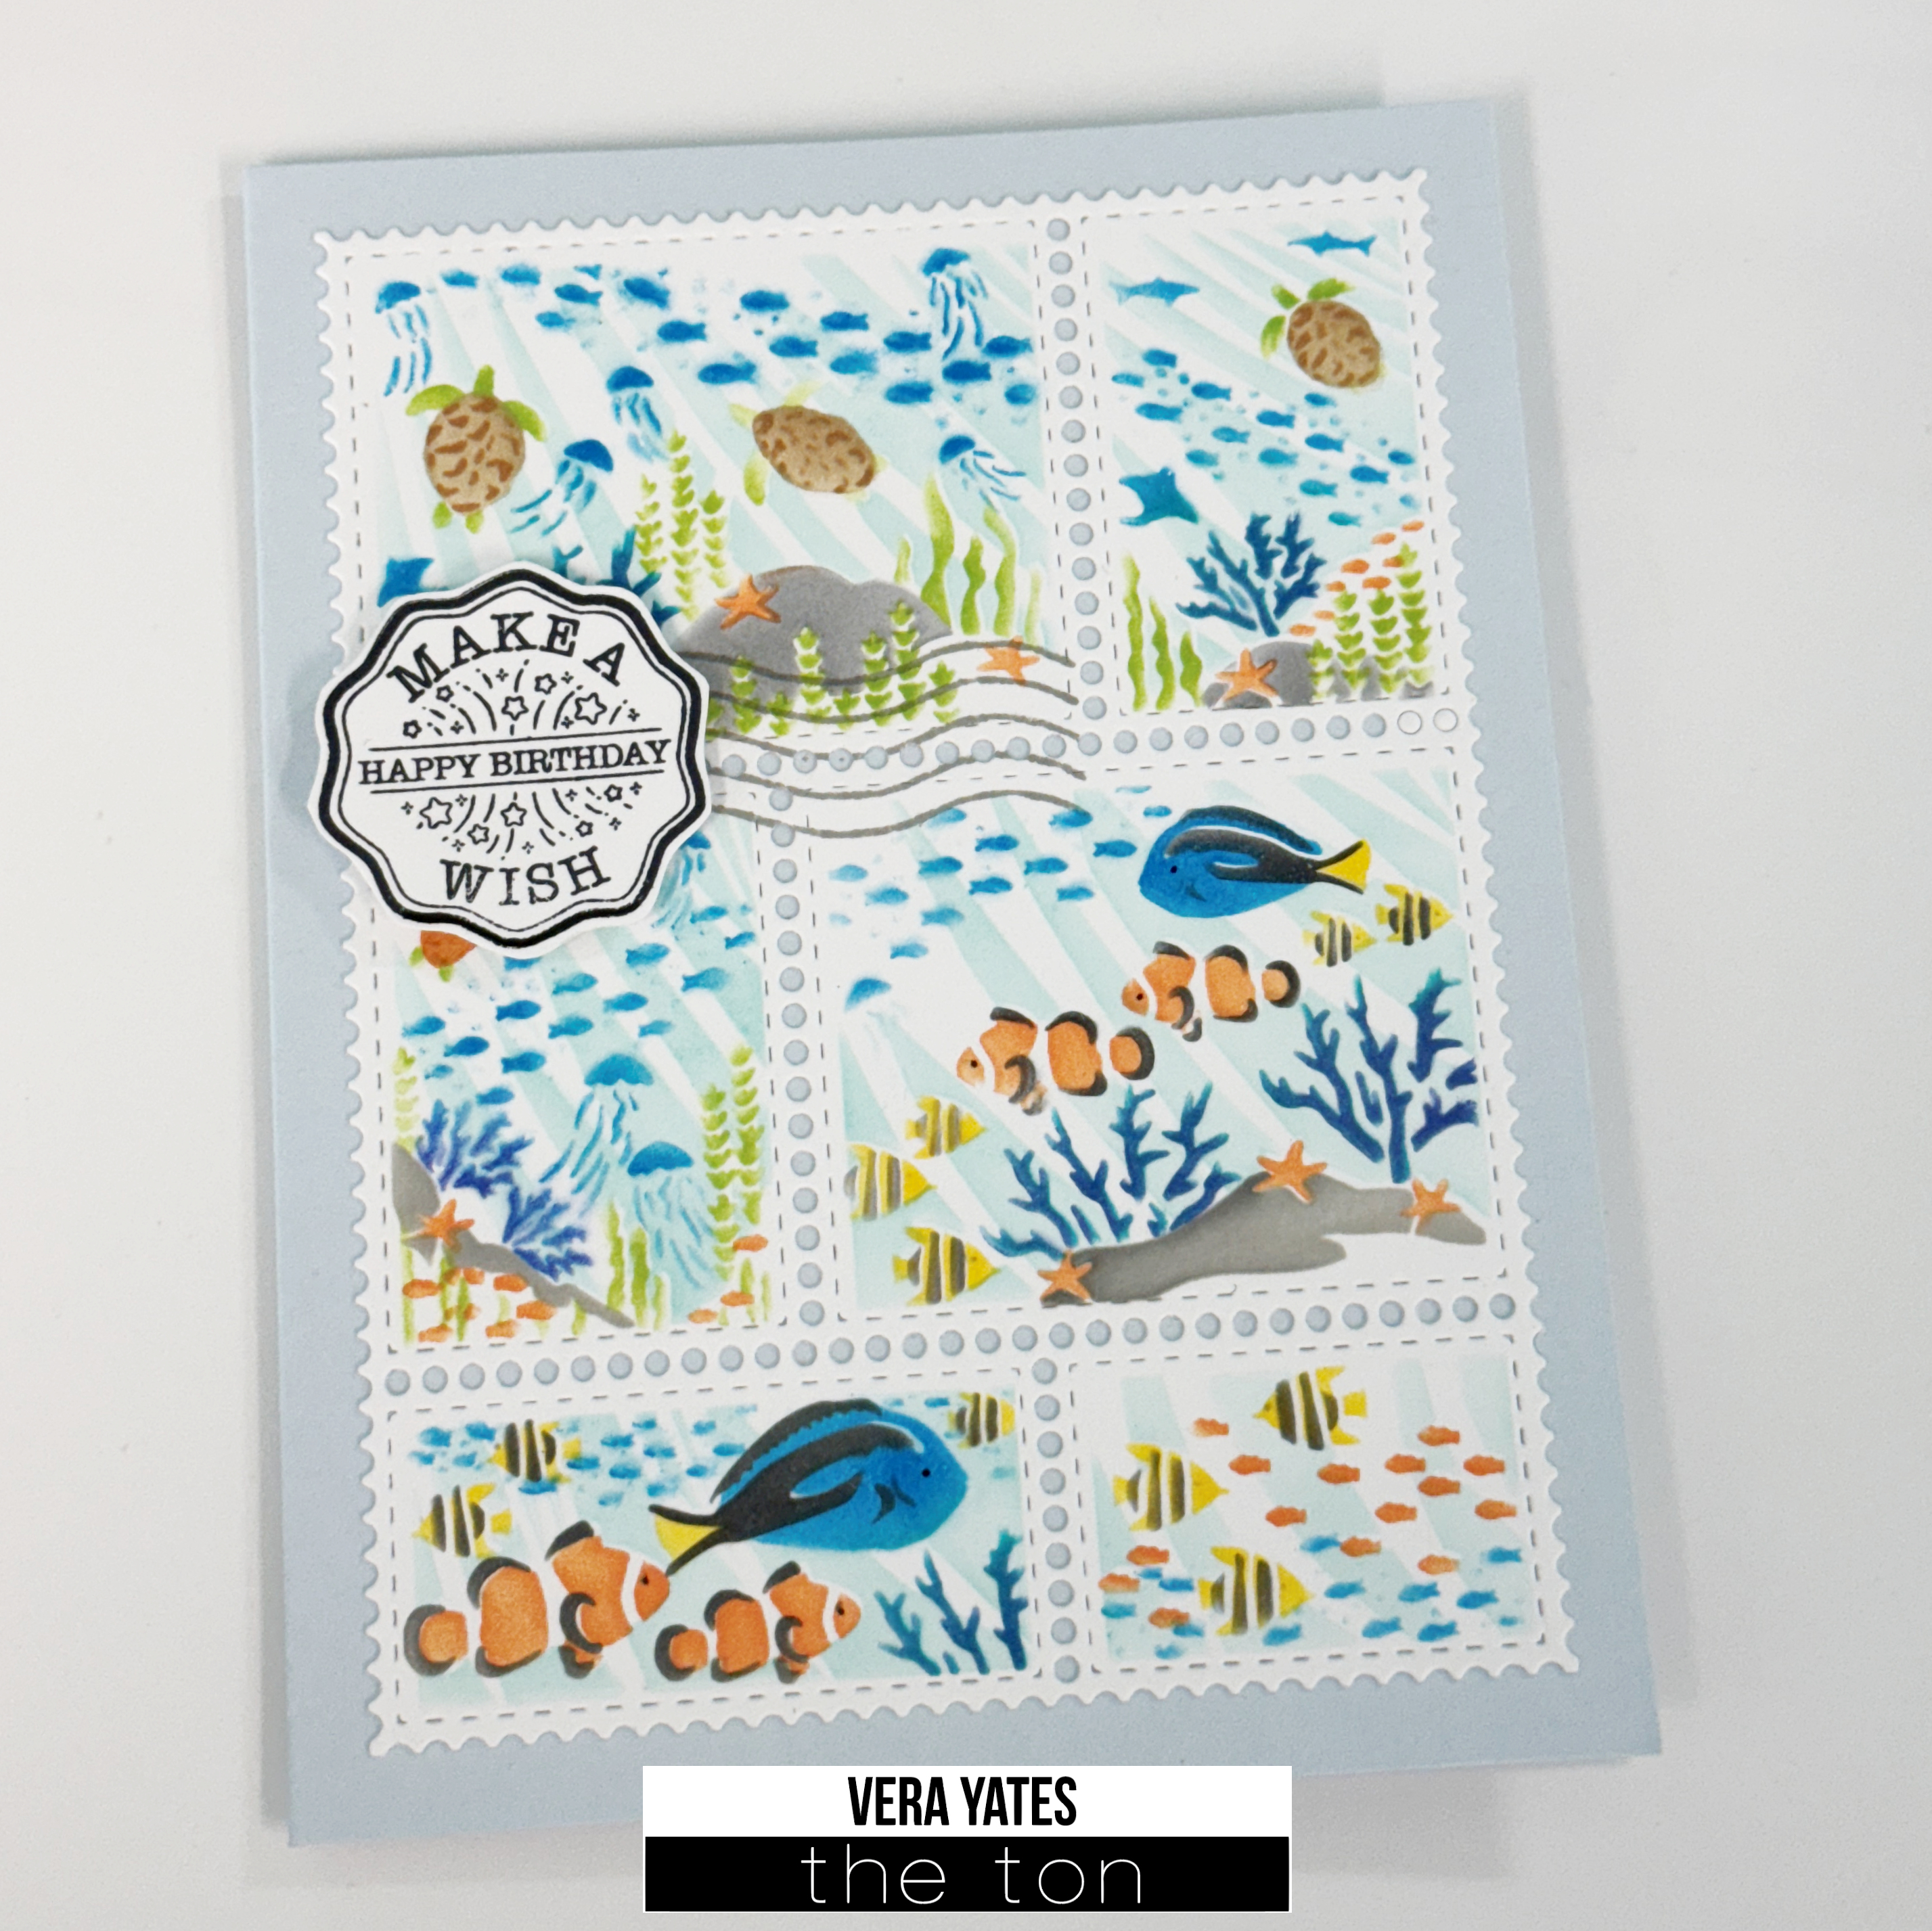
This card is pretty straight forward. I die cut the postage background using Postage Party die set. Then I laid the blank panel on The Ton Grip Mat and layered the stencil on top of it. The mat help keep the stencil in place and I also dab any extra ink on the brush to the mat. For the ocean I used Blue Diamond. For the blue fish I used Parisian Blue and Caviar for the body. For the tail I used Lemon Drop (I also used this color for the yellow and black fish). For the clown fish & starfish I used Coralline and Caviar. For the coral I mixed Parisian Blue with Ocean Teal. For the seaweed I used Meadow. Of course, the beauty of making cards is you can always use your color of choice. Go wild!

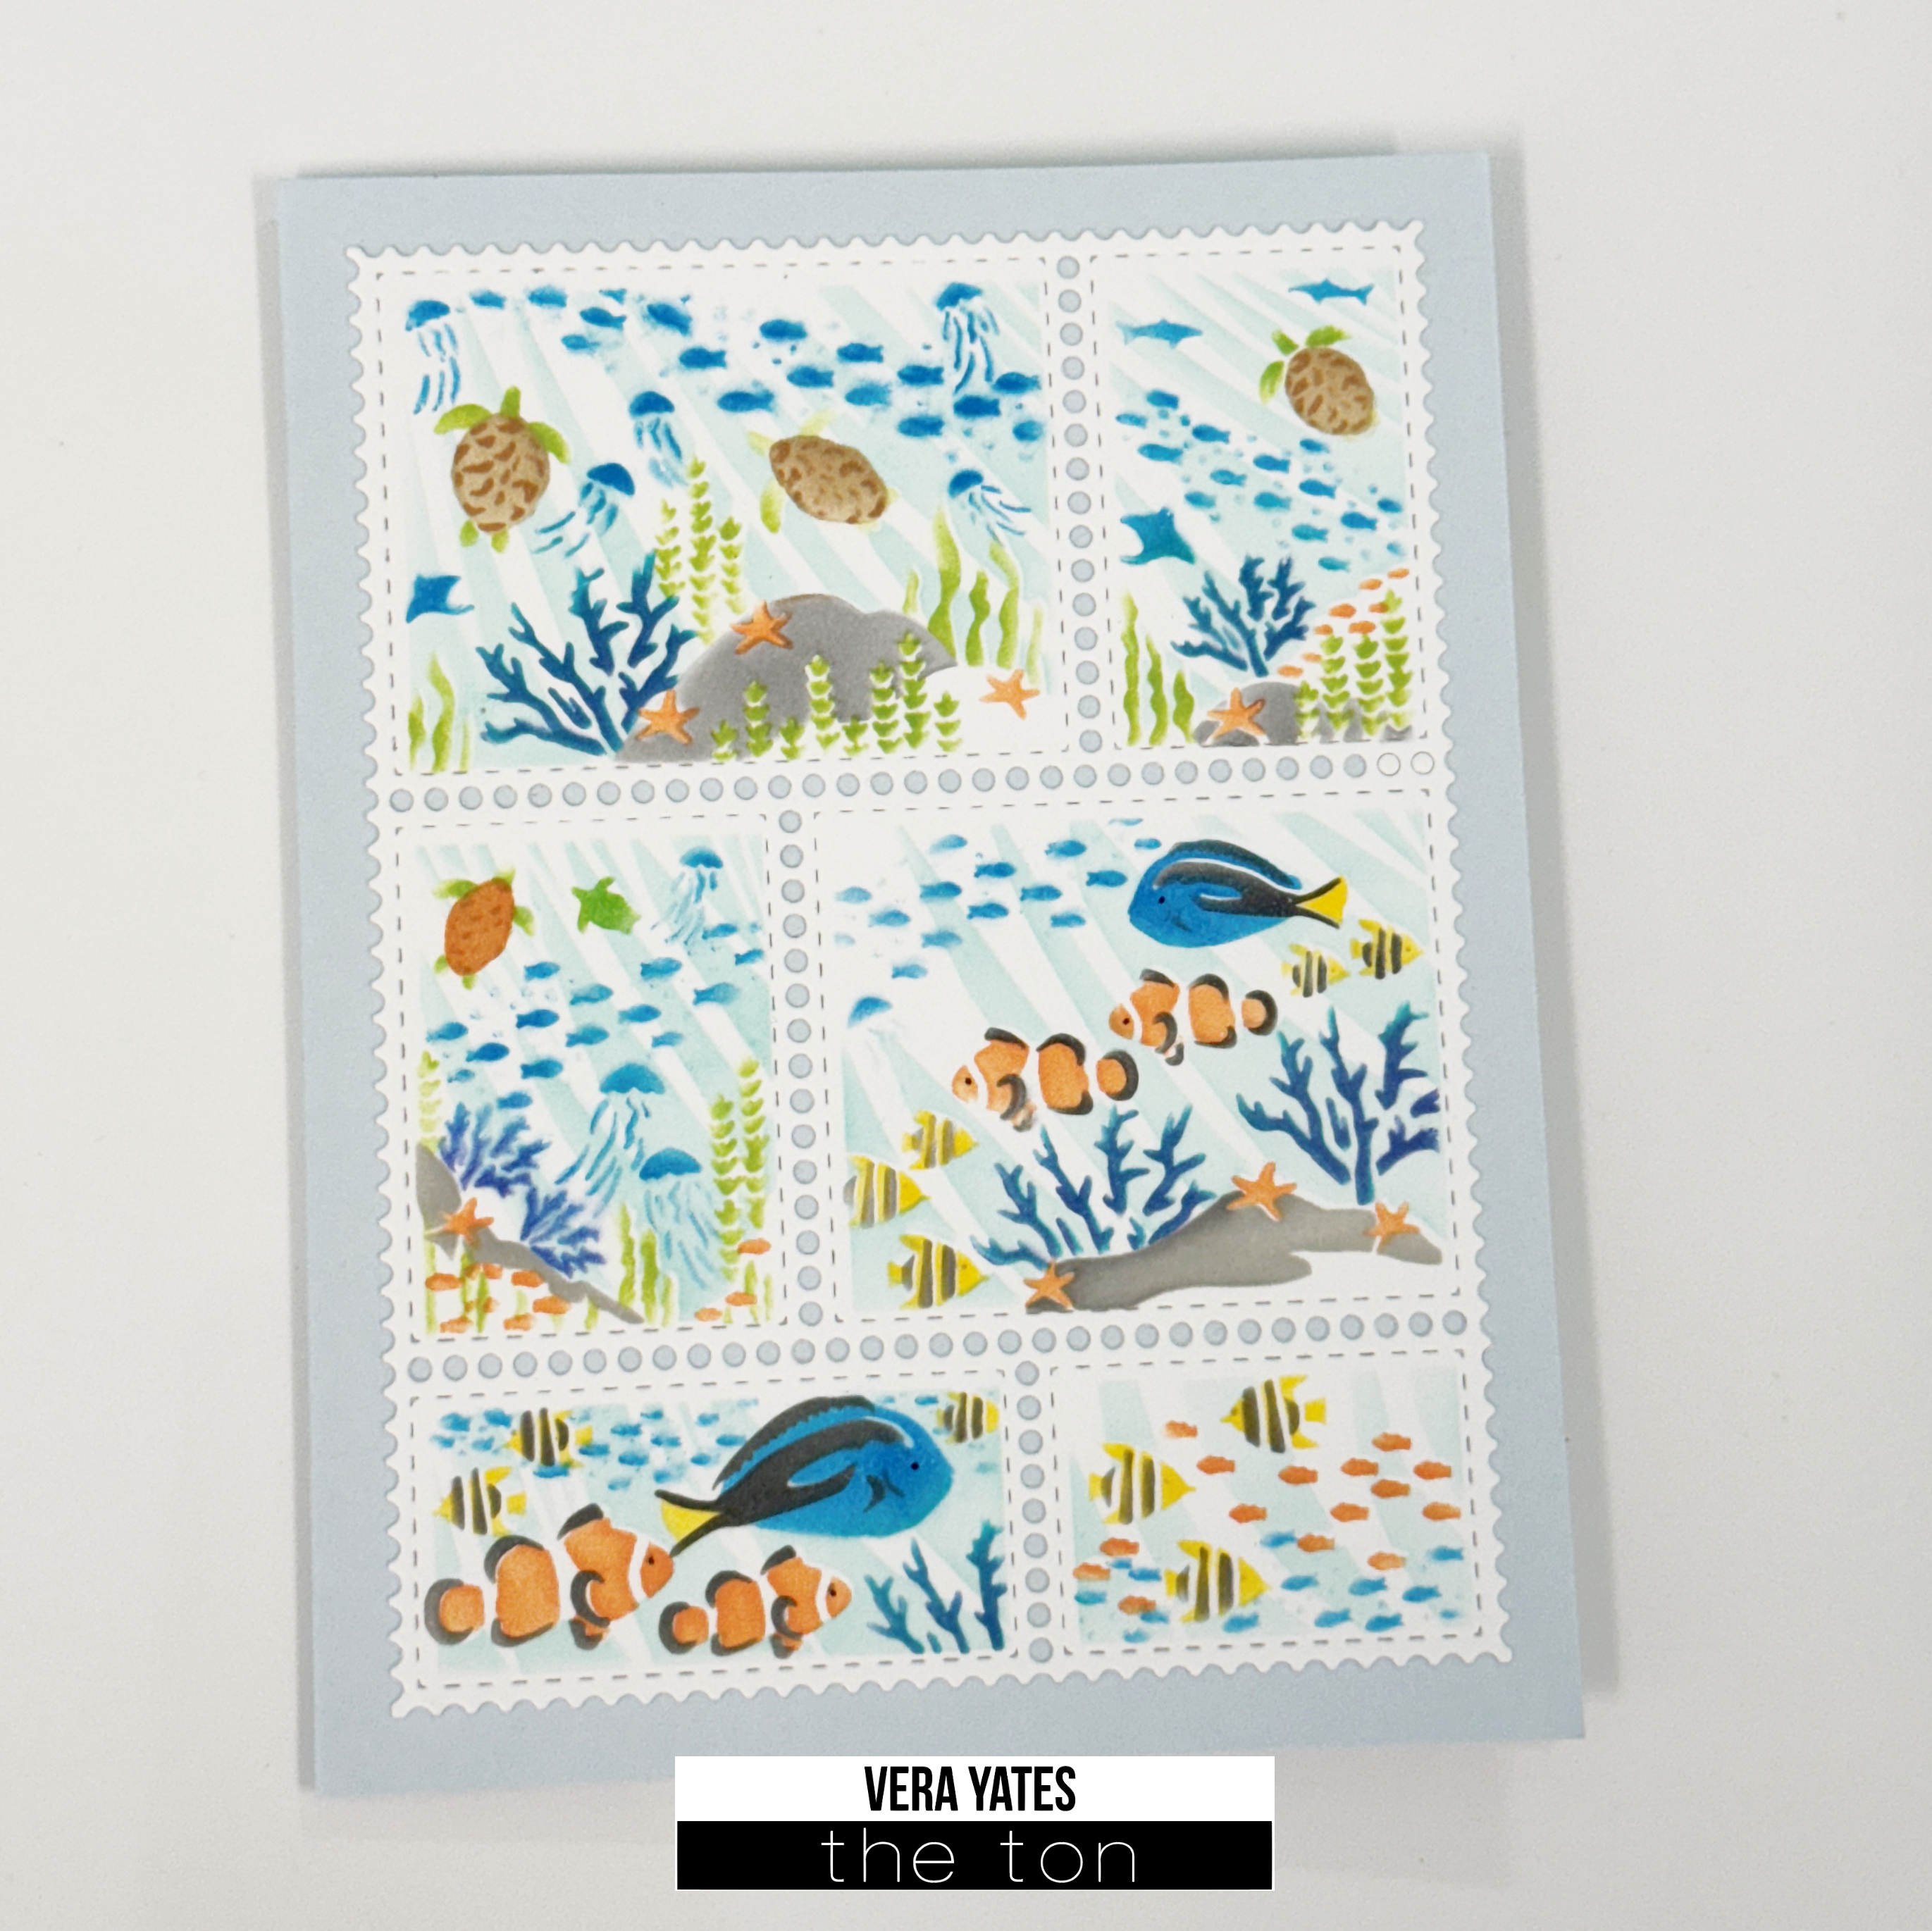
I feel this postage is so pretty just the way it is and no need to add much else. So, I opted to just add the sentiment postage and that’s it. Often less is more in my book. Just a quickie card for me for today. I’ll be back with more fun stuff soon! Till next time, friends.

Many Monsteras Birthday

Hi friends. Vera here. You know, I’ve been designing for The Ton for over 8 years now. And, a couple weekends ago I finally get to meet Effie in person. I was so excited. Am truly glad that now I can say that I’ve met her in person. 🙂 Oh yes, visiting The Ton booth was such a treat. I know The Ton products very well. But, to see so many gorgeous cards lined up on the booth was definitely inspiring. It actually inspire me to get crafty again as I’ve been slacking big time!

Anyway, let’s get on to cards, shall we? I kind of been feeling tropical, so for my card this week, I am showcasing Many Monsteras set.

I just love the way Monsteras leaves look and they made such gorgeous background. To start, I ink blended Hot Tourmaline, Spring Salad, Meadow and Soft Garden on the background panel. Once that done, then I stamped the leaves. I prefer to stamp the image after the blending to keep the image lines looking sharp. Trim the panel and adhere to card base. Finish with my favorite label sentiment from Rose Labels set and as always some enamel drops.

Since I am needing some birthday cards, I figure I just made another card with slight variation on the color. This time I added the deeper Ocean Teal on the bottom right corner of the panel and angle the coloring.

Two pretty quick birthday cards that’s perfect for summer birthday. Hope you enjoy today’s cards and as many of us facing the brutal heat, please stay dehydrated. Maybe sneak some time to get crafty! Till next time!

Cosmos Border Duo

Hi friends. Happy month of June! Vera here to start this month’s inspiration. I just recently started planting Cosmos in my garden. It’s not very successful. However, I figure I can’t fail with paper craft Cosmos. 🙂

For today, I am using Cosmos Border Layering Stencil and made a couple cards.

To start, I inked up the stencil with Bright Emerald, Periwinkle, Soft Orchid, Coralline and Meadow. When I did the ink blending, on purpose I didn’t fill up the whole opening of the flower with 1 color. Instead I like to do partial ink blending with 1 color followed by another. For example, some of the petals are mix of Bright Emerald and Perinwinkle and some of Soft Orchid and Coralline.

Then, I stamped the banner and sentiment from Basic Banners. This specific set already been discontinued, but you can use any banner set you have. Finish by adding some enamel drops.

Since, I already have the stencil out, might as well do a double whammy. Why do only 1, right? My plan was simply switch the color placement. I didn’t wipe my stencil from when I did the 1st card, so, the colors ended up different. It became a bit muddier, but I just keep going. Since it becomes new color (I literally use same inks as previous card), I decided to add Crystal Pewter for the leaves just to keep the muted color theme going.

I am very happy with the way this duo turned out, even if the 2nd card color was unplanned. It was a happy accident. Soft color always have special place in my heart.

I hope you enjoy today’s post and wherever you are I wish that something good happens to you today that makes you smile. Till next time, friends.

Clean and Simple Mother’s Day Cards

Hi friends. Vera here and I have a couple Mother’s Day cards to share. I decided to reach one of my all time favorite set from The Ton, called Coming Lilies.

I went back to my clean and simple style. I was inspired by one of my favorite card maker, Michelle Short. She knows how to rock clean style like nobody business. I started by die cutting the dome shape base using Dome Nested Dies. On one card I ink blended Caribbean Turquoise, Hot Tourmaline & Matcha. The other one I ink blended Grand Fuchsia and Lemon Drop. Stamped Coming Lilies.

Then using craft knife, I cut the notch on t he bottom to create the tag look. For the card above I added heat embossed sentiment from Pragmatic Wreath set (apology that this set already been discontinued).

For the pink card I stamped the sentiment directly on the tag using sentiment from Gladiola Cheer. Adhere tag to card base with foam adhesive.

Finish both card by adding some mix size enamel drops. Clean and simple with a pop of color. I think they’re perfect for Mother’s Day. Friends, I hope you enjoy today’s cards and may your weekend be a good one. Cheers.

Creative Layering with Postage Wildflowers Stencil

Hi friends. Vera here as we’re on the last day of 2025 first quarter. Today, I am showcasing the fun Postage Wildflowers Layering Stencil set. This set is just gorgeous!

To start I die cut the postage frame background using Postage Party die. Once that done, I inked up the stencil. I decided to go colorful and use post-it-note to cover the panel as I color each panel. For the purple flowers I used Dolled Up & Iris Blooms. For the blue flower I used Cali Blue & Azurite. For the pink flower I used Hollywood Star & Grand Fuchsia. I used Meadow for the leaves. I also did some soft ink blending on the bottom of each panel to create hazy green base for the flowers.

Adhere the panel to card base and finish by adding sentiment from layered Floral Alpha Stamps set.

Bonus card. From my previous cards on THIS POST, I have some left over pieces. I decided to use those leftover pieces and mix & match with Postage Wildflowers Layering Stencil. Here. I finished the card with sentiment from Rose Labels set.

There you go, a couple cards to start your week. Hope you enjoy the cards as much as I enjoy making them. Wishing you all a lovely weeks. May something good happened to you this week that bring smiles to your heart. Till next time, friends. Cheers….

Palatial Peonies

Hi friends. Happy Wednesday. Vera here. I am excited to share my cards for today as I just love the way they turned out. Today, I am showcasing the newly released Palatial Peonies Layering Stencils.

To start I inked up the stencil with Grand Fuchsia, Plum Wine, Coralline, Meadow & Matcha ink. For the very last layer for the flower, instead of ink, I used transfer gel to add silver foil. In person, this add a little shimmer to the card without overwhelming it. You can see a short reel of the card on my Instagram post (you can find me under: wirianta). Finish with sentiment from Rose Labels set and some mix size enamel drops.

I love the way this card turned out, that I decided to create another version. Pretty much I repeat the same step as above, except I didn’t use Coralline ink on the card below.

I love the way The Ton keep delighting me with their gorgeous flower sets. After all, flower is timeless in my book. I hope you enjoy today’s cards and be inspire to carve a little time to create. Till next time friends. Cheers.

Floral Damask Duo

Hi friends. Vera here. Today, I am showcasing one of the new set from The Ton, Floral Damask Layering Stencil set.

To start, I inked up the panel above with Parisian Blue, Hot Tourmaline and Periwinkle.

Trim panel and adhere to card base. Stamped sentiment from Fancy Script set and die cut it with Coordinating Fancy Script dies. Adhere the sentiment with foam adhesive.

For my next card, I repeat the same steps above and this time make a horizontal card.

When I showed this card to hubby, he said it reminded him of Greece because of the pattern and color. I’ll take that since Greece is one of my favorite place I’ve visited.

Hope you enjoy today’s cards and may you find some times to get crafty this weekend. Till next time, friends.

Gentle Peonies

Hi friends. Vera here. I was organizing my craft room this weekend and going through The Ton collection on my stash. It dawned on me that by October this year, I’d be with The Ton for 10 years! How crazy is that? And, yes, I still have some sets from way back then.

With the economy right now, I know many of us trying to stretch our stash. So, I thought for today, I am sharing some oldies that I still love. I hope this also encourage you to look at your stash with new ideas. Here, I mix and match several sets to create this card below.

To start, I inked up Gentle Peonies Layering dies with various inks. I used Hot Tourmaline, Meadow, Violet Fringe, Plum Wine, Soft Ash, Smoky Quartz & Lemon Drop. It might look like I used more colors, but I am not. I simply start with very light touch for the first layer and added more ink and pressure as I go through the next and the next layers.

Once done, I trimmed the paper. Hah… I almost didn’t want to. It looks so pretty just the way it is. Anyway, I trimmed it, adhere to card base and stamped sentiment from Baroque Frame set.

If you want, you could just stop here. I decided to take another step, by stamping the outline from this Peony set that I believe was from 2nd of 3 year from The Ton. I should have checked, but I don’t think this set is available anymore. But, you get the idea. Basically you can use any flower outline set that you have on your stash.

I do feel like when you take the time to go through your old stash, it almost felt like going shopping. I saw some sets where I was like oooh, I forgot I had this set. It makes me excited all over again to use them. Hope you enjoy today’s card and I wish you all a lovely day. Till next time.

Single Sunflower

Hi there crafty friends. Vera here. Today I am sharing a sunflower card featuring Single Sunflower Stencil set.

I started by stenciling the flower image using Frosted Cupcake, Lemon Drop, Beach Blondie for the petals and Aspen Cocoa for the center. For the leaves I used Matcha & Meadow. Finish with the coloring, I die cut the flower using Coordinating Single Sunflower dies. Put aside and cut and embossed the background using Wood Planks dies. Adhere all the woodplank pieces to card base, followed by the sunflower. Finished by creating sentiment from Easy Expression stamp set and coordinating die.

That’s all for me today. Hope you get to do some fun crafting this week. Till next time.

Thank You Poppies

Hi friends. Happy Monday. Vera here. Today I want to share a card that’s mixing the old with the new. My card below showcasing the new Diamond Quilted A2 Coverplate & the older set called Precious Poppies Layering Stencil set.

I am really into blending 2-3 colors in a flower lately and here I decided to paired up Coral Cavern for the inside of the flower with Beach Blondie & Coralline for the outer part of the flower. For the leaves I used Meadow & Evergreen & Smoky Quartz for the center of the flower.

Done with the coloring, I die cut the piece using Coordinating Precious Poppies die. Adhere the quilted panel to card base. Next, simply arrange the flower on it. For the sentiment, I used a sentiment from Urban Jungle set that I stamped with Noir ink.

I hope you enjoy this card. Hopefully somehow in my small way I can inspire you to get crafty. Thank you for stopping by here. Till next time.