Rose Duo Layering Stencils

Hello and Happy Friday, everyone! It’s TaeEun here today with a stenciled floral card featuring the Rose Duo Layering Stencils. This set includes four stencils: three layers for the roses and three layers for the leaves, which create a beautifully detailed rose cluster.

First, I cut white cardstock using the Rose Duo coordinating die and then stenciled the image.  I think this method makes it much easier to align than the other way around. 

I stenciled the roses and leaves in two tones. I placed the die cut white cardstock on the Grip Mat and the first stencil to color the first layer of the roses in Peach Blossom and Bubblegum. The first layer of the leaves was stenciled in Matcha and Warm Hazelnut. The second and the third layer of the roses and the leaves are on the same stencil, so I covered the leaves with a piece of paper when applying ink to the rose part, and vice versa. The second layer of the roses was stenciled in Dolled Up and Amber Citrine, and the second layer of the leaves in Spring Salad and Found Topaz. For the third layer of the roses, I used Deep Peony and Coralline hybrid ink, and for the leaves, Everglade Moss and Aspen Cocoa

For a subtle background, I lightly ink blended the front of a white cardbase in Peach Blossom and Matcha and adhered the white die cut Geo Triangles coverplate to it. 

The sentiment is from the Script Notes set. I heat embossed the Scripted part in gold and stamped the sub-sentiment in Noir. The die cut sentiment was then added to the card using foam tape. 

As an embellishment, I picked some Bright Gold Opaque rhinestones. 

Thank you so much for stopping by! I hope you like my card 🙂 !

Have a wonderful weekend!

TaeEun

Climbing Hibiscus Layering Stencils

Hello, everyone! Hope you’re having a lovely weekend! It’s TaeEun here today with a stenciled hibiscus card. I used the Climbing Hibiscus layering stencils to create my card. There is a coordinating outline stamp called Coming Up Hibiscus. However, I didn’t use it to give my card a no-line coloring look. You can achieve this easily using the layering stencils !

To start, I first cut white cardstock using the Climbing Hibiscus coordinating die. I placed it on the Grip Mat and began stenciling. It’s much easier to align the stencils, if you have the shape already cut. I stenciled the center of the flowers in pink and the tips of the petals in coral-orange. For the first layer I used Bubblegum and Peach Blossom, and for the second layer, Deep Peony and Coralline hybrid ink. The third layer was stenciled in Pink Derby. I stenciled the stamen in orange, and the leaves were colored in Matcha. I added a bit of Everglade Moss to the leaves for some depth. I also shaded the darkest part of the flowers using a dark pink colored pencil. 

To create the background, I first stenciled a white panel using the Abstract Clouds stencil in Soft Ash, Cali Blue and Soft Amethyst. After stenciling, I dry embossed the panel with the Geo Triangles coverplate die and glued it onto a white cardbase. 

The Climbing Hibiscus image was then foam mounted to the background. 

The sentiment is from the Coming Up Hibiscus stamp set. I stamped it in Noir and cut it using the coordinating die. I cut it once again from some purple cardstock and layered it under the sentiment die cut piece, slightly shifted. 

I finished off the card with a few Dark Purple Opaque rhinestones.

Thank you so much for stopping by! 

I hope I was able to inspire you with my card today!

TaeEun

Lovely Peony

Hello everyone! Hope the new week is off to a great start for you all! It’s TaeEun here today, sharing a floral card featuring the Lovely Peony Layering dies and Geo Triangles coverplate die from The Ton. The Ton offers several floral layering die designs that look gorgeous when completed !

I watercolored some lightweight watercolor paper in pink using three different shades and a piece of watercolor paper in green with some areas darker than the rest. 

Next, I die cut the three layers of the flowers and two layers of the leaves from the colored watercolor paper using the Lovely Peony Layering dies . Lastly, I cut the outline from some white cardstock. 

I then started assembling the die cut layers. First, I stacked the three layers of the flowers and added the white outline on the top. Then, I added the leaves and the buds to the outline. I set the assembled die cut flower aside.

To create the background, I die cut the Geo Triangles coverplate from some white cardstock. To match the background color with the peony, I ink blended the center of the die cut Geo Triangles in Dolled Up and the center of a pink cardbase in Cherry and Bubblegum

I splattered opaque white and pink ink on the cardbase and let it dry. 

After the cardbase was dry, I foam mounted the Geo Triangles panel on it and added the die cut flower to it using foam tape. 

The sentiment is from the Easy Expressions Just Because set. I gold heat embossed the scripty part and stamped the other part in Noir and die cut it using the coordinating die.

To add some bling to the card, I scattered some Soft Pink Gems on the card. 

I hope you enjoyed looking at my card today!

Thank you so much for stopping by!

TaeEun

New Background Dies

Hello everyone! Hope you’re having a great week so far! It’s TaeEun here today with three floral cards! I used all the new die sets from the Winter 2023 Die Release to create the backgrounds of my cards ! And, of course, the main floral images are showcasing the new floral layering stencils.

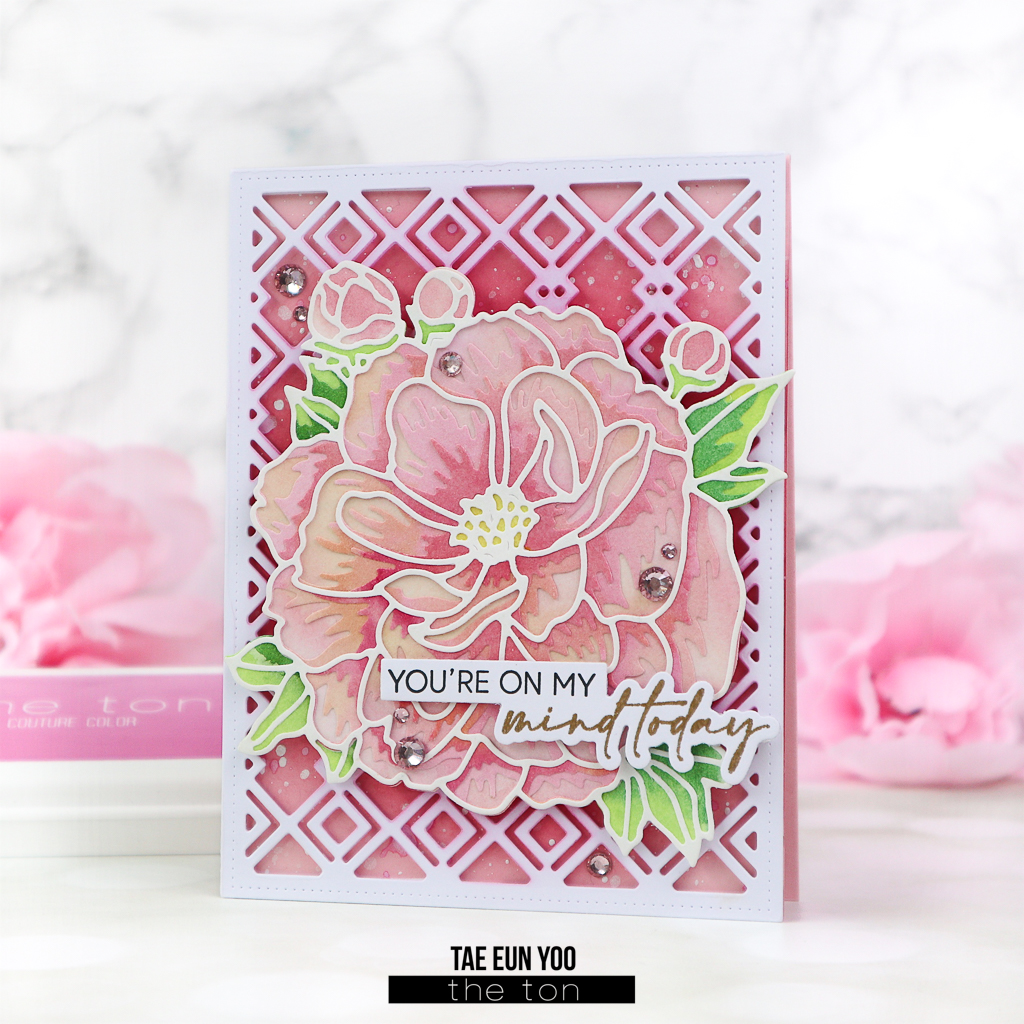
The first card features the Heartfelt Blossoms layering stencils and the Geo Triangles Coverplate die from the new Releases. The Heartfelt Blossoms layering stencils coordinate with the Heartfelt Blossoms stamp and the coordinating die from a previous release.

For a crispy look, I stamped the Heartfelt Blossoms stamp image in Noir and clear heat embossed it afterward by stamping the image again in an embossing ink.

I then stenciled the image. For the three layers of the flowers I used Bubblegum, Dolled Up and Lipstick Red. The berries were stenciled in Parisian Blue and Violet Fringe, and the leaves in Meadow and Everglade Moss. For the leaves and the first layer of the berries, I mixed the two colors mentioned above to give them some depth.

Once done with the stenciling, I cut the image using the Coordinating die and set it aside.

To create the background, I first watercolored an A2 sized mixed media paper loosely in light pink and light green and adhered it to a white cardbase. I then covered the base with a white Geo Triangles Coverplate panel using some foam tape and placed the stenciled image on it.

The sentiment is from the Easy Expressions Just Because set. I stamped a part in Noir and heat embossed the scripty part in gold. The die cut sentiment was added to the card using foam tape.

I scattered some Bright Gold Opaque rhinestones, and the card was done!

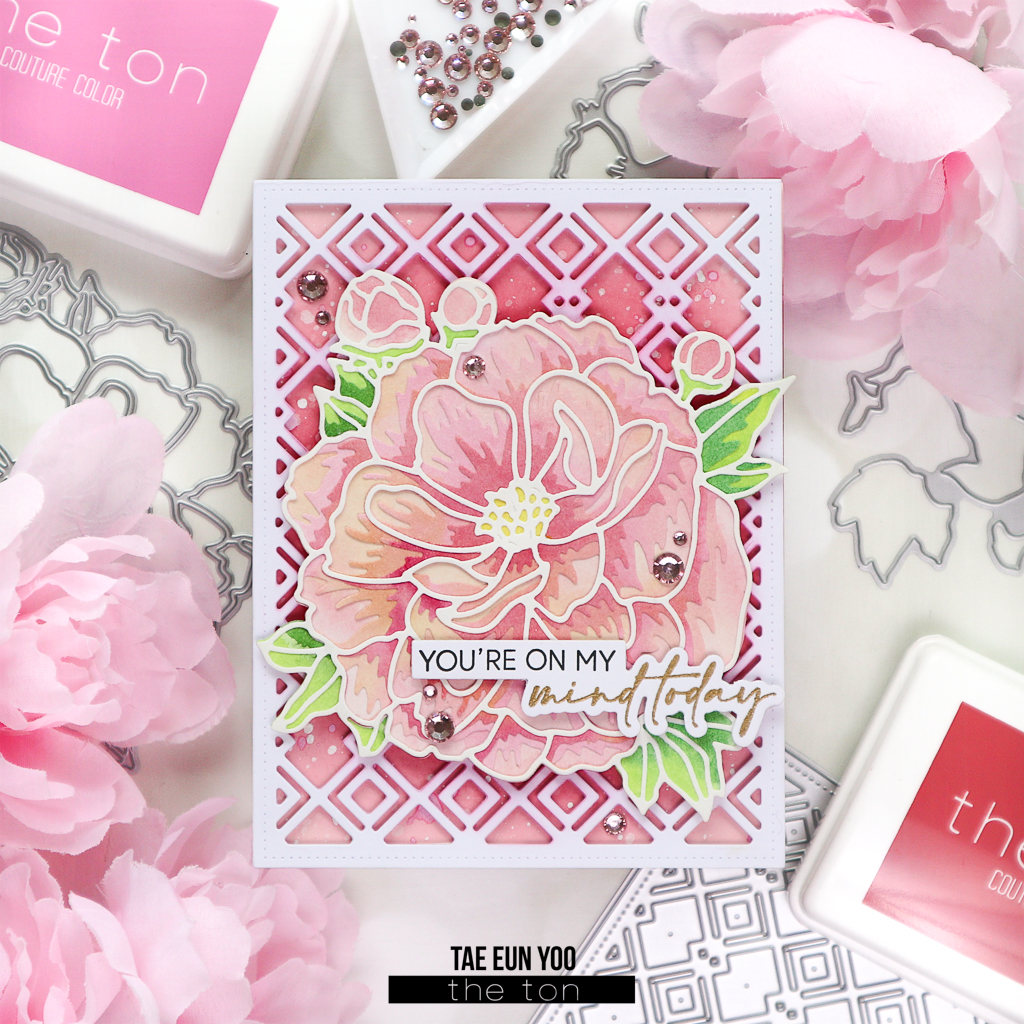
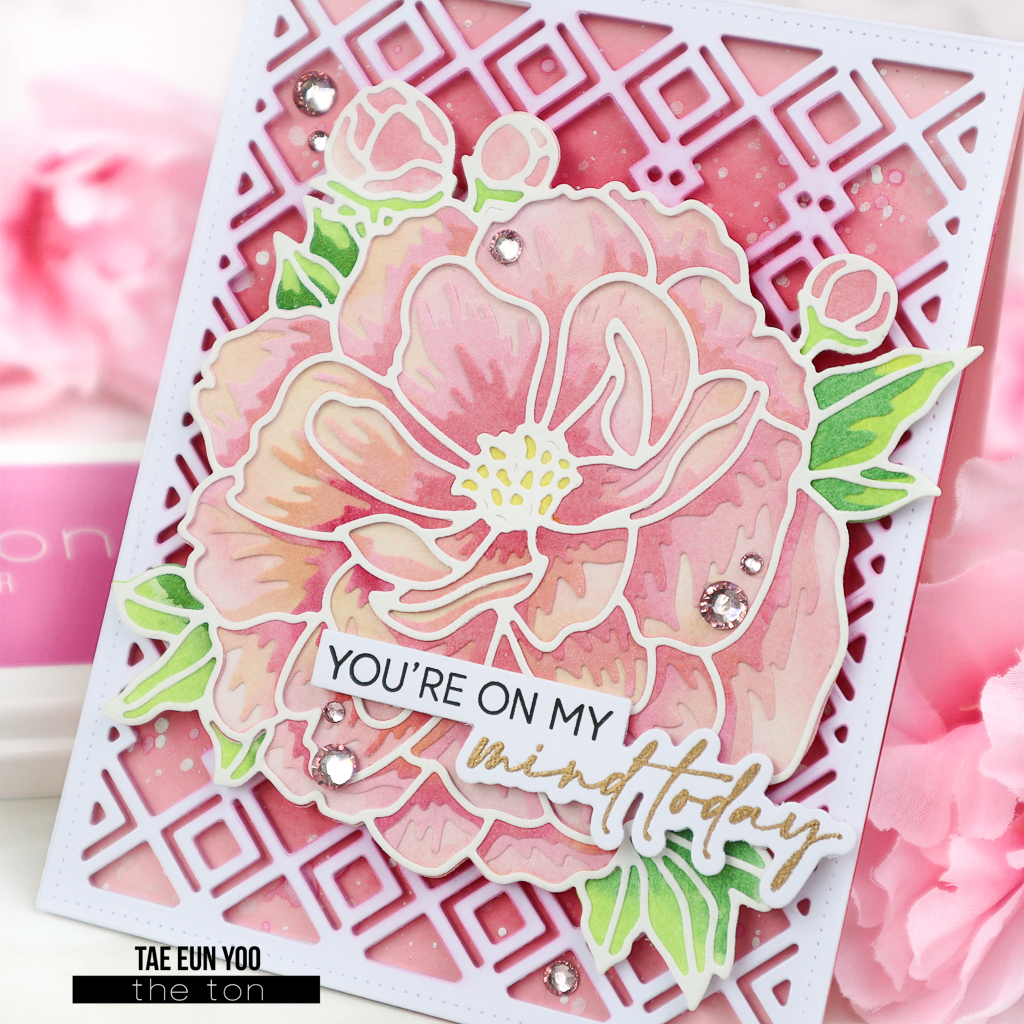
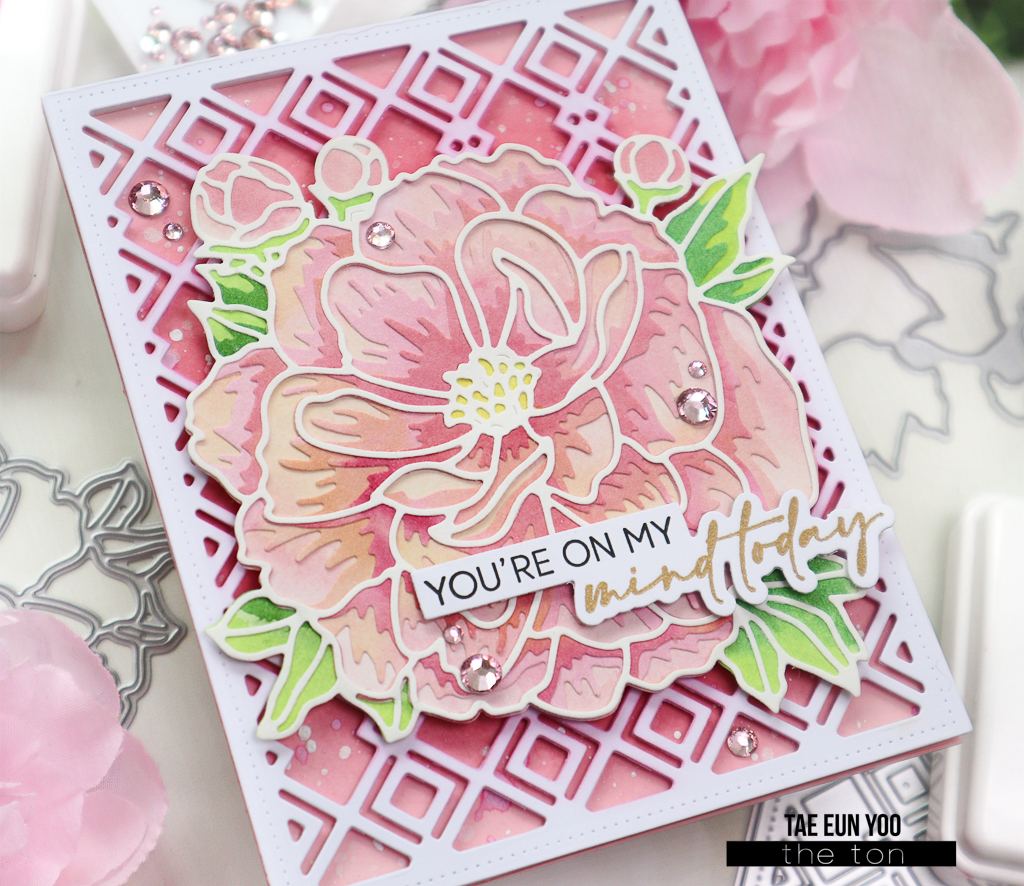
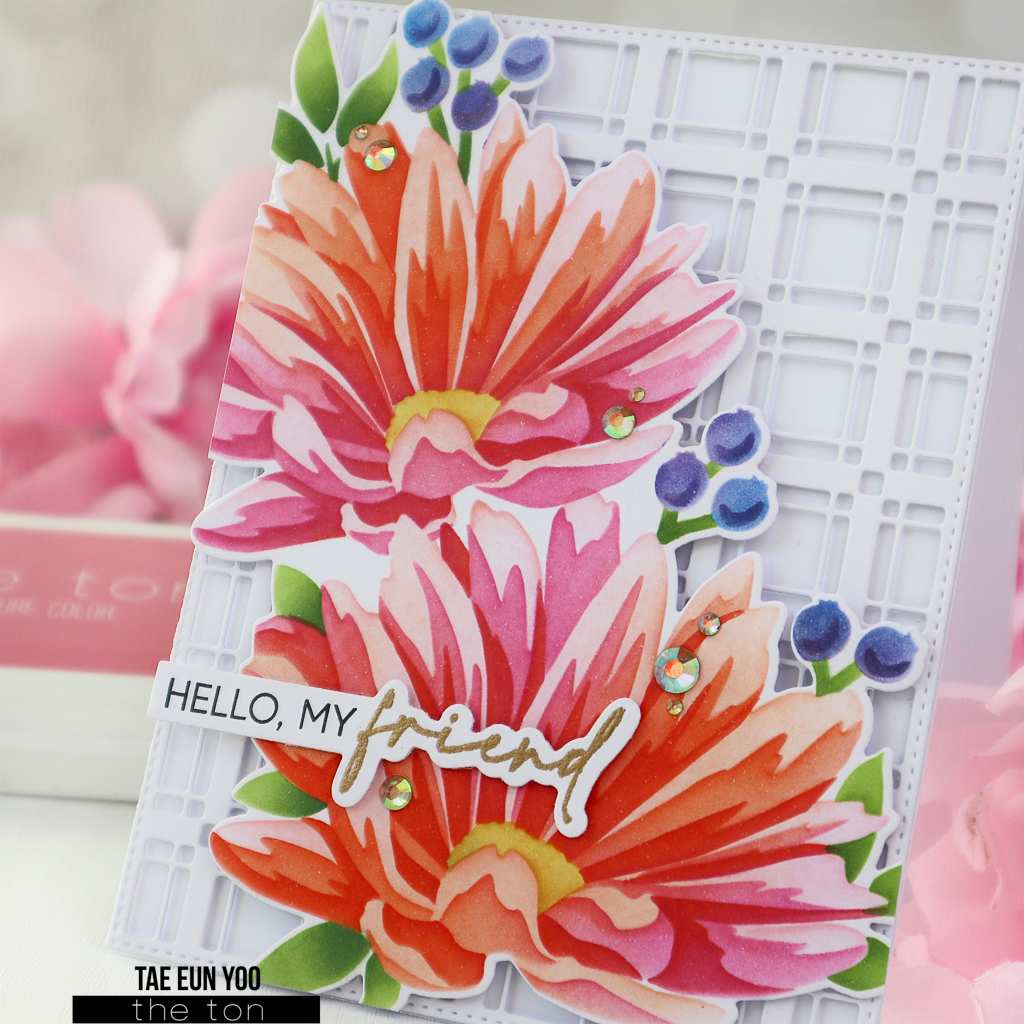
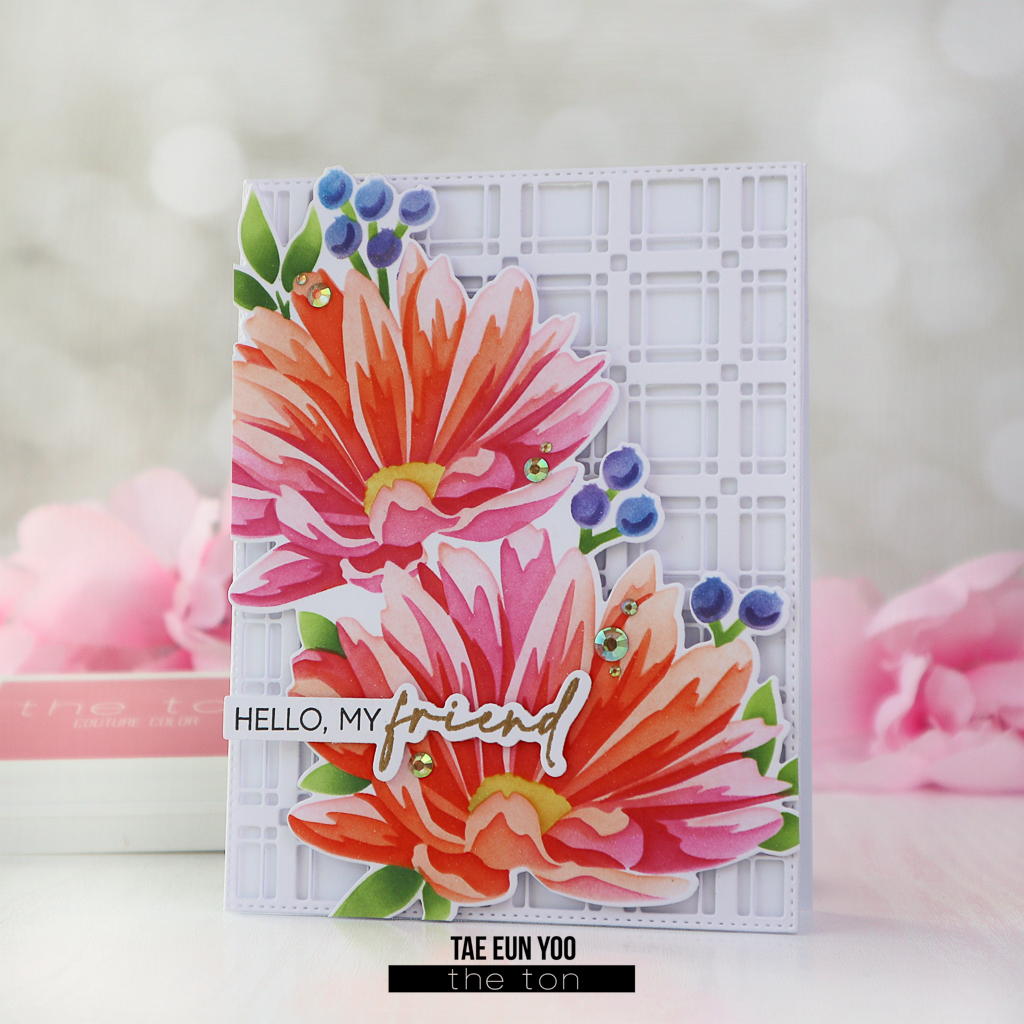
The second card is showcasing the Lively Cosmos Layering stencils and the Single Plaid Coverplate die.

I started by stenciling the Lively Cosmos on some white cardstock with the help of the Grip Mat. The Grip Mat is a must-have tool for stenciling that makes it a lot easier !

I stenciled the flowers in two tones: orange and pink using Peach Blossom, Coralline hybrid, Bubblegum, Dolled Up and Deep Peony. For the berries, I used Cobalt Breeze and Violet Fringe ,and for the leaves, Meadow and Everglade Moss. The center of the flowers was stenciled in Lemon Drop. I added a bit of dark shade to the base using Amber Citrine. I then cut the image using the coordinating die.

For this card I chose a white on white background. So, I cut the Single Plaid panel in white and foam mounted it on a white cardbase. I used a sentiment from the Easy Expressions Just Because set for this card like the first one.

Some Gold Rainbow Opaque rhinestones were my finishing touch for this one.

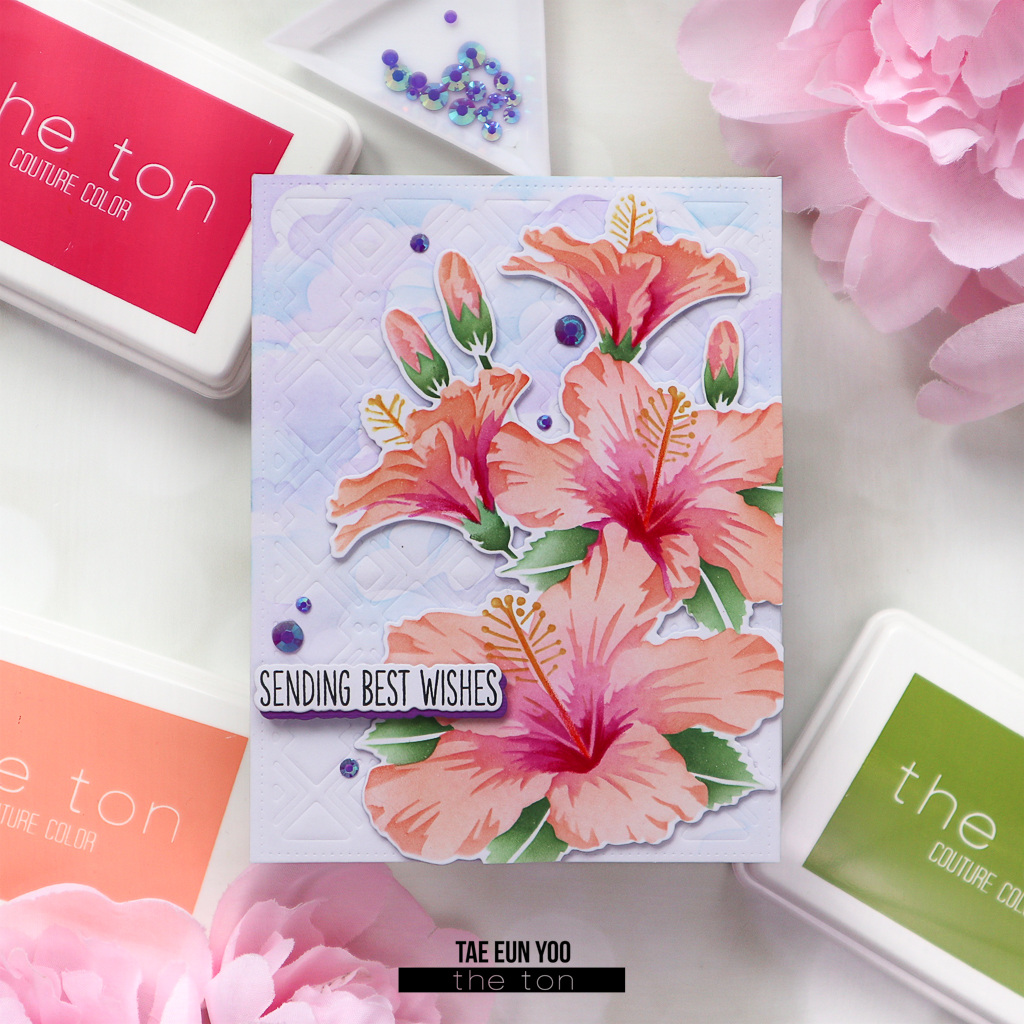
The next card features the Delightful Wildflowers layering stencils from the new release. This stencil set coordinates with the Delightful Wildflowers stamp and the coordinating die. The arch background features the Sand Dollar Coverplate die, the Dome Frames Slim Borders coverplate die and the Dome Nested Dies.

To begin, I white heat embossed the flowers, berries and leaves from the Delightful Wildflowers stamp set on some white cardstock. I heat embossed the leaves and the berries several times to get multiple elements for my floral arrangement.

Next, I stenciled the images. For the flowers I used Lemon Drop, Amber Citrine, Peach Blossom and Coralline hybrid ink. For the berries, I used Lipstick Red and Pink Derby, and for the leaves, Meadow and Everglade Moss. The flowers are in three layers. I used four inks to stencil the flowers to make one flower lighter than the other one. After I was done with the stenciling I cut the images using the coordinating die and set them aside.

Here also I made a white on white background. This time I used the Sand Dollar, the Dome Frames Slim Border Coverplate die and the Dome Nested Dies. First I cut a white panel using the Sand Dollar coverplate die and cut it again using a die from the Dome Nested Die set. The matching white dome frame was cut using the Dome Frames Slim Border Coverplate die. I adhered the dome frame on the die cut Sand Dollar piece and foam mounted it on a white cardbase.

After that, I arranged the flowers, leaves and berries on the background panel as shown in the picture.

The sentiment is from the Blooming Hibiscus set. I stamped it in Noir and die cut using the coordinating die. The final touch for this card was some Crystal Clear Rainbow rhinestones.

Please check out the Winter 2023 Die Release post to see all the details on the new dies!

Thank you so much for stopping by! I hope you enjoyed looking my cards and could get some inspiration for your next crafting session 🙂 !

TaeEun