Blooming Shelves

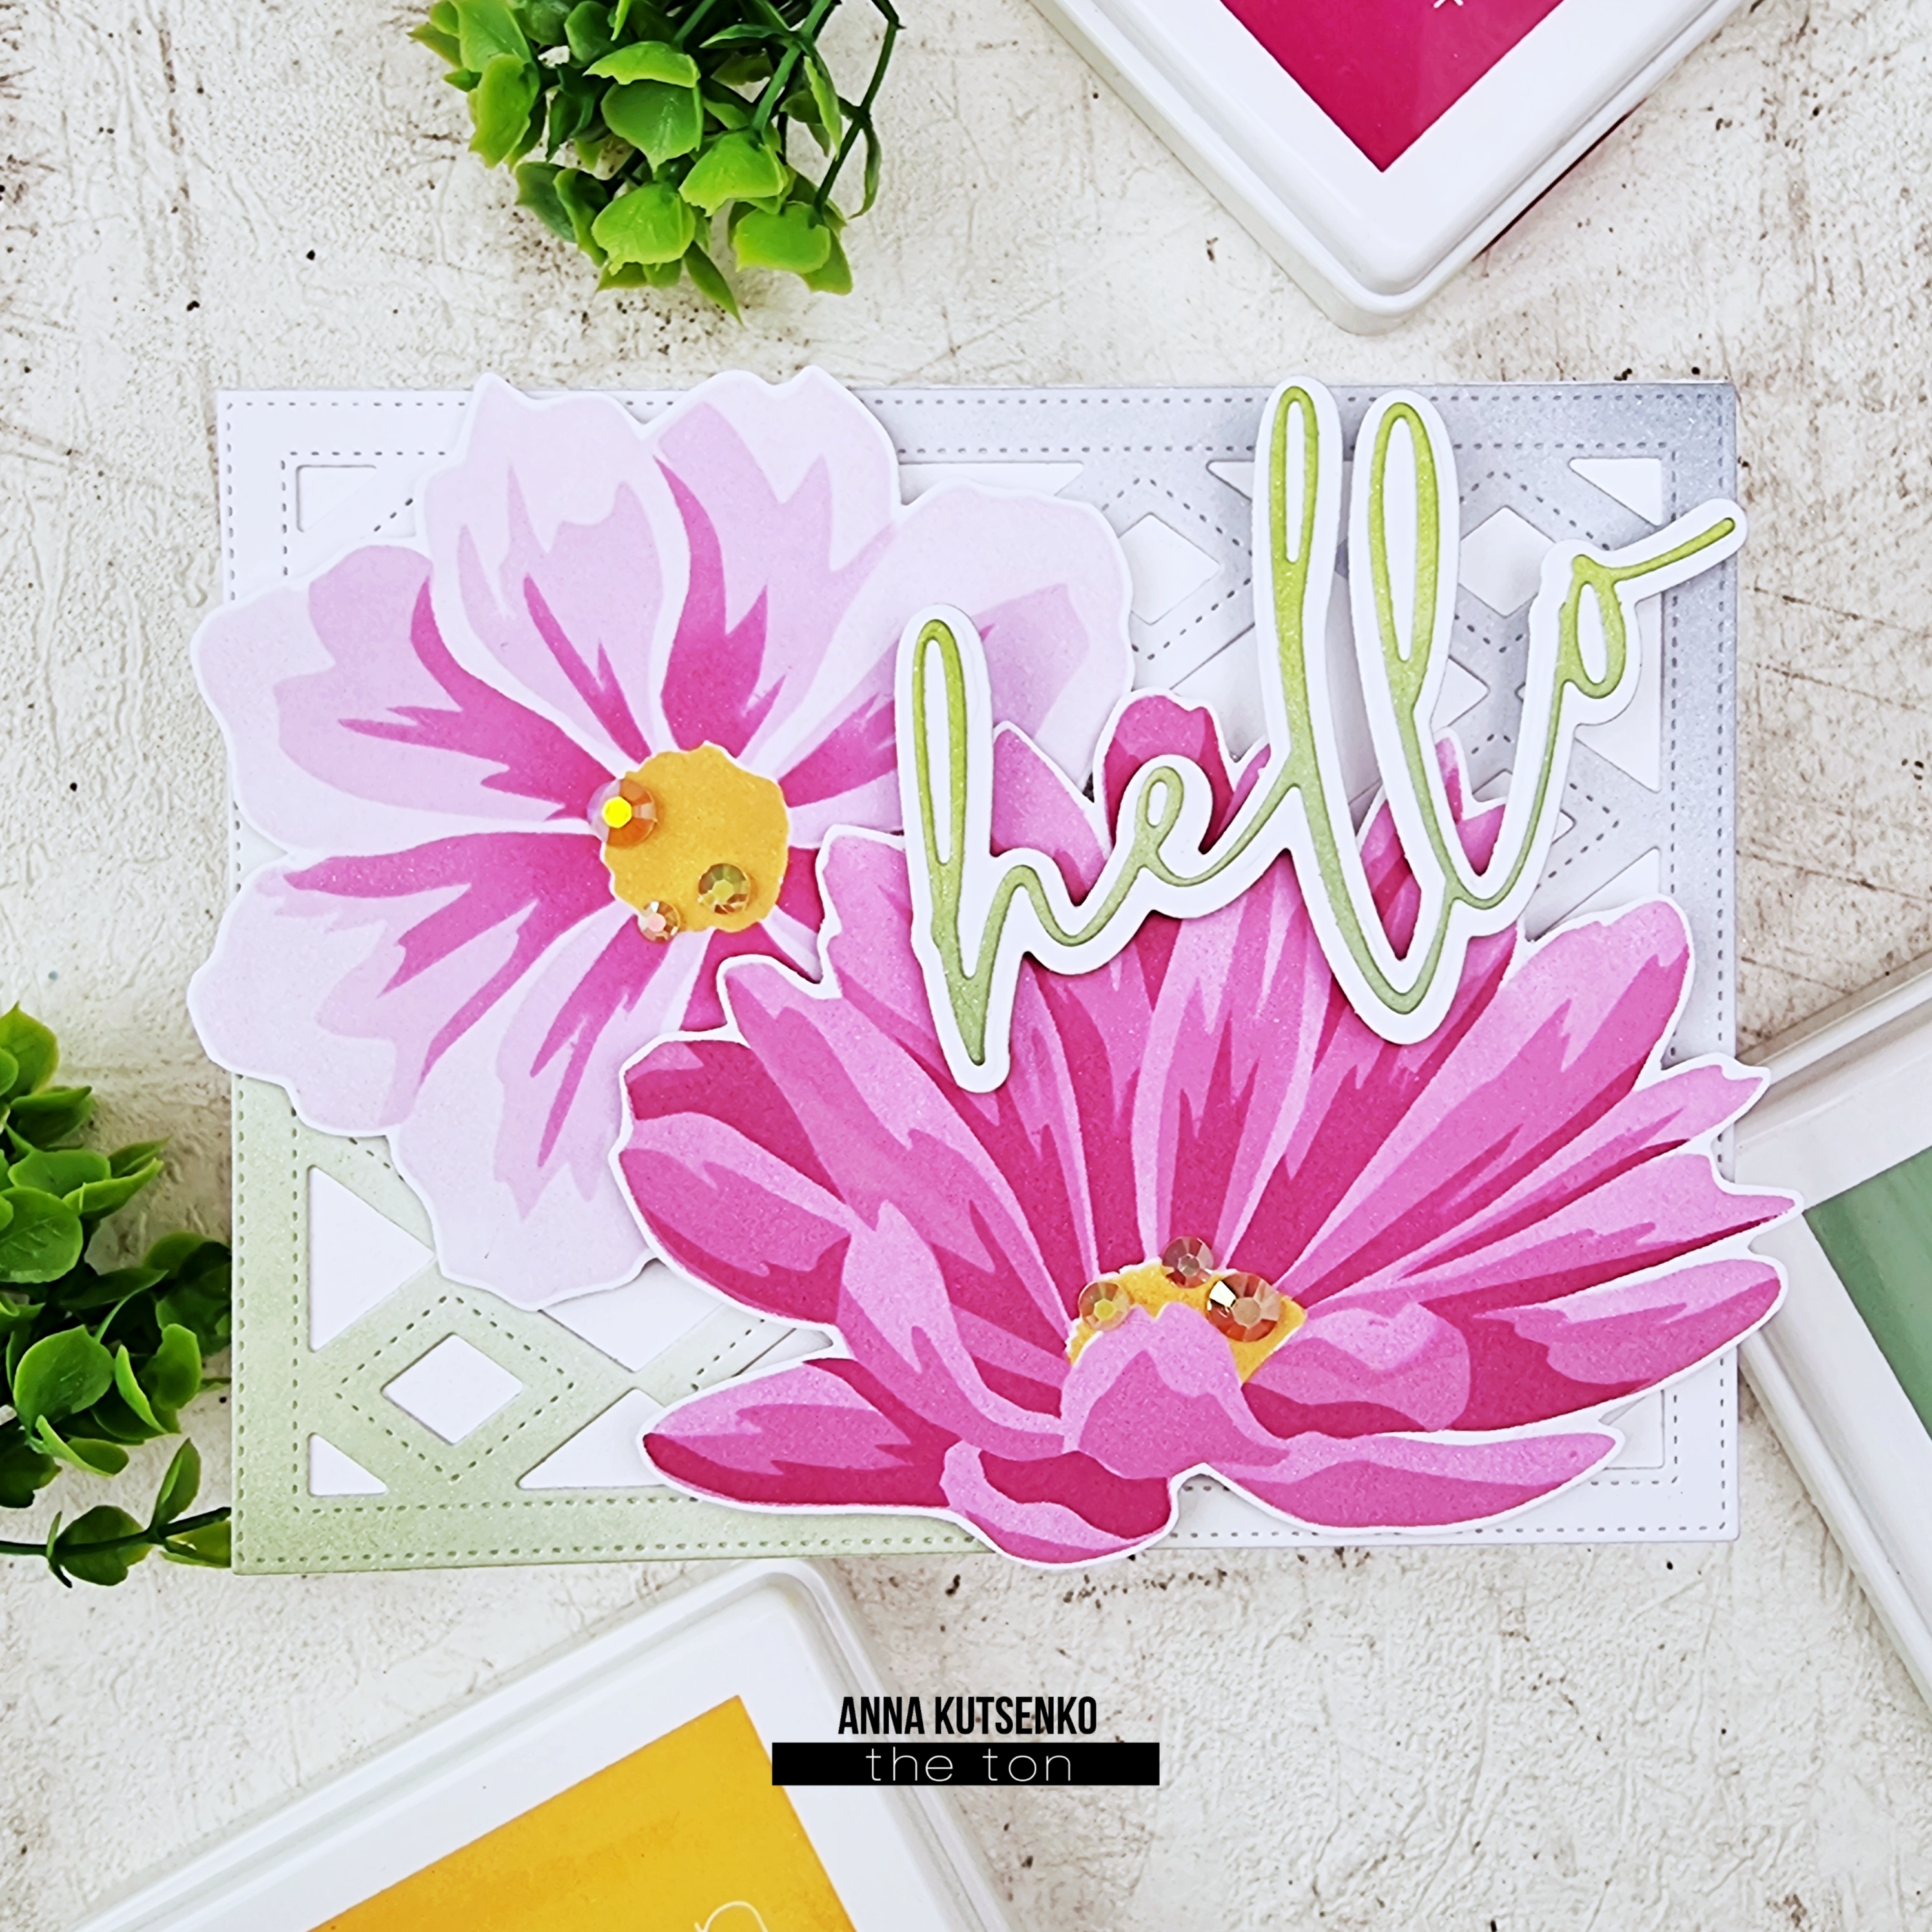
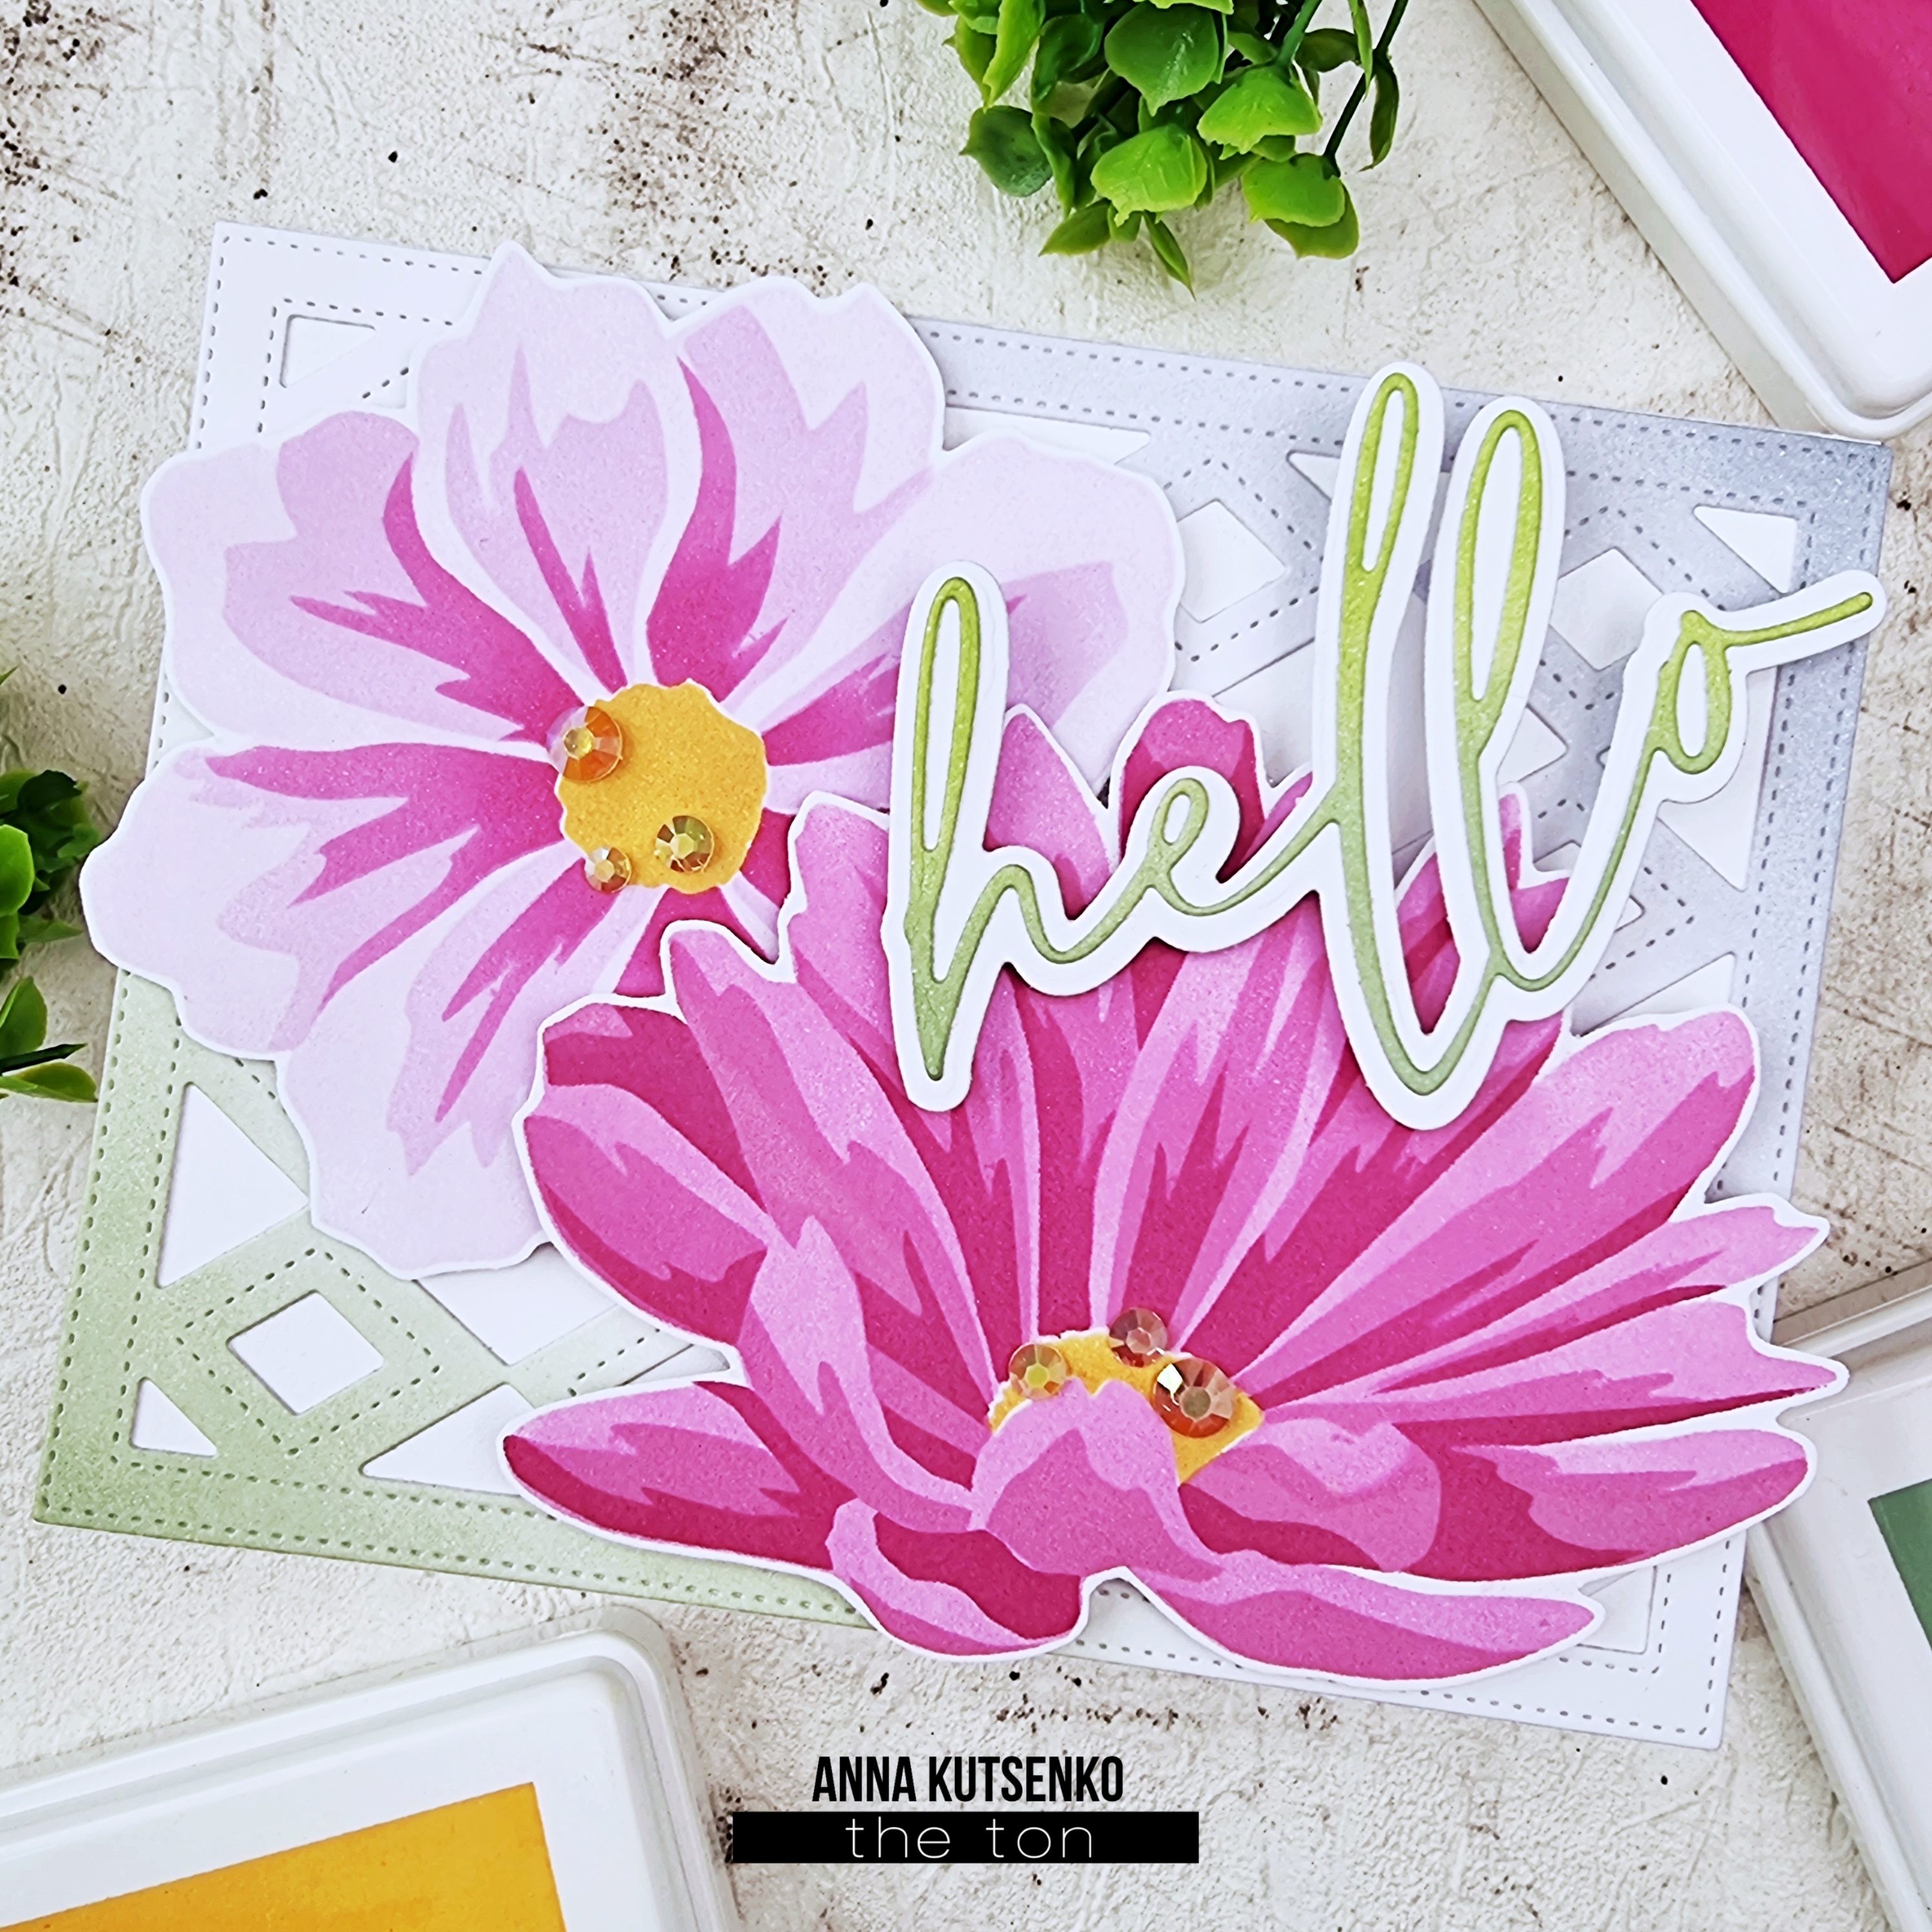
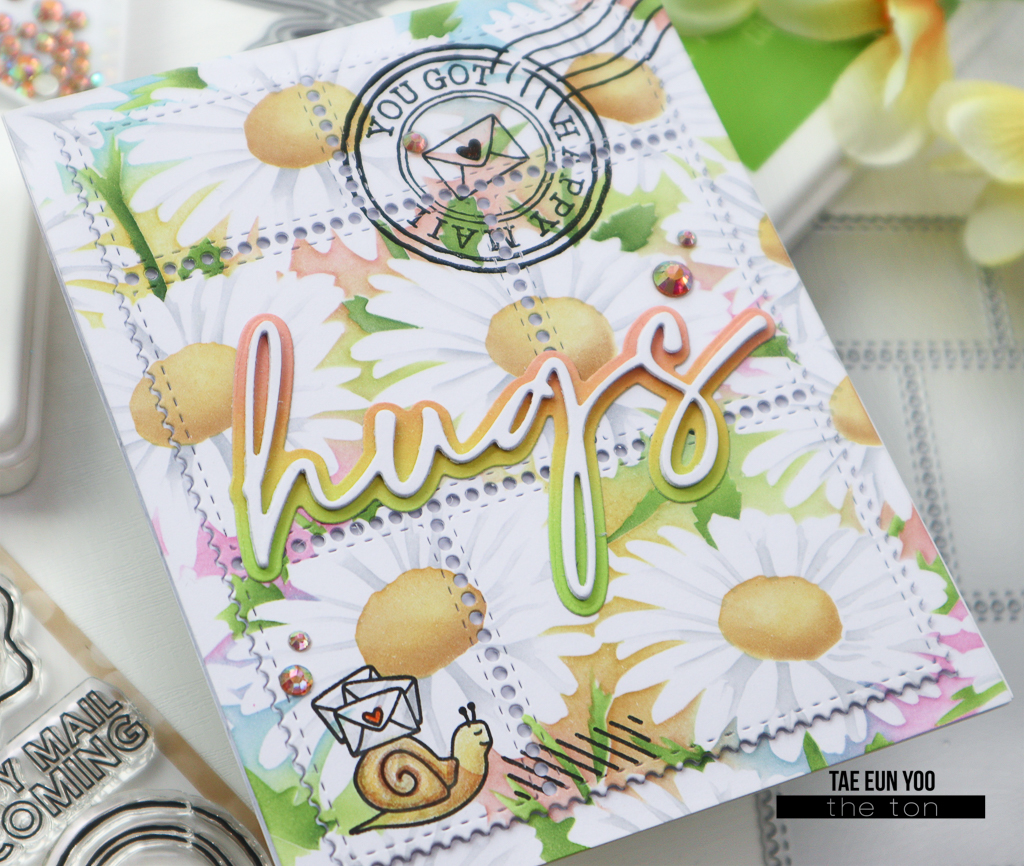
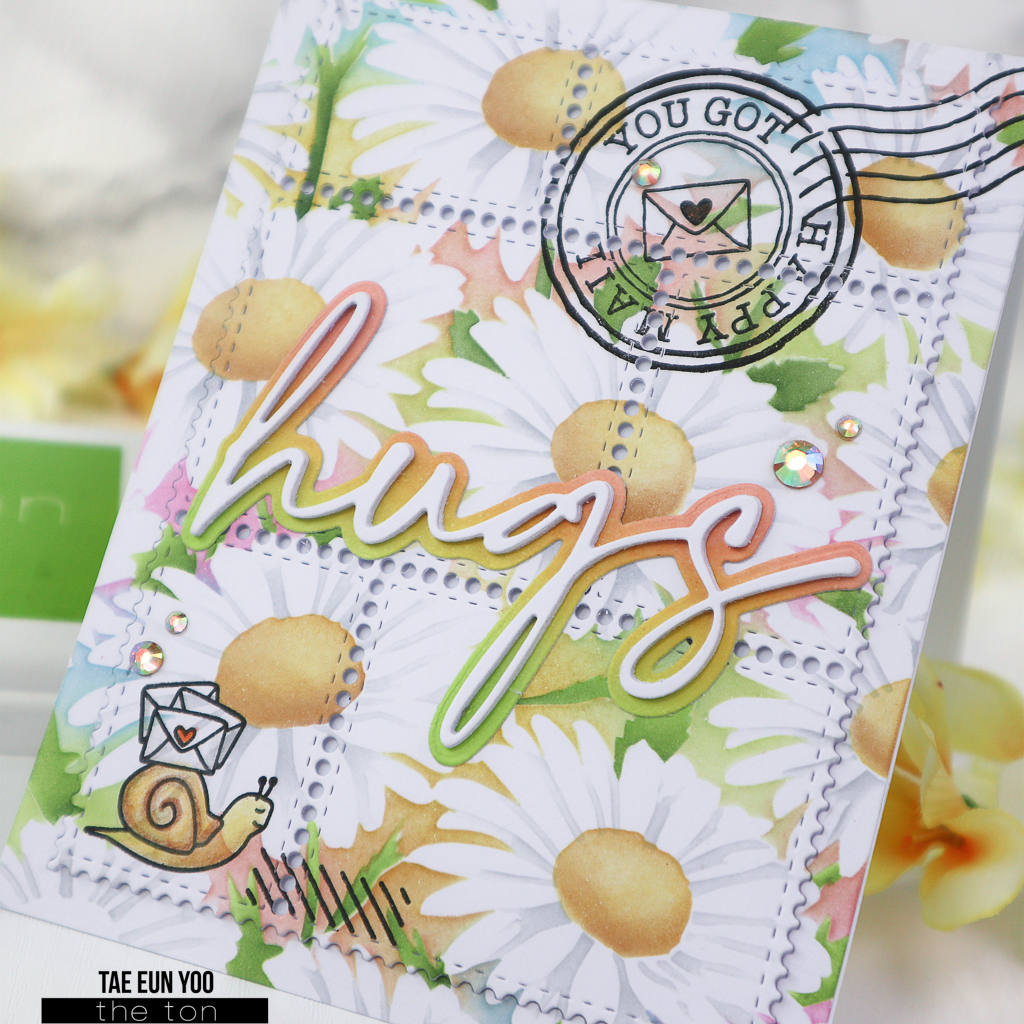
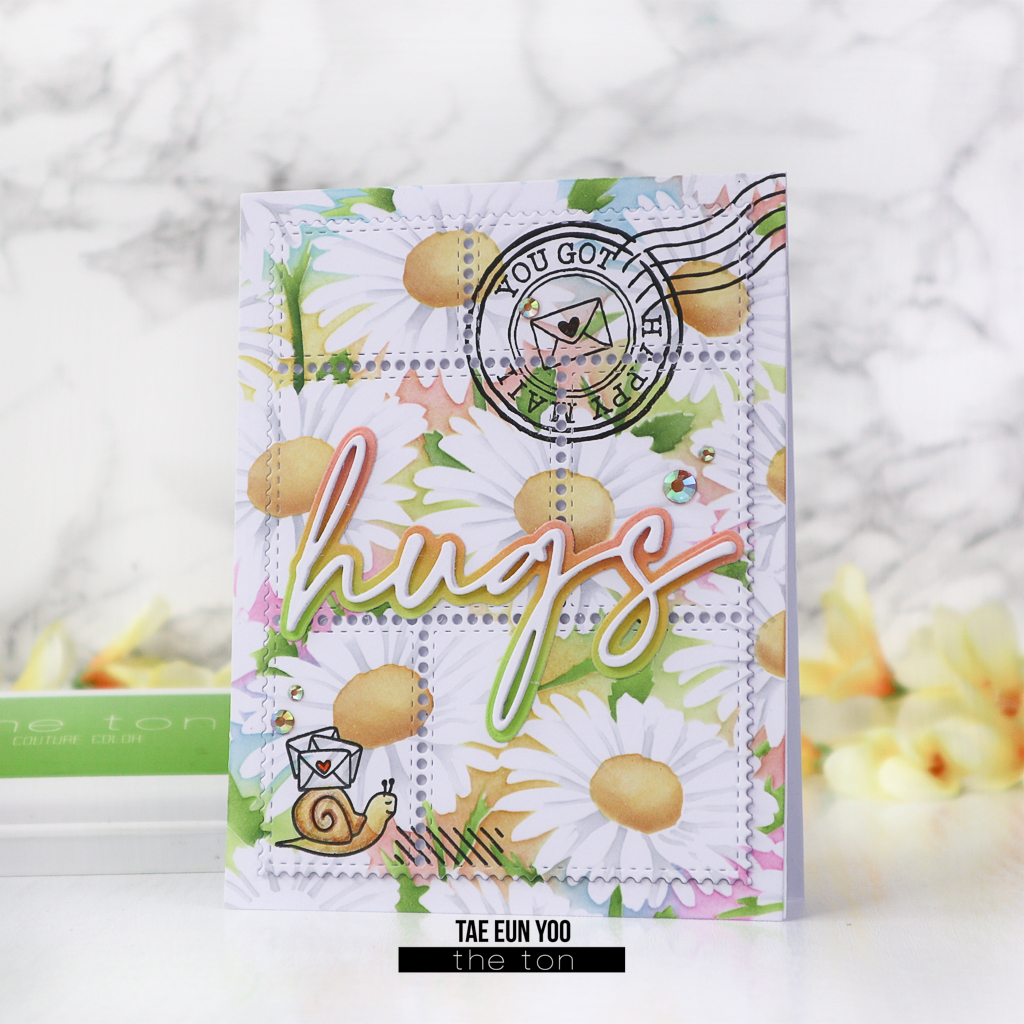
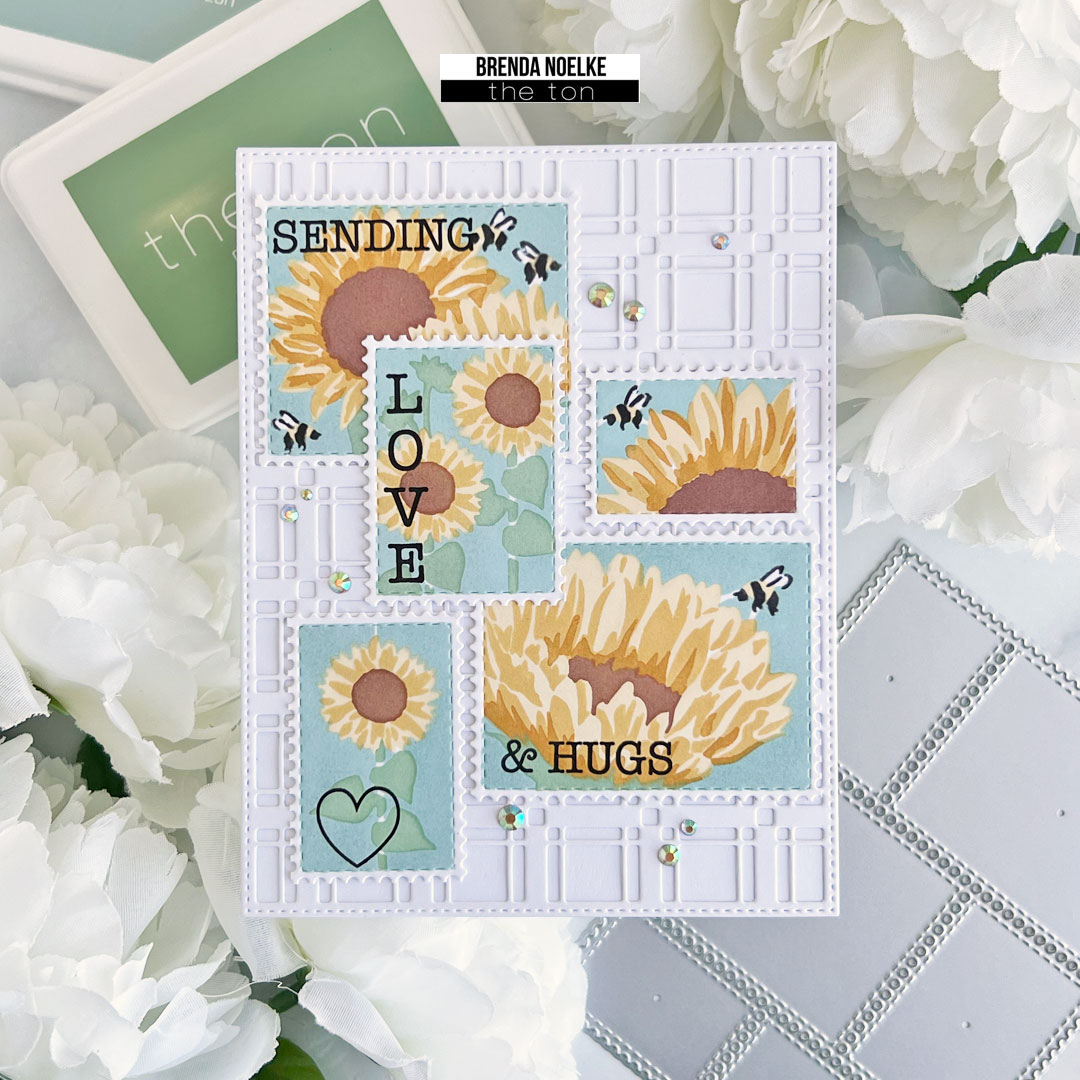
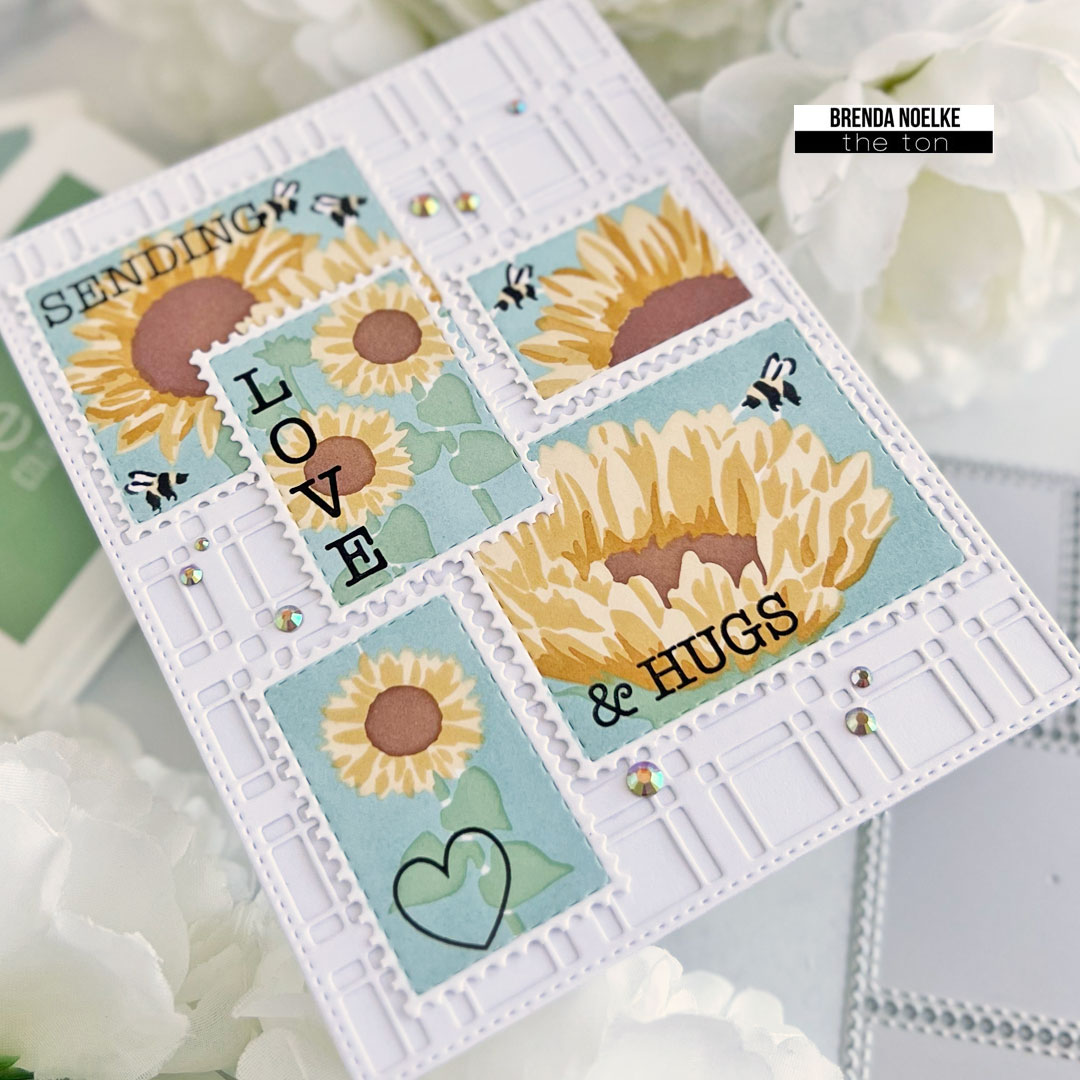
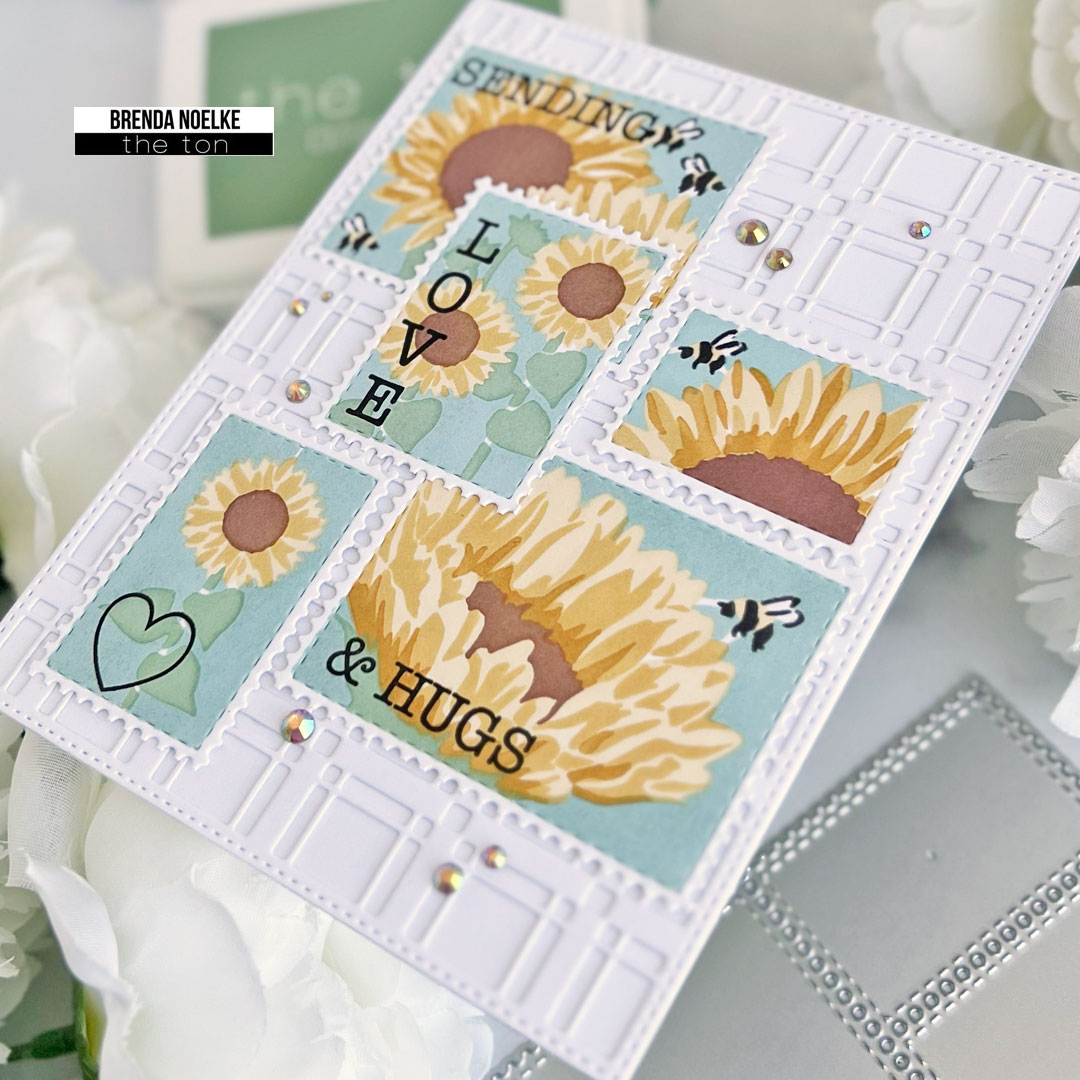
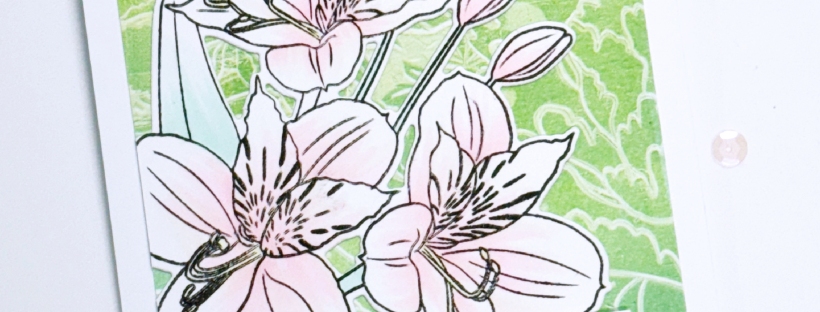
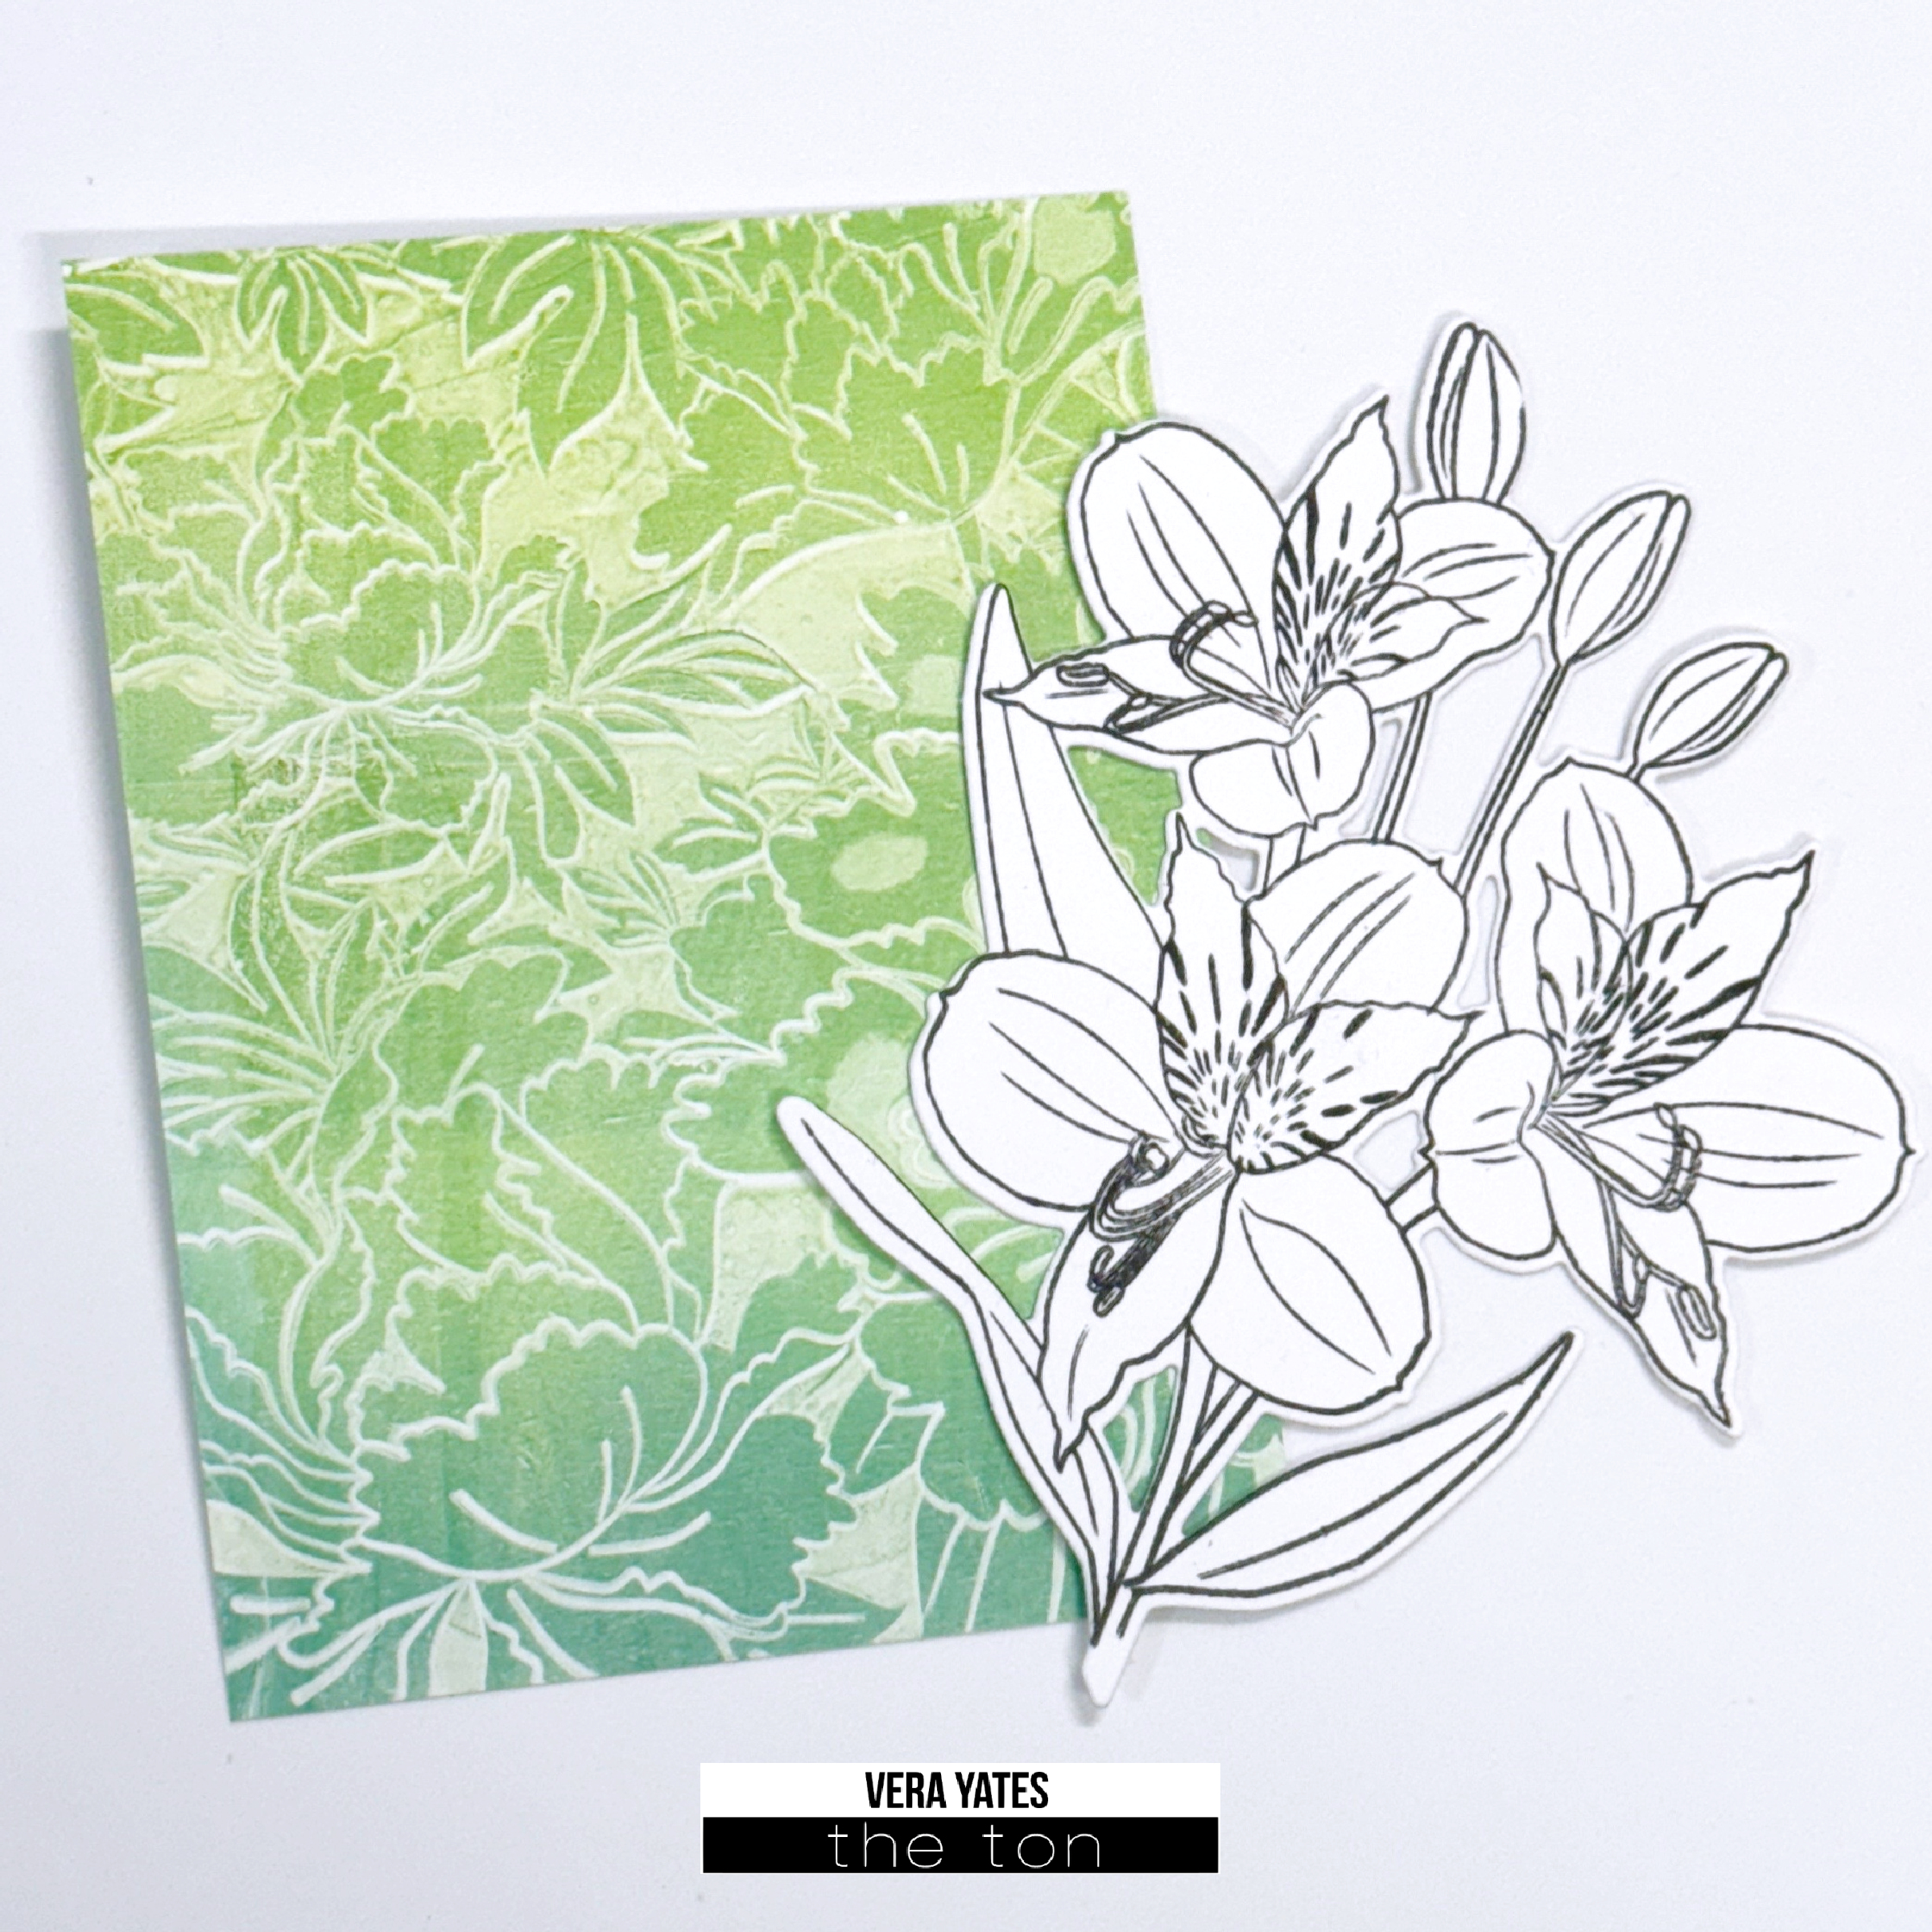
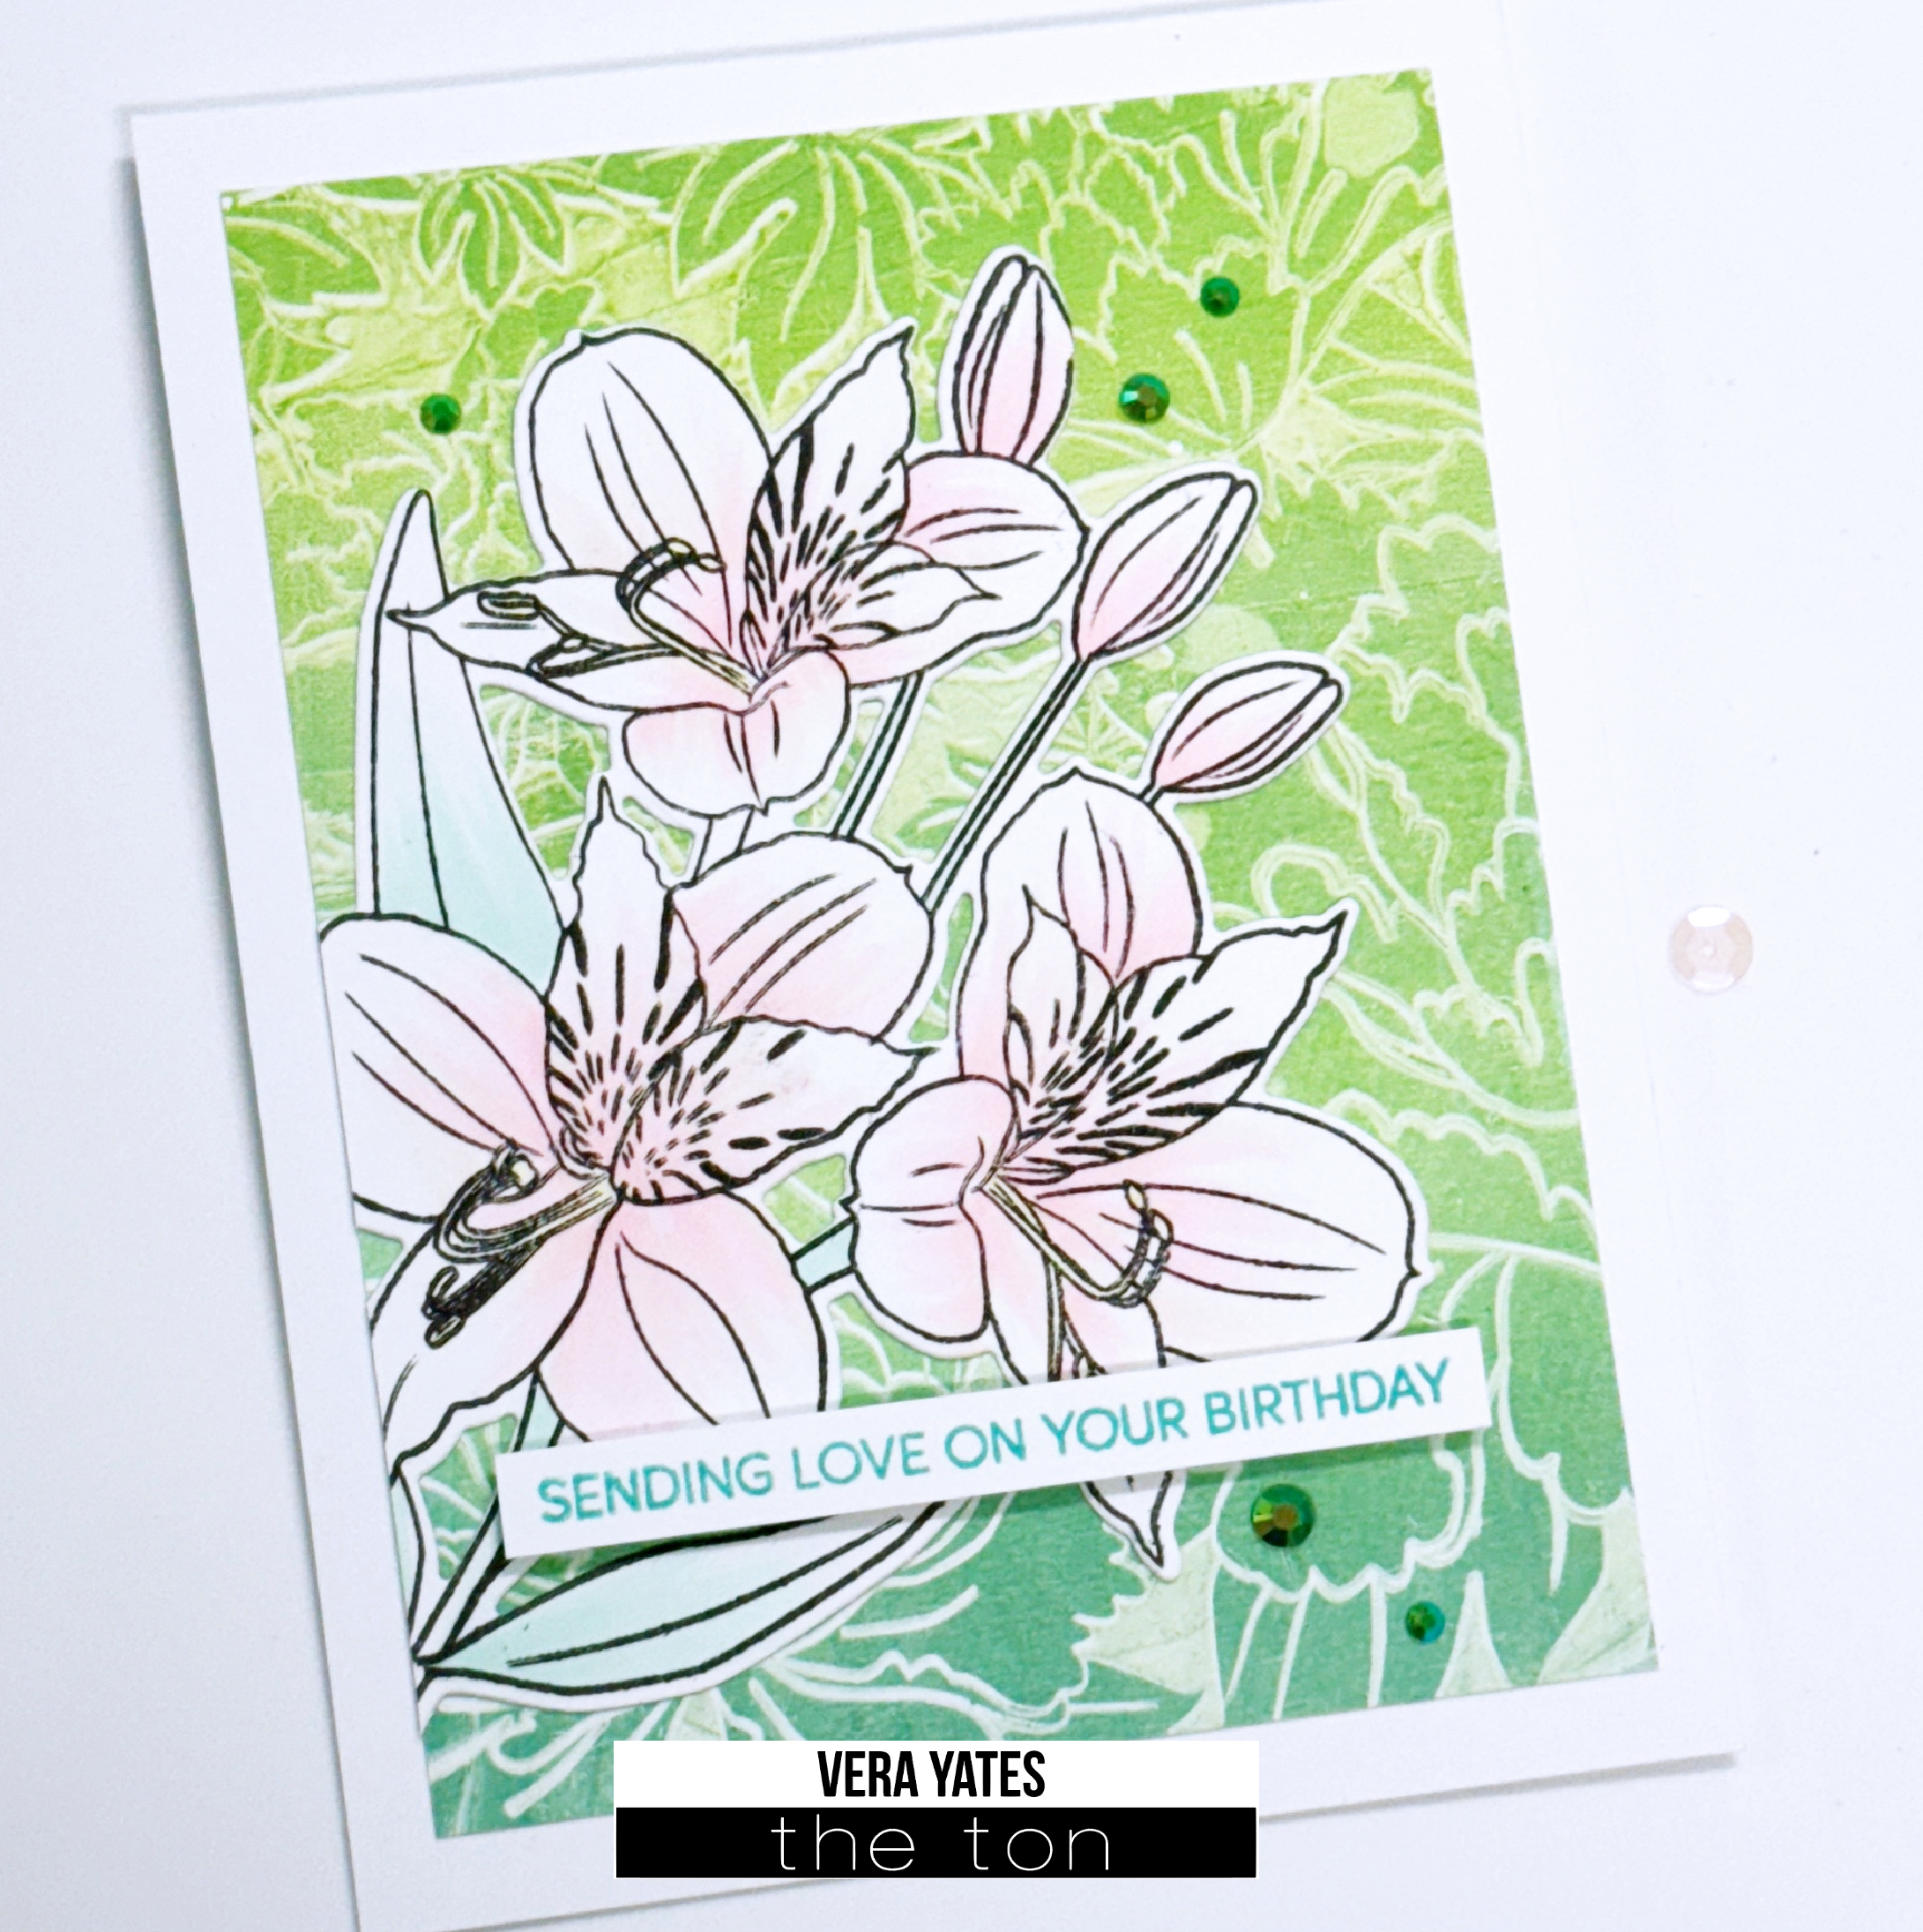
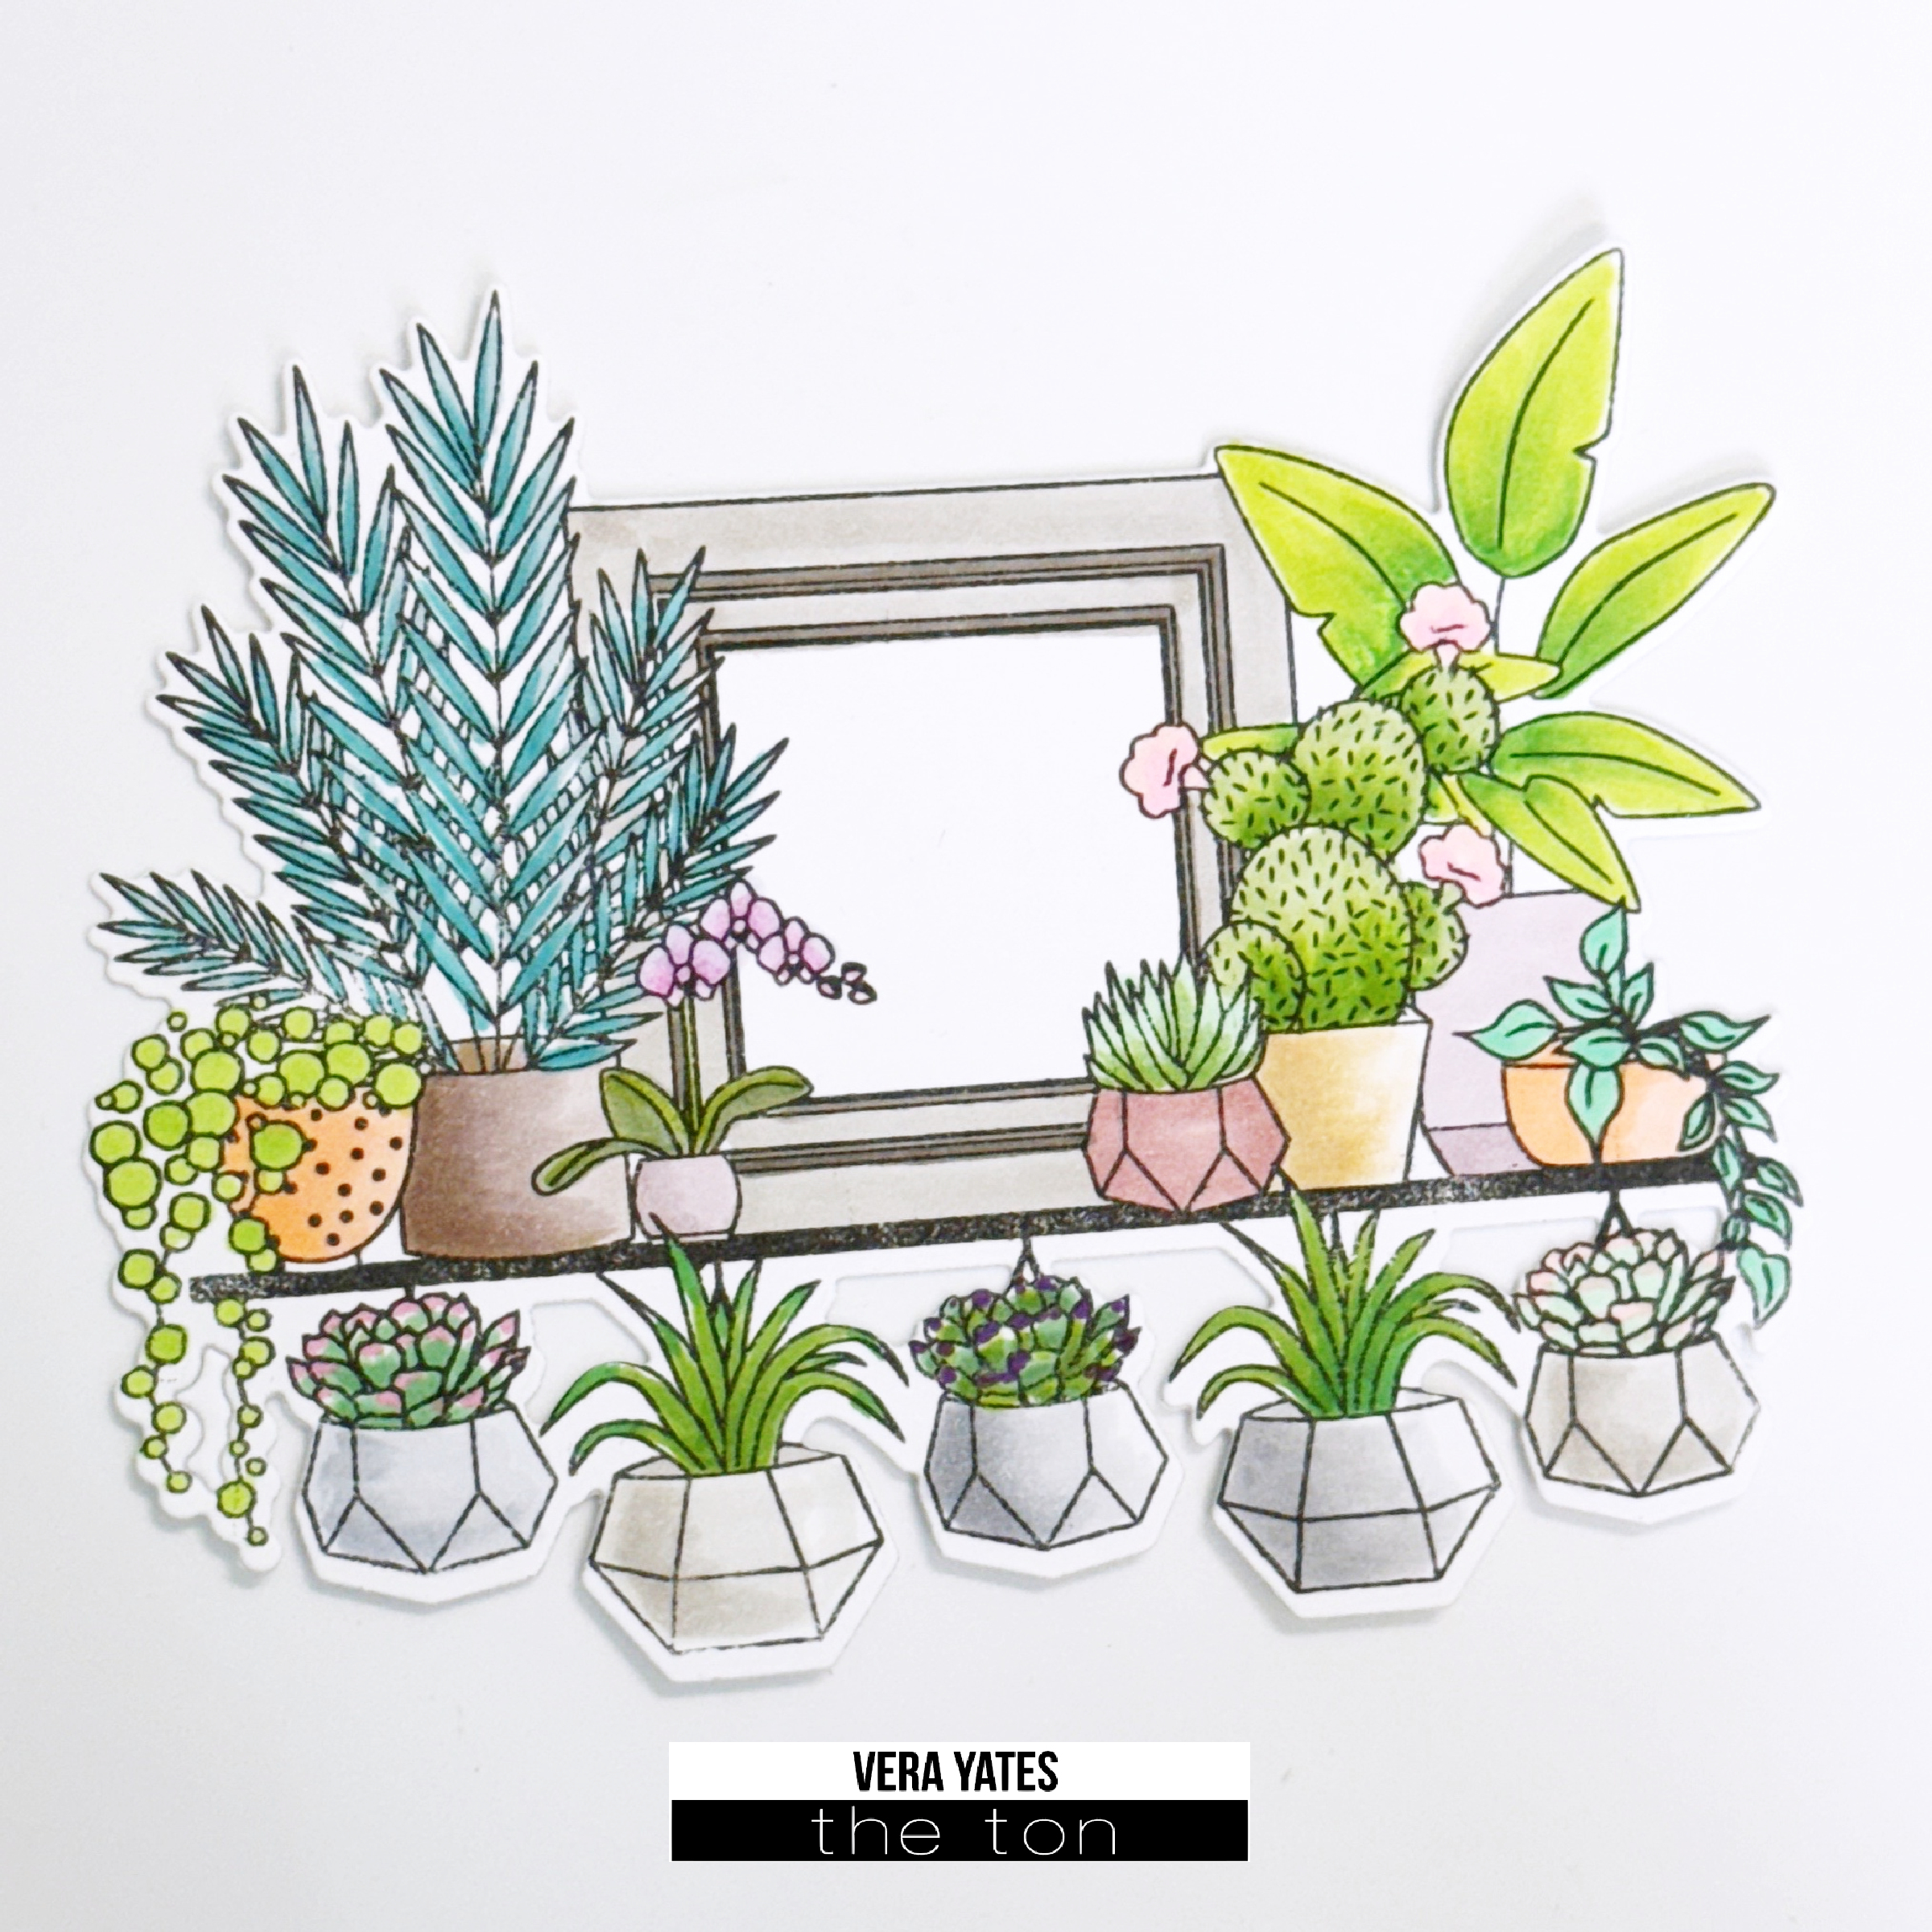
Hi friends. Vera here. I recently went through my stamp collection and upon seeing this Blooming Shelves set, I am reminded that I haven’t shown this beautiful set much love. So, to correct this, today I am showcasing this fun set and by using this set I am also reminded how I really haven’t used my Copic as much as I used to.

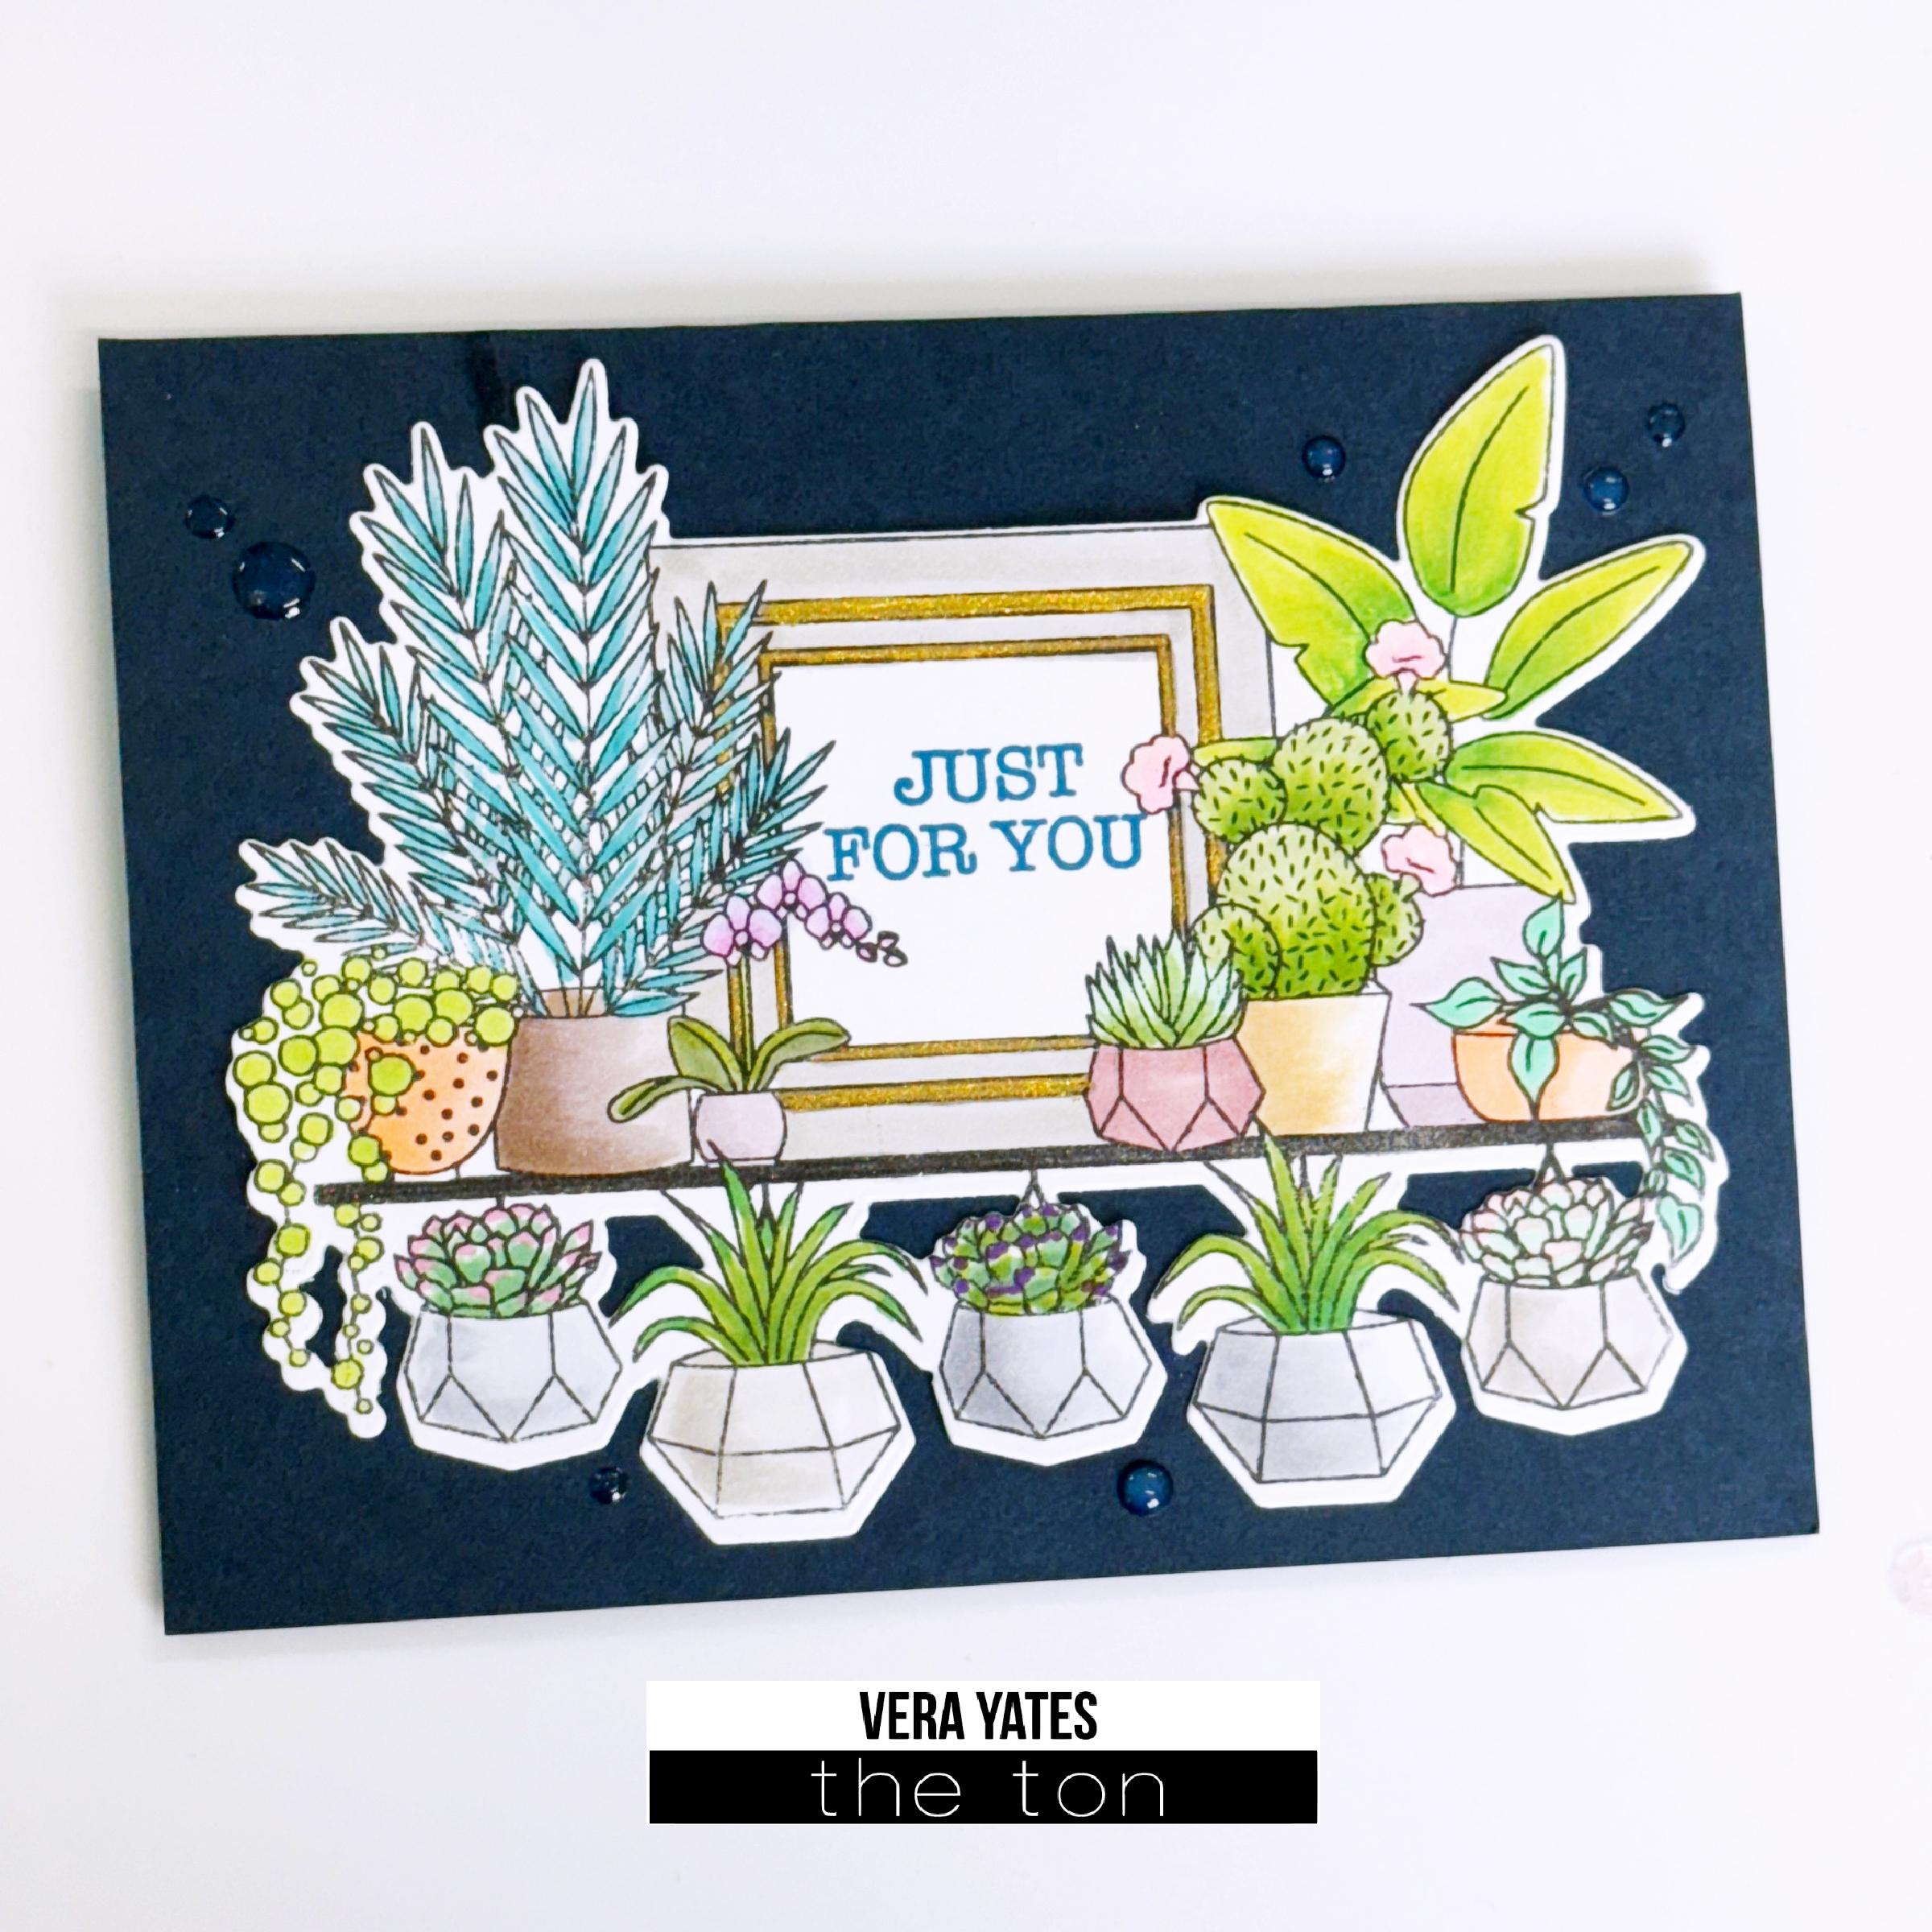
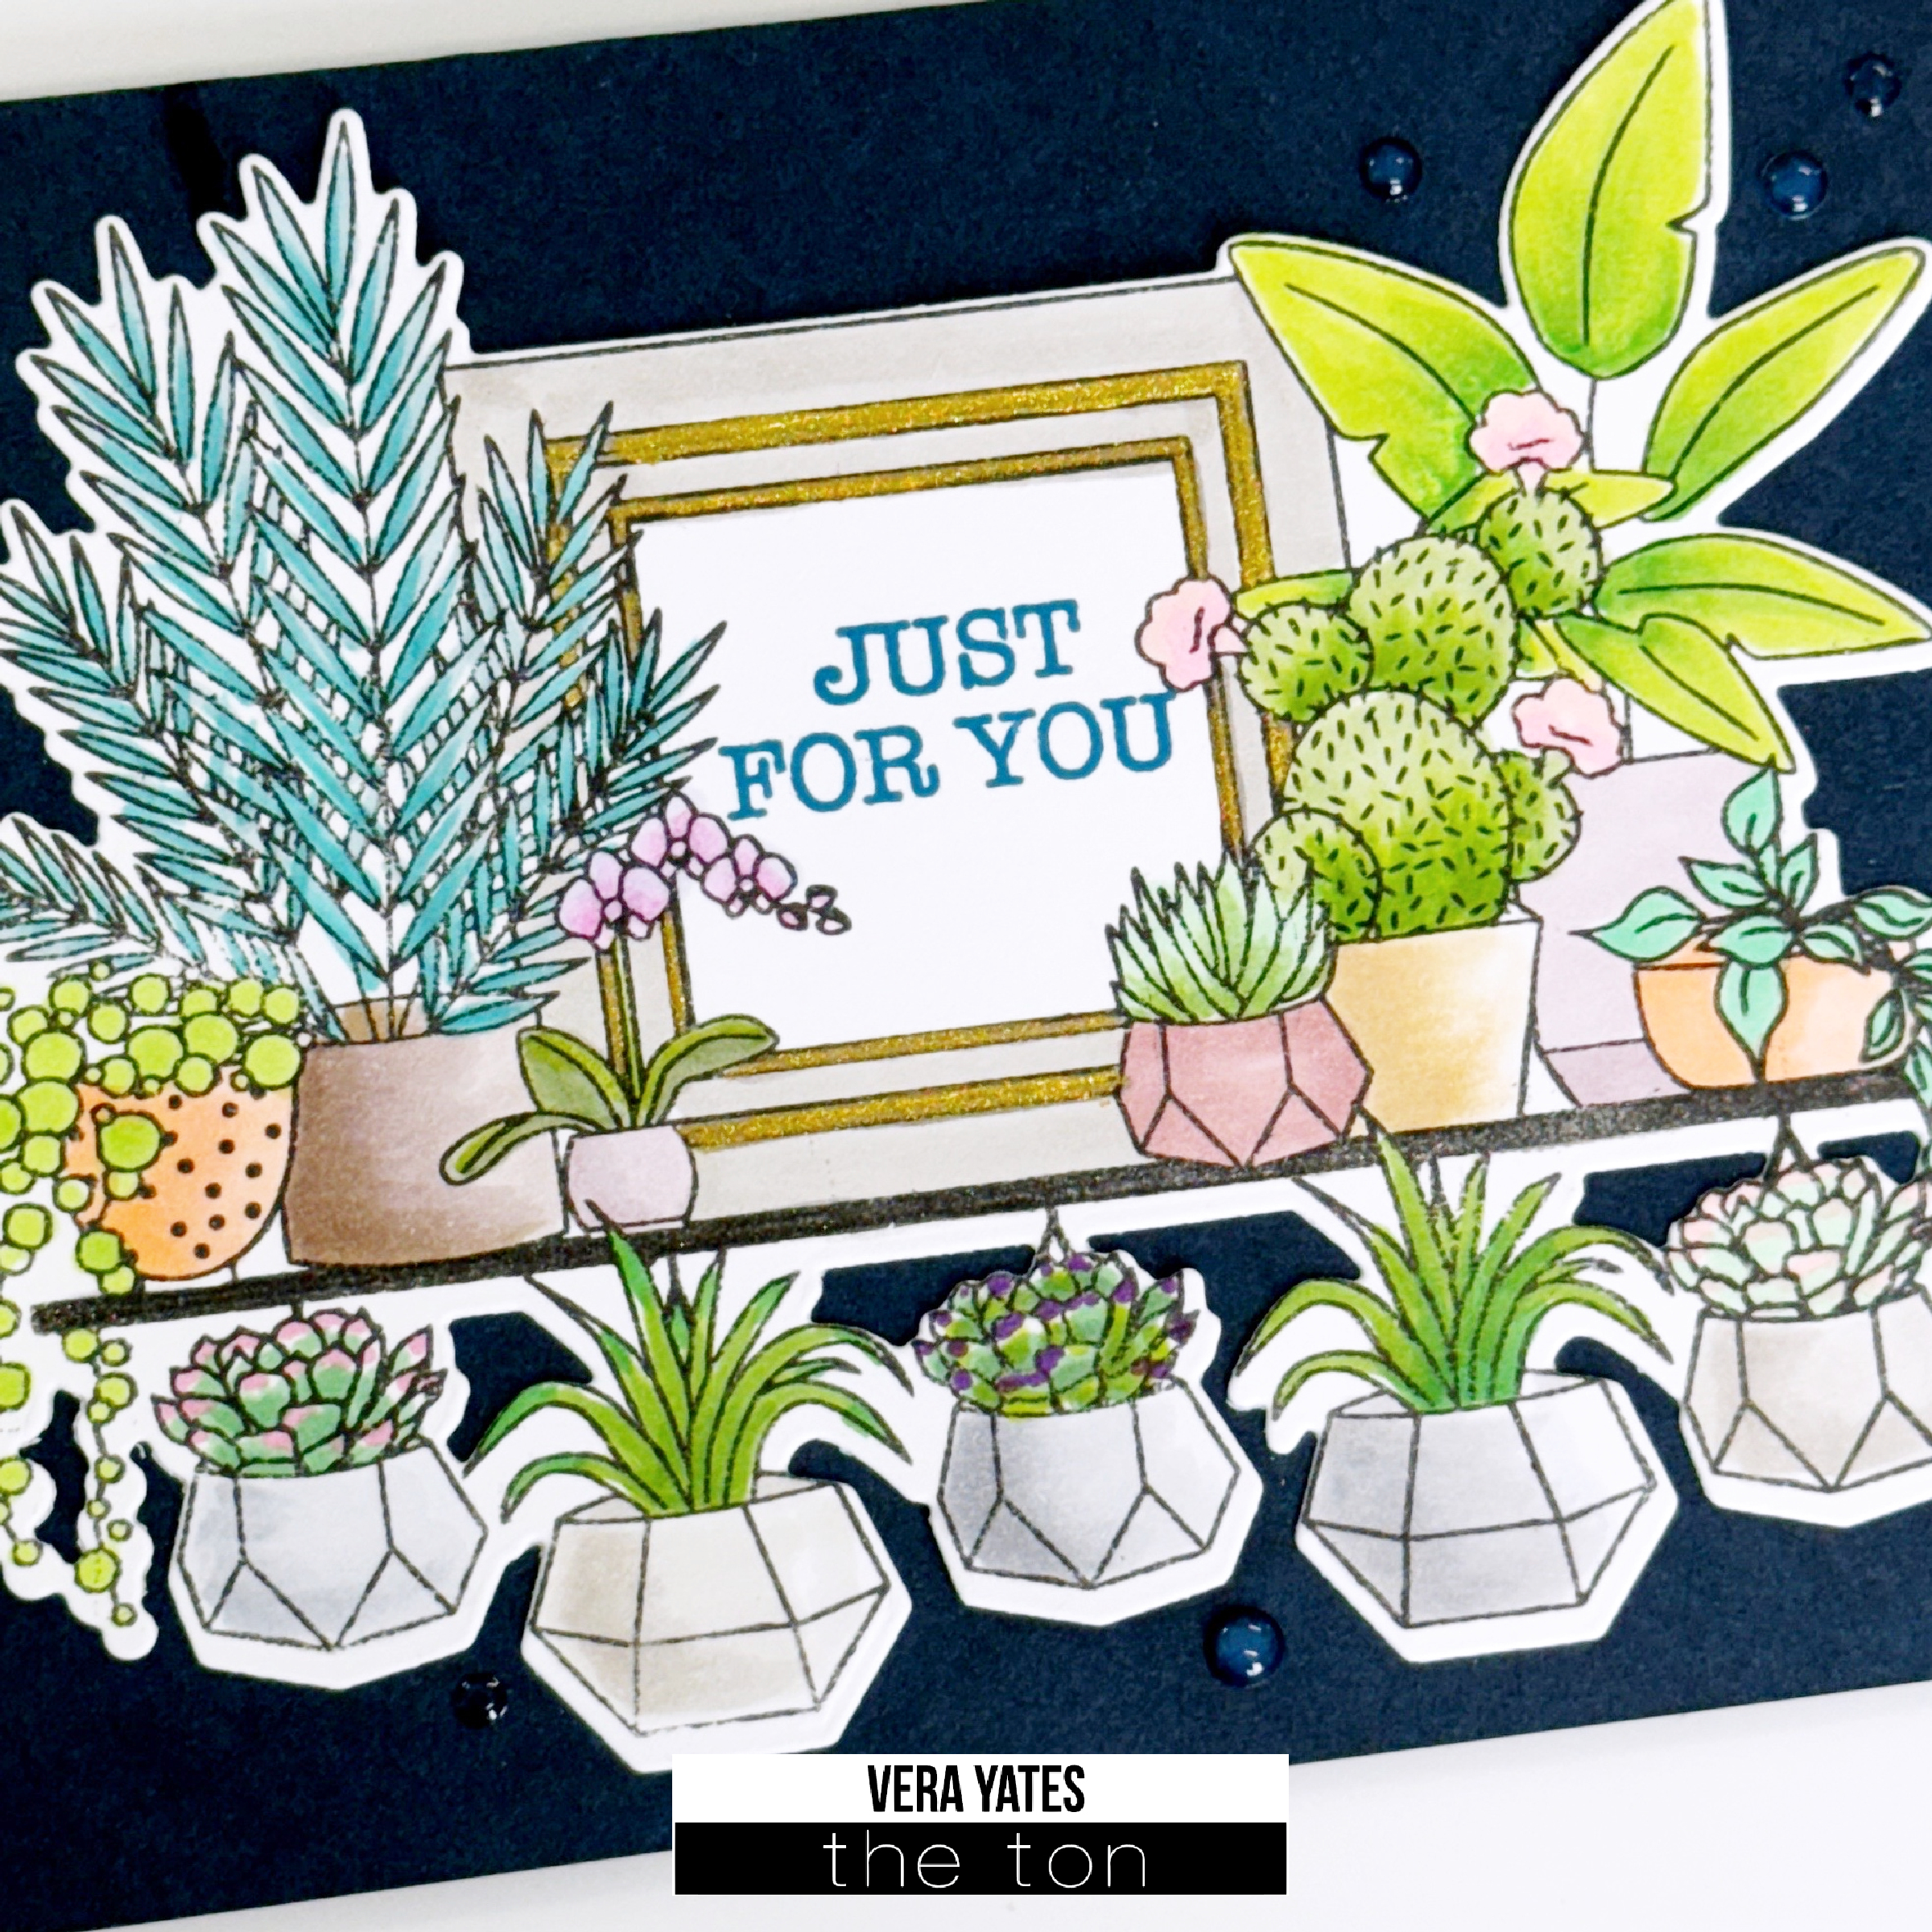
This image pretty much cover the whole front of the card. I simply stamped the image and then went t town coloring with with Copic markers. Once done, die cut the image with Blooming Shelves Coordinating dies.

Adhere to card base and stamp the sentiment. However, once I did this, I decided a little shimmer wouldn’t hurt, so I added some gold metallic watercolor to the mirror part of the image. Finish by adding some enamel drops.

I am happy that I get to use this set again. I feel as card maker we tend to collect stamp sets, yet we often focus only on new sets or only use the sets when we first got them. For a change let’s take a look back at all the sets that we have in our collection. If after all these years you still love them, then how about using the sets again? I feel this is pretty invigorating and I hope you feel the same. That’s all for now friends. May today something good happens to you. Big hugs!

Hello card with beautiful Cosmos flowers

Today Anna here with a Hello card showcasing Calming Cosmos 1+2 Layering Stencils.

I started by stenciling flowers with Soft Orchid, Orchid Crush and Dolled Up inks (Calming Cosmos 1), Dolled Up, Deep Peony and Pink Derby inks (Calming Cosmos 2). The centers of flowers were colored in Amber Citrine. I then fussy cut all flowers. To make the background, I ink blended Stormy Sea and Meadow on the piece of white cardstock and cut it out with Diamond Plaid Layering Coverplate Dies. Next, I adhered this panel on a white cardstock card base.

“Hello” was made with Script Word dies and Meadow ink. I added a few gems from Rhinestones Mixed – Pale Orange Opaque to finish it up.

Hope you have a great day!

Anna

Darling Daisies + Postage Party die

Hello everyone! Hope you’re having a great week so far! It’s TaeEun here today with fun floral background card featuring the Darling Daisies layering stencils, the Postage Party die and the Not a Bill stamp set. I used a Spring-y color palette to create the airy background and added a large die cut sentiment to the card. 

To start, I stenciled the Darling Daisies on a white panel. I placed the paper on the Grip mat and stenciled the image starting with the background. I used five pastel colors to color the background : Lemon Drop, Cali Blue, Peach Blossom, Bubblegum and Soft Garden. Next, I stenciled the leaves and stems in Soft Garden. I added a darker shade to them using Everglade Moss. The shadow between the petals was colored in Soft Ash. The center of the daisies was colored in Amber Citrine first and then in Warm Hazelnut for some dimension. 

I stamped the postage elements from the Not a Bill set in Noir on the stenciled panel , colored the snail using colored pencils, and cut the panel using the Postage Party die

I adhered the frame from the stenciled panel on a white cardbase and foam mounted the center part onto it. 

I ink blended a small white panel in Soft Garden, Lemon Drop and Peach Blossom and cut the shadow layer of the Script Word “hugs” from the panel. 

The word “hugs”was cut four times from white cardstock, layered together and added to the shadow layer. 

To finish off the card, I scattered some Gold Rainbow opaque rhinestones

That’s it from me for today!   I hope you enjoyed reading the making process!

Thank you so much!

TaeEun

Sending Love & Hugs – Postage Sunflowers

Happy Monday, crafty friends!! I hope you had a great weekend!! Brenda here with a card featuring the Postage: Sunflowers Layering Stencil Set and the Postage Party Die!! I previously used the products the way they were intended but I wanted to use them again in a different way!!

I began by die-cutting the Postage Party Die from white cardstock and stenciling it with the Postage: Sunflowers Layering Set. I used the following ink colors: Vanilla Frosted Cupcake, Beach Blondie, Amber Citrine and Aspen Cocoa on the sunflowers; Raw Sea Glass on the background; Vineyard on the leaves and stems; and Noir for the bees. I trimmed the individual stamps along the die-cut perforations.

For the background, I die-cut the Single Plaid Coverplate Die from white cardstock and adhered it to an A2 white card base. I figured out how I wanted the postage stamps laid out, then stamped the sentiments from the Postage: Sentiments Stamp Set with Noir ink. I needed to add some black to the lower left stamp, so I stamped the heart from the Not A Bill Stamp Set with Noir ink. The stamps were adhered to the background with liquid glue.

Gold Rainbow Opaque Rhinestones add a bit of sparkle to finish off the card.

That does it for me today!! Thanks for stopping by!! Have a great week!!

Brenda

Birthday Peruvian Lilies

Hi friends. Vera here. As this post goes up, cross fingers, I have arrived safely in Tokyo, Japan. Hubby & I been planning this trip for a while and we’re so looking forward to this. And, of course, being in Tokyo, I’ll be dragging hubby to the craft store than Japan is famous for. Anyway, I’ve prepared today’s card in advance.

For this post, I am showcasing Coming Up Peruvian Lilies set. To start, I created the background using gel press technique. I used Soft Garden, Spring Salad, & Caribbean Turquoise and with a brayer smooth the colors and then press Blooming Peony Garden Background stamp to the gel pad. Carefully lift up the stamp and press a cardstock panel to the gel pad to get the above background.

Next, stamped the Peruvian Lilies and colored with Copic markers. Die cut with Coming Up Peruvian Lilies Coordinating Die set. Adhere the flower at an angle to the green panel. Trim the excess part and then adhere the panel to the card base. Finish by adding sentiment from Layered Floral Alpha Stamps (by the way, if you need a sentiment set that covers a lot of occasions, this is a good set to have) and some mix size Emerald Green Opaque rhinestones.

That’s all I have for today. Hope you enjoy today’s inspiration and may today brings something that brighten your day.

Birthday card with the Jumbo Cosmos flower

Hello, everyone! Anna here today with a birthday card I made using beautiful Jumbo Cosmos layering Stencils.

I started by stenciling Cosmos flower image with Beach Blondie, Amber Citrine, Peach Blossom, Bubblegum, Cherry and Valentine Red inks. Next, I fussy cut the image. For the background, I ink blended Meadow on a white cardstock card base. I then cut out a white cardstock panel using Lone Dahlia Coverplate Die and adhered it on the card base.

I stamped the sentiment using Easy Expressions Birthday stamp set with Noir (but “Yay” was gold heat embossed) and cut out with Easy Expressions Birthday Coordinating Die. To embellish the card, I added a few rhinestones from Rhinestones Mixed – Pale Yellow Opaque and Rhinestones Mixed – Deep Pink Gem.

Thank you for stopping by today!

Anna

Cosmos Birthday Card

Happy Friday, fellow crafters!! I hope you’re all doing well and have some fun Easter plans this weekend!! Brenda here with a bright, colorful birthday card to share with you today!!

I started by stenciling the Calming Cosmos 1 Layering Stencil Set onto white cardstock using Dolled Up, Deep Peony, Grand Fuchsia, Lemon Drop and Found Topaz inks. The Coordinating Die was used to cut them out and I added dots to the centers with a yellow gel pen. Next, I stenciled the Dahlia Leaves Stencil onto white cardstock using Soft Garden and Bright Fern inks and used their Coordinating Die to cut them out.

For the background, I blended Dolled Up and Soft Garden inks onto a panel of white cardstock using the Postage: Stripes Stencils. I used the largest die in the Rectangle A2 Nested Die Set to cut it out. The flowers and leaves were arranged and adhered with liquid glue.

The sentiment, from the Easy Expressions: Just Because Stamp Set, was stamped onto white cardstock with Noir ink, cut out with the Coordinating Die and popped up with foam tape. Deep Pink Rhinestone Gems add a little bling and draw your attention to the sentiment.

That’ll do it for me today!! Have a wonderful weekend and a very Happy Easter!!

Brenda

Mid-Hibiscus Layering Stencils

Hello everyone! Hope you’re having a great week so far! It’s TaeEun here today with a stenciled hibiscus postcard! Like my last card I shared here on Saturday, I once again used layering stencils without the coordinating outline stamp. The Mid-Hibiscus layering stencils coordinate with the Blooming Hibiscus stamp set and the Mid-Hibiscus die

To begin, I cut white cardstock using the coordinating die and stenciled the Mid-Hibiscus onto it on the Grip Mat. I stenciled the first layer in Lemon Drop, the second layer in Amber Citrine and Peach Blossom, and the third layer in Coralline hybrid ink. The leaves were stenciled in Matcha and Everglade Moss

I then stenciled the orange and green stripes on the white cardbase in Coralline hybrid ink and Matcha using the Postage: Stripes stencils. I foam mounted the background panel, which I cut using the Postage Party die, to the cardbase. The postage stamp image from the Not a Bill set was stamped in Noir, and the Sentiment from the Postage: Sentiments set was stamped in the same colors as the stripes. 

I added the flower and the leaves using foam tape to the card and scattered a few Bright Yellow opaque rhinestones to complete my card!

That’s it from me for today! I hope you like my card 🙂 !

Thank you so much for visiting!

TaeEun

Climbing Hibiscus Layering Stencils

Hello, everyone! Hope you’re having a lovely weekend! It’s TaeEun here today with a stenciled hibiscus card. I used the Climbing Hibiscus layering stencils to create my card. There is a coordinating outline stamp called Coming Up Hibiscus. However, I didn’t use it to give my card a no-line coloring look. You can achieve this easily using the layering stencils !

To start, I first cut white cardstock using the Climbing Hibiscus coordinating die. I placed it on the Grip Mat and began stenciling. It’s much easier to align the stencils, if you have the shape already cut. I stenciled the center of the flowers in pink and the tips of the petals in coral-orange. For the first layer I used Bubblegum and Peach Blossom, and for the second layer, Deep Peony and Coralline hybrid ink. The third layer was stenciled in Pink Derby. I stenciled the stamen in orange, and the leaves were colored in Matcha. I added a bit of Everglade Moss to the leaves for some depth. I also shaded the darkest part of the flowers using a dark pink colored pencil. 

To create the background, I first stenciled a white panel using the Abstract Clouds stencil in Soft Ash, Cali Blue and Soft Amethyst. After stenciling, I dry embossed the panel with the Geo Triangles coverplate die and glued it onto a white cardbase. 

The Climbing Hibiscus image was then foam mounted to the background. 

The sentiment is from the Coming Up Hibiscus stamp set. I stamped it in Noir and cut it using the coordinating die. I cut it once again from some purple cardstock and layered it under the sentiment die cut piece, slightly shifted. 

I finished off the card with a few Dark Purple Opaque rhinestones.

Thank you so much for stopping by! 

I hope I was able to inspire you with my card today!

TaeEun

Blue Cosmos

Hi friends. Happy Thursday. Vera here today. As many of you may know, I like featuring older sets especially from The Ton as I feel like we have so many beautiful sets that deserves lots of love instead of just being used when they’re newly released. For today, am highlighting Lively Cosmos Layering Stencil set. To me, this is what I consider as timeless set.

To start, I did the background using another all time favorite Quilted A2 Coverplate Die. Inked up the edges lightly with Cobalt Breeze just to add a bit of shadow. Next, using Lively Cosmos Layering Stencil I inked up the main image using Periwinkle, Stormy Sea, and Bright Emerald. Die cut using Lively Cosmos Coordinating Die. For the center of the flower I used Copic marker to add some dots.

Adhere the quilted heart background directly to card base. Then adhere the flower. Finish by adding the sentiment and some mix size Sky Blue Opaque Rhinestones.

I often find blue tones card as calming and am pretty happy with the way this card turned out. I hope you enjoy today’s card as much as I enjoy making it. Hope your week been a good one and this coming weekend be filed with some crafty times. Cheers.