Hello everyone! It’s Jenny here and I’m back with 4 cards I created using couple of our floral border cling stamps. I absolutely love how our border cling stamps are designed. They are border images built with clusters of beautiful florals images, and they have a hollow space (Can’t quite think of a right term. Ha!) in the middle, perfect to stamp the sentiments or to create shaker cards using the coordinating dies. For today’s projects, I created a set of fun shaker cards, and another set of quick cards with more loose and artistic look. They look very different, but both were so fun to create! I can’t decide which set I like better!
Quick & artistic look
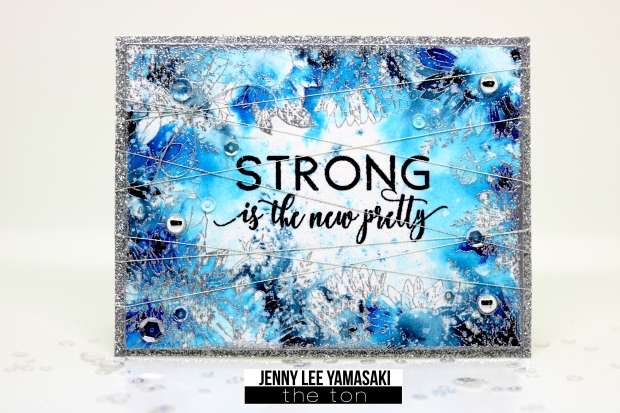
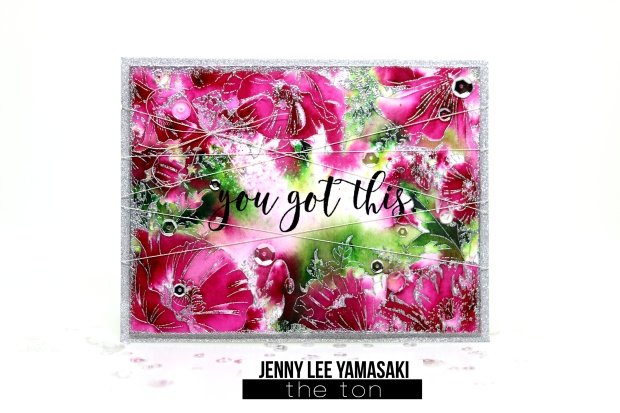
Products used: Sunflower Border Cling stamp (blue card), Poppy Border Cling stamp (pink card), & The New Pretty stamp set (sentiments).
For these cards, I went with simple and quick but artistic look. I started the card by stamping the border stamps on watercolor cardstock in Versamark ink. Then I heat embossed the images with silver embossing powder and taped the edges down to a sturdy board to minimize warping. I sprayed clean clear water to the embossed cardstock and sprinkled Ken Oliver’s Color Burst Powders. If you don’t have the Color Burst Powders or other pigment powders, no worries, use your favorite watercolors. Pre-wetting the watercolor cardstock (wet-on-wet technique) will give you a similar look. After watching the pigment bloom out few more seconds, I sprinkled on more powder and sprayed more water. You could repeat this process until you are happy with it. I was happy with the look, so I used the heat tool to dry the cardstock. The Color Burst powders I used are Peony & Sap Green for the Poppy Border card, and Ultramarine Blue & Prussian Blue for the Sunflower Border card.

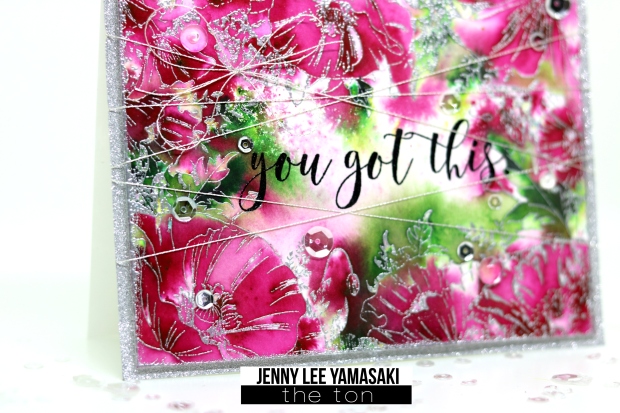
I trimmed the cardstocks down slightly smaller than the A2 size, heat embossed the edges in silver, and stamped the sentiments in Noir Dye ink. I adhered the panels on A2 white card bases, edges dressed up with the Silver Glitter tape (Poppy Border card), and Glossy Fine Silver Adhesive paper (Sunflower Border card). I wrapped the card around with Silver Metallic thread for more dramatic look, and finished it with adding Mixed Clear Dew Drops, Silver Dew Drops, and Glass Slippers sequins.

Shaker cards


Products used: Poppy Border Cling Stamp (blue card), Poppy Border Coordinating Die, Sunflower Border Cling Stamp (pink card), Sunflower Border Coordinating Die, Basic Banner Stamp set, Basic Banner Coordinating Dies.
Our floral Border Cling stamps has a hollow space in the middle of the image, making it perfect to create fun shaker cards. You could cut it out with craft knife, but the coordinating die makes it so much easier!
I started the card by stamping the border cling stamps on watercolor cardstock in Versamark ink. I heat embossed the images in silver and colored them with Color Burst Powders. However, this time I spent time coloring each flowers and leaves, blending and building the colors with Water Brushes. The powder colors I used are: Peony, Ultra Marine Blue, Prussian Blue, Violet, Lemon Yellow, Marigold, Sap Green, and Lime Green.

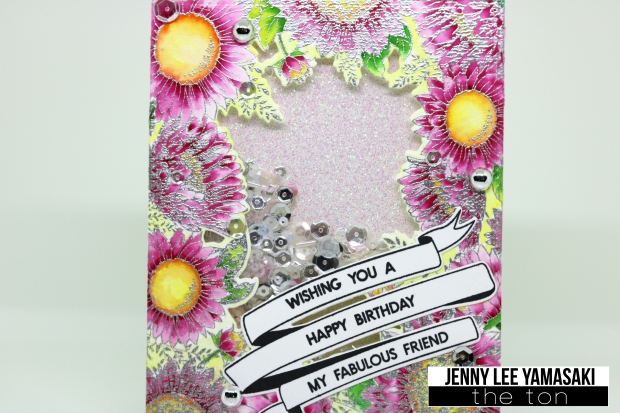
After the colored panels were good and dry, I die cut them using the largest die from our (Large)Double Stitched Rectangle Dies and also the middle of the panels using the coordinating dies (Poppy & Sunflower). I turned them into shaker frame (double layer of foam tape), filled the frames with shaker bits, closed it up with Glossy Fine Transparent Adhesive paper, and adhered them on A2 white card bases. I filled the Poppy Border shaker card with Blue Lagoon Couture Mix, Fresh Snow Couture Mix, Glass Slippers, and Silver Metallic Sequins. For the Sunflower Border, I filled the shaker up with Pink Diamond Couture Mix, Fresh Snow Couture Mix, Glass Slippers, and Silver Metallic Sequins. I stamped the banner and the sentiment from our Basic Banner stamps in Noir Dye ink, die cut the out with the Coordinating Dies, and adhered them on the card. I adhered some Silver Dew Drops, Glass Slippers, and Silver Metallic Sequins and the cards were complete!


Hope you enjoyed the cards! That’ all from me today!
Also…
Please join us for this month’s The Ton’s Challenge “Summer” for a chance to win a $50 spree to The Ton’s shop!
*Gift certificates only apply to The Ton Stamps, Dies, Ink, Gilding, and Embossing Powder.
![]()
Here is how to play:
To participate in our challenge, create a paper crafting project based on the monthly theme.
- You must use a Ton product as the main focal point of your card or tag.
- Display the cue word/inspiration photo on your blog post and include a link to this challenge in the body of your post.
- There is no limit to the number of projects you wish to enter into the challenge.
- The winning project will be chosen based upon detail, composition and aesthetics.
- Enter your card by August 31, 2017 by 12:55pm EST.
- There is a $50 Gift card that will go to the winning entry!
Thank you for stopping by and hope you have a fabulous day! Happy Crafting!
hugs,


WOW! Amazing cards!!
LikeLiked by 1 person
The first two could easily be Christmas cards! Beautiful
LikeLiked by 1 person
Gorgeous cards! I love the sentiments too!
LikeLiked by 1 person
So many different cards with only 2 stamps. They are wonderful.
LikeLiked by 1 person
really like the somewhat abstract cards! they really hit you! very striking in the colors
and w the thread to add extra texture… great!
LikeLiked by 1 person
Wow Jenny! These are all so awesome! I love the vibrant colors! Just amazing my friend!
LikeLiked by 1 person
Beautiful cards Jenny! The first two are my favorite:) What a great way to make an artsy card set quickly!
LikeLiked by 1 person
Gorgeous cards! Love the sentiments and beautiful color!
LikeLiked by 1 person
magical
LikeLiked by 1 person